¶ What is the data import wizard?
The Data Import Wizard is a custom DHIS2 application that helps you to; as the name suggests, import data into your DHIS 2 instance, from various sources. The sources you can import data from include:
- Excel Spreadsheets
- CSV files
- JSON files
- API Endpoints (Other systems or DHIS2 instances)
- Go.Data
The most recent version of the data import wizard (v2) has been improved to support the integration of DHIS2 with Go.Data, but with bi-directional data import capabilities.
¶ How the Data Import Wizard works.
At the moment, we can import event data, aggregate data and organisation units. There are options within the application that correspond to the kind of data you want to import, that is; Individual Data, Aggregate Data, Organisation Units, and Scheduling imports. Also, coming soon are the User Import and Metadata Import options.
 Individual Dtaa Import data into tracker or event program.
 Aggregate Data Import aggregate data.
 Organisation Units Import organisation units.
 Schedule Imports Schedule data import using saved mapping.
¶ Components
The data import wizard is comprised of the following tools and components.
| Tool/Component | Description | Repository |
|---|---|---|
| Data Import Wizard Core | The core Data Import Wizard custom DHIS2 application | data-import-wizard-utils |
| Data Import Wizard Utils | Reusable utilities for both the core and scheduler for the Data Import Wizard | data-import-wizard-v2 |
| Scheduler | The scheduler for importing data using mappings generated by the Data Import Wizard custom application | data-import-wizard-scheduler |
¶ Data import steps
For each type of import, you go through the following steps to accomplish the import process.
- Add source system configuration
- Define your destination (could be DHIS 2 or other system)
- Define a mapping for your metadata. What objects need to be mapped in both systems
- Utilize generated mapping to import the data.
¶ Installation
At the moment, the data import wizard can be built from two repositories (core and utils). It also works along side a scheduler that processes data to import based on generated mappings.
-
data-import-wizard-utils - the utilities library that is also used by the data import wizard scheduler
-
data-import-wizard-v2 - the core application
-
data-import-wizard-scheduler - the scheduler application.
¶ Recommended prerequisites.
- Nodejs v18.16.0
- Yarn
¶ Clone and build the utils repository
git clone https://github.com/HISP-Uganda/data-import-wizard-utils.git

cd data-import-wizard-utils

yarn install

yarn build

yarn link

# move 1 step out of the current directory
cd ..
¶ Clone and build the core repository
git clone https://github.com/HISP-Uganda/data-import-wizard-v2.git

cd data-import-wizard-v2

yarn install

yarn link "diw-utils"

yarn build
Builds the app for production to the buildfolder.
It correctly bundles React in production mode and optimizes the build for the best performance.
The build is minified and the filenames include the hashes.
A deployable .zip file can be found in build/bundle!
¶ Installing the wizard in a DHIS2 instance
Navigate to the App Management core application in your DHIS 2 instance. Since the latest build of the application is not yet on the DHIS2 App Hub, you will have to manually install the application by hitting the Upload icon on the Standard Apps page.
Uploading the previously build app will install it on your DHIS2 instance and make it available under the apps you can choose from.
¶ Building and runing the scheduler
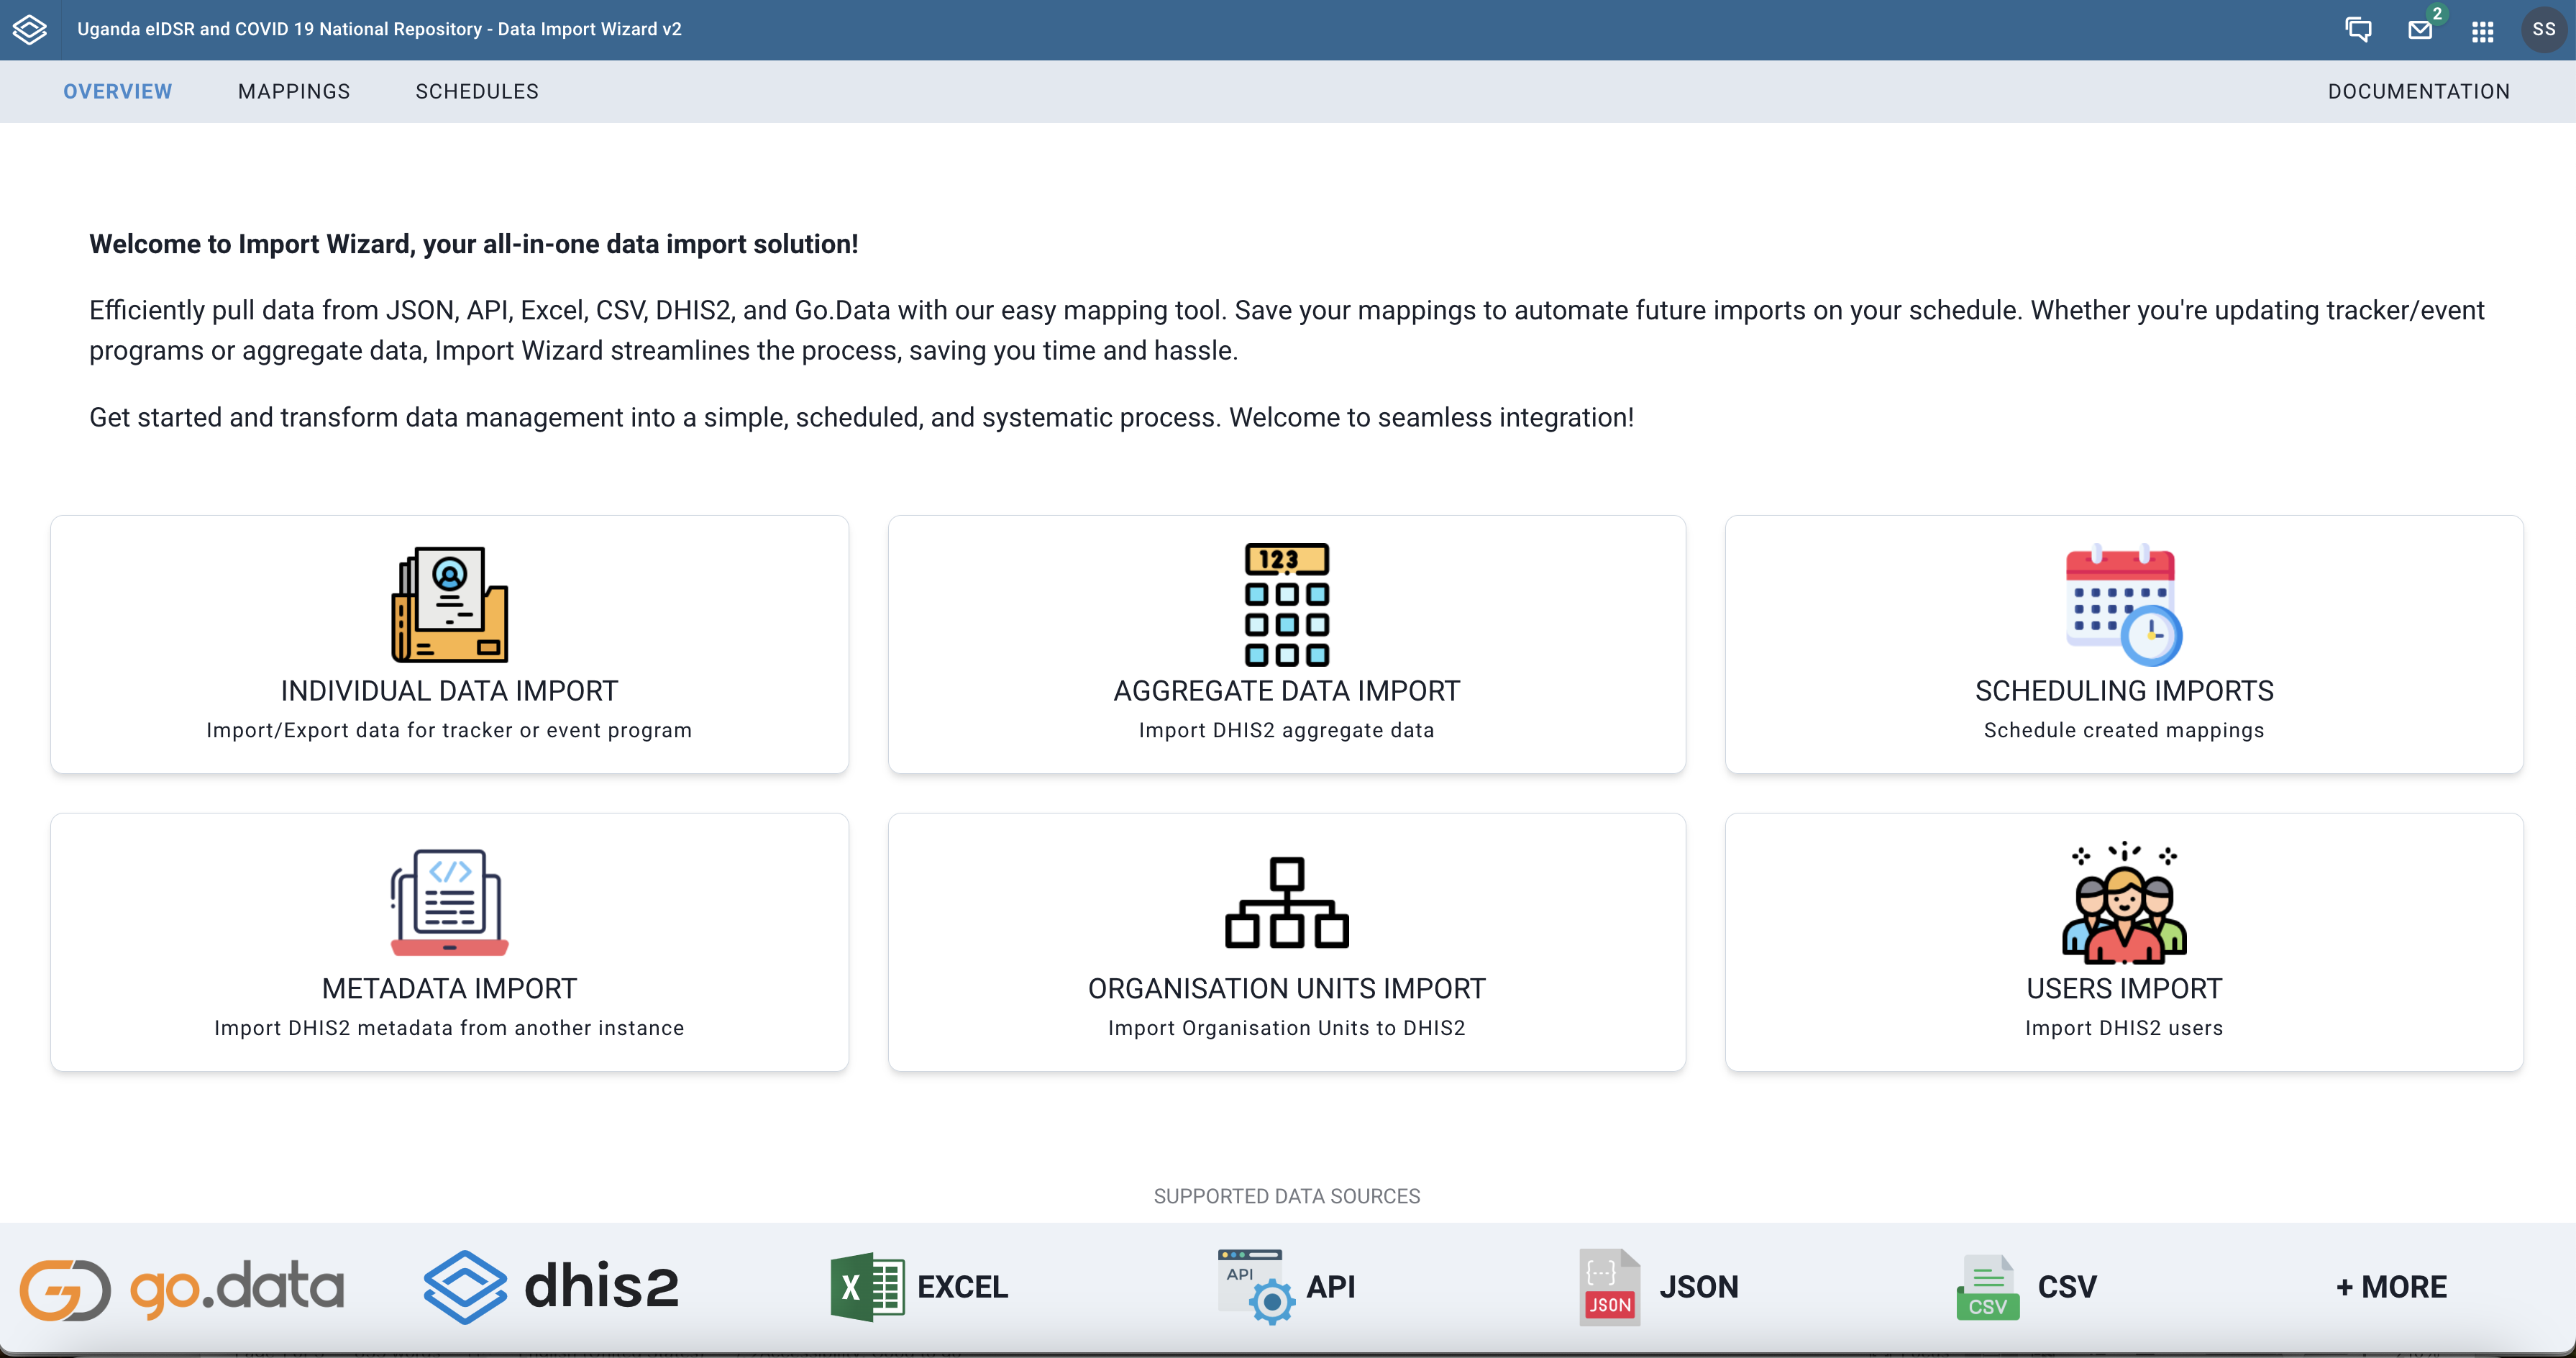
¶ The Overview Page
The Overview page gives a quick summary of the capabilities of the data import wizard. It shows cards with a description and links to the various components of the application. Each link on the top navigation bar has a summary tooltip that describes what you can do with the page accessed by the clicking the link.
 |
|---|
| Home page with overview |
¶ Individual Data Import
The Mappings page walks you through steps that help you to import data from a source (Excel, CSV, JSON, API or Go.Data) to a DHIS2 tracker/ event program. We can also use the same page to configure mapping for importing from a DHIS2 tracker/ event program to Go.Data. The process of importing data generally involves creating a mapping for your data and shared resources between source and destination, after which you use the created mapping to import the data.
The steps involved in the mapping and import process depend on whether DHIS2 is the source or destination system.
¶ When DHIS2 is the destination system
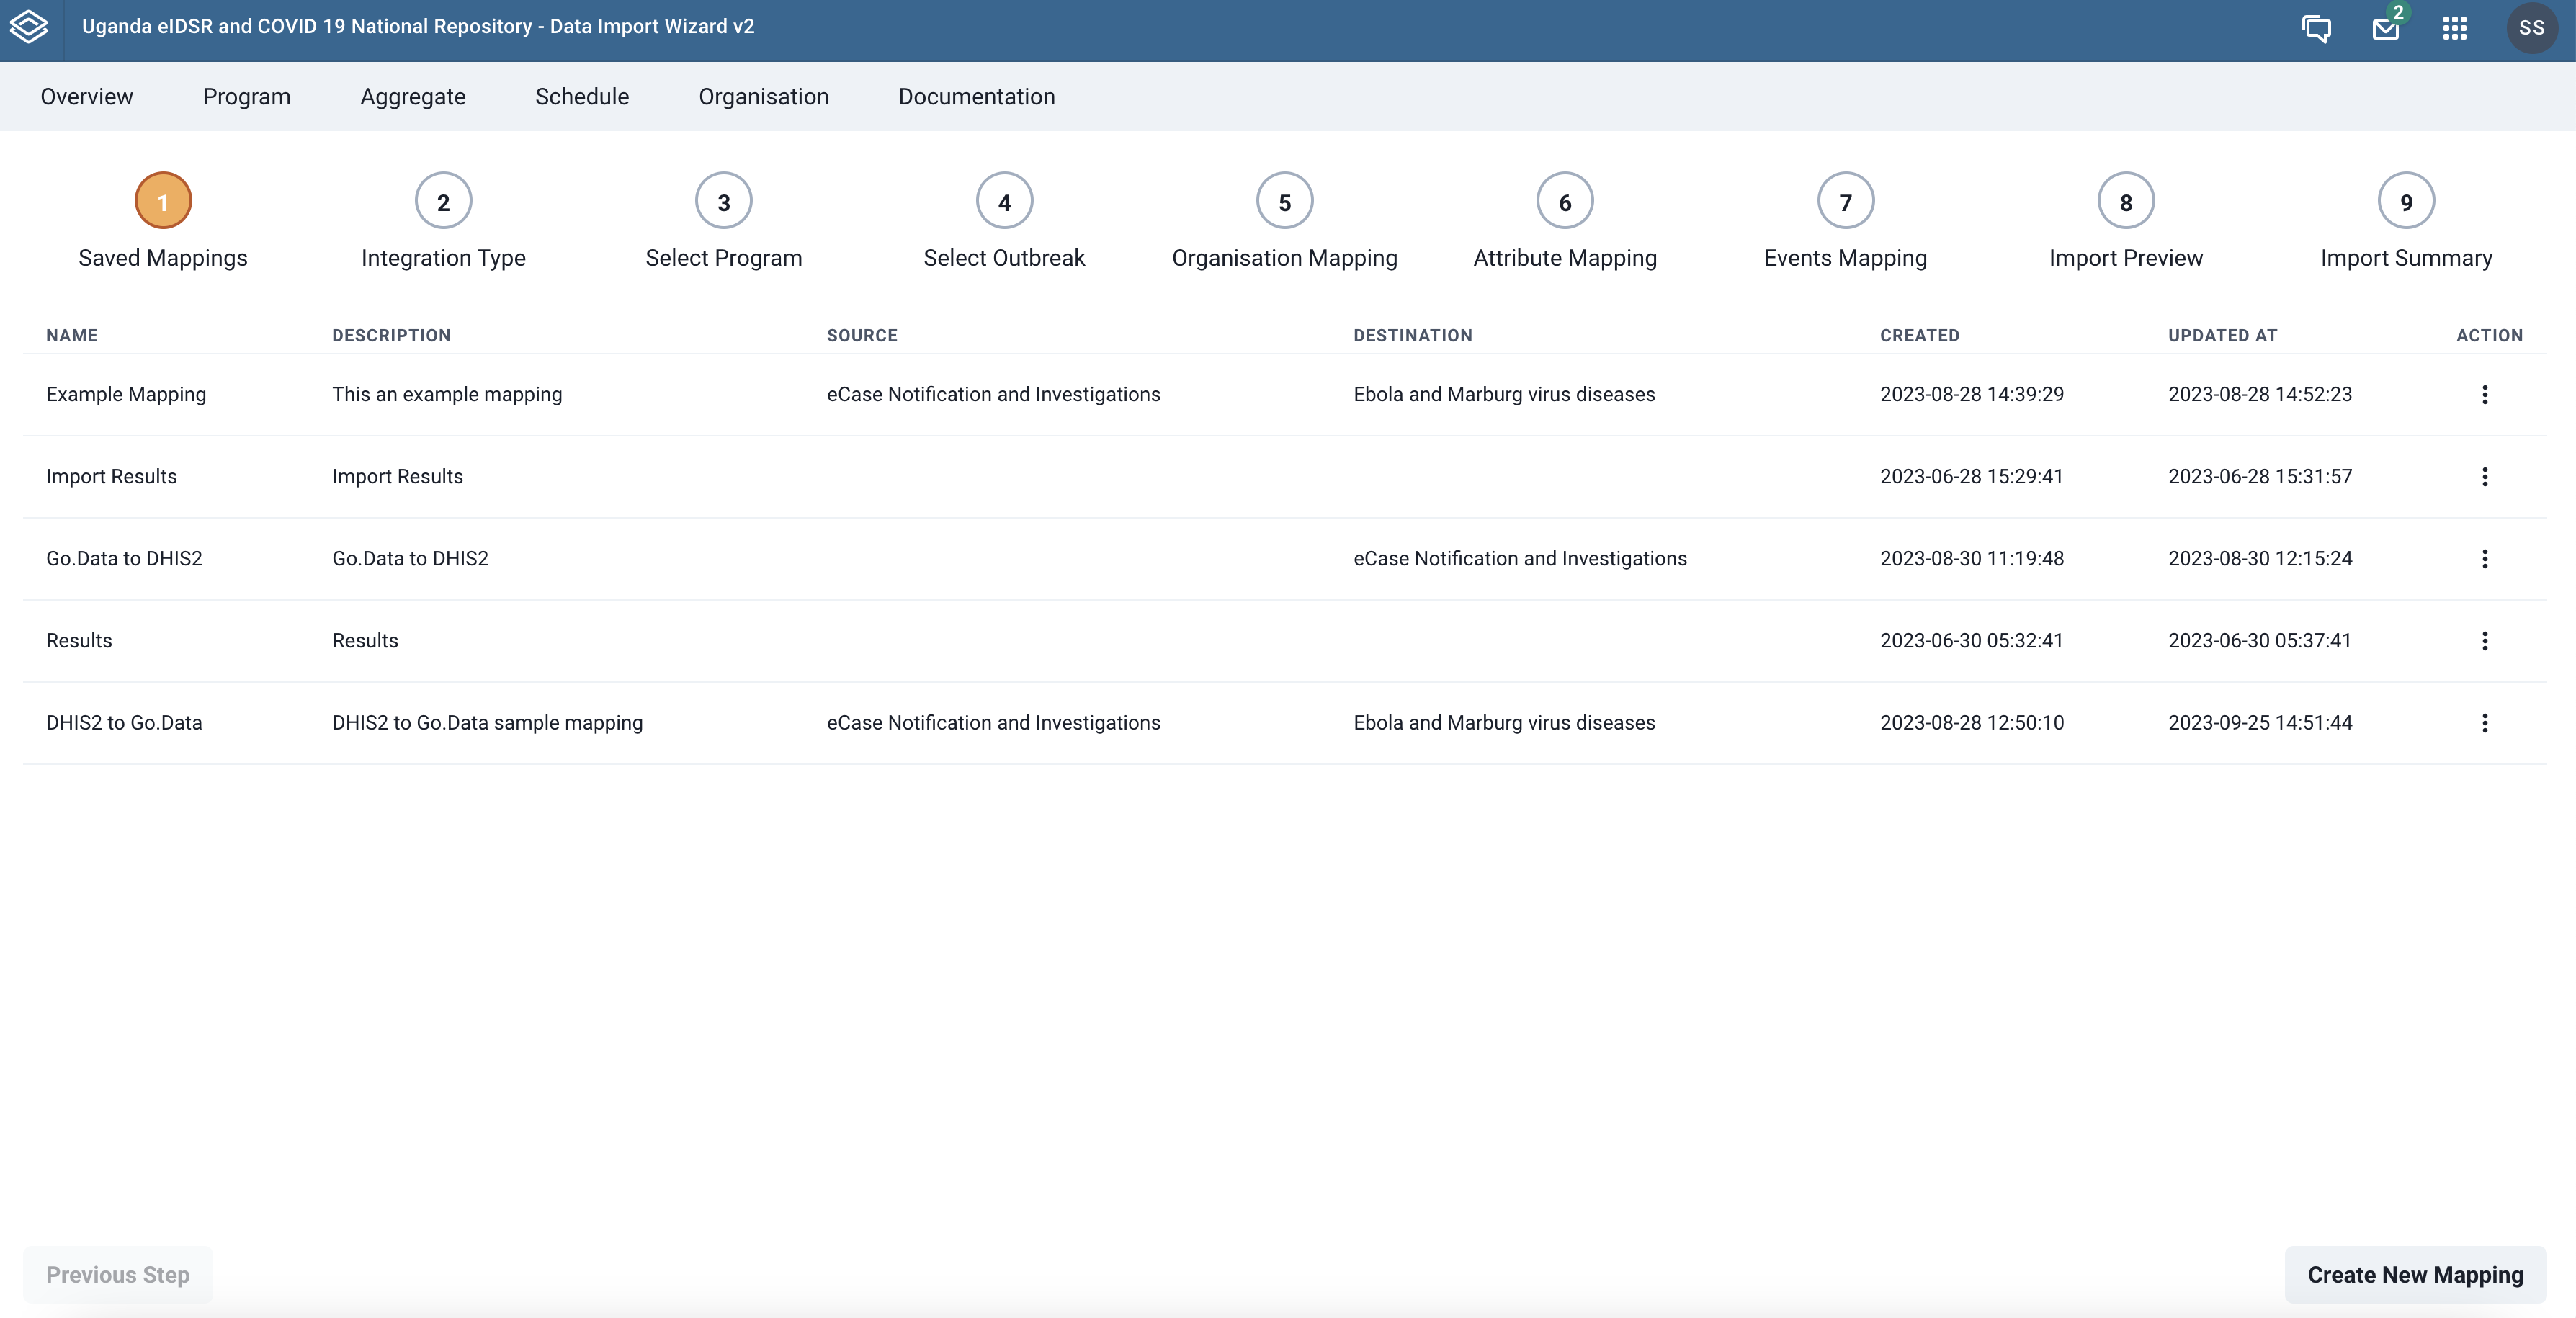
Step 0 - Use existing mapping or create a new one
The MAPPINGS page lists the previously created mappings that you can choose from to start the data import.
To use an existing mapping, click the three vertical dots icon to the right of mapping in the listing to reveal a menu for the actions you can make with your mapping.
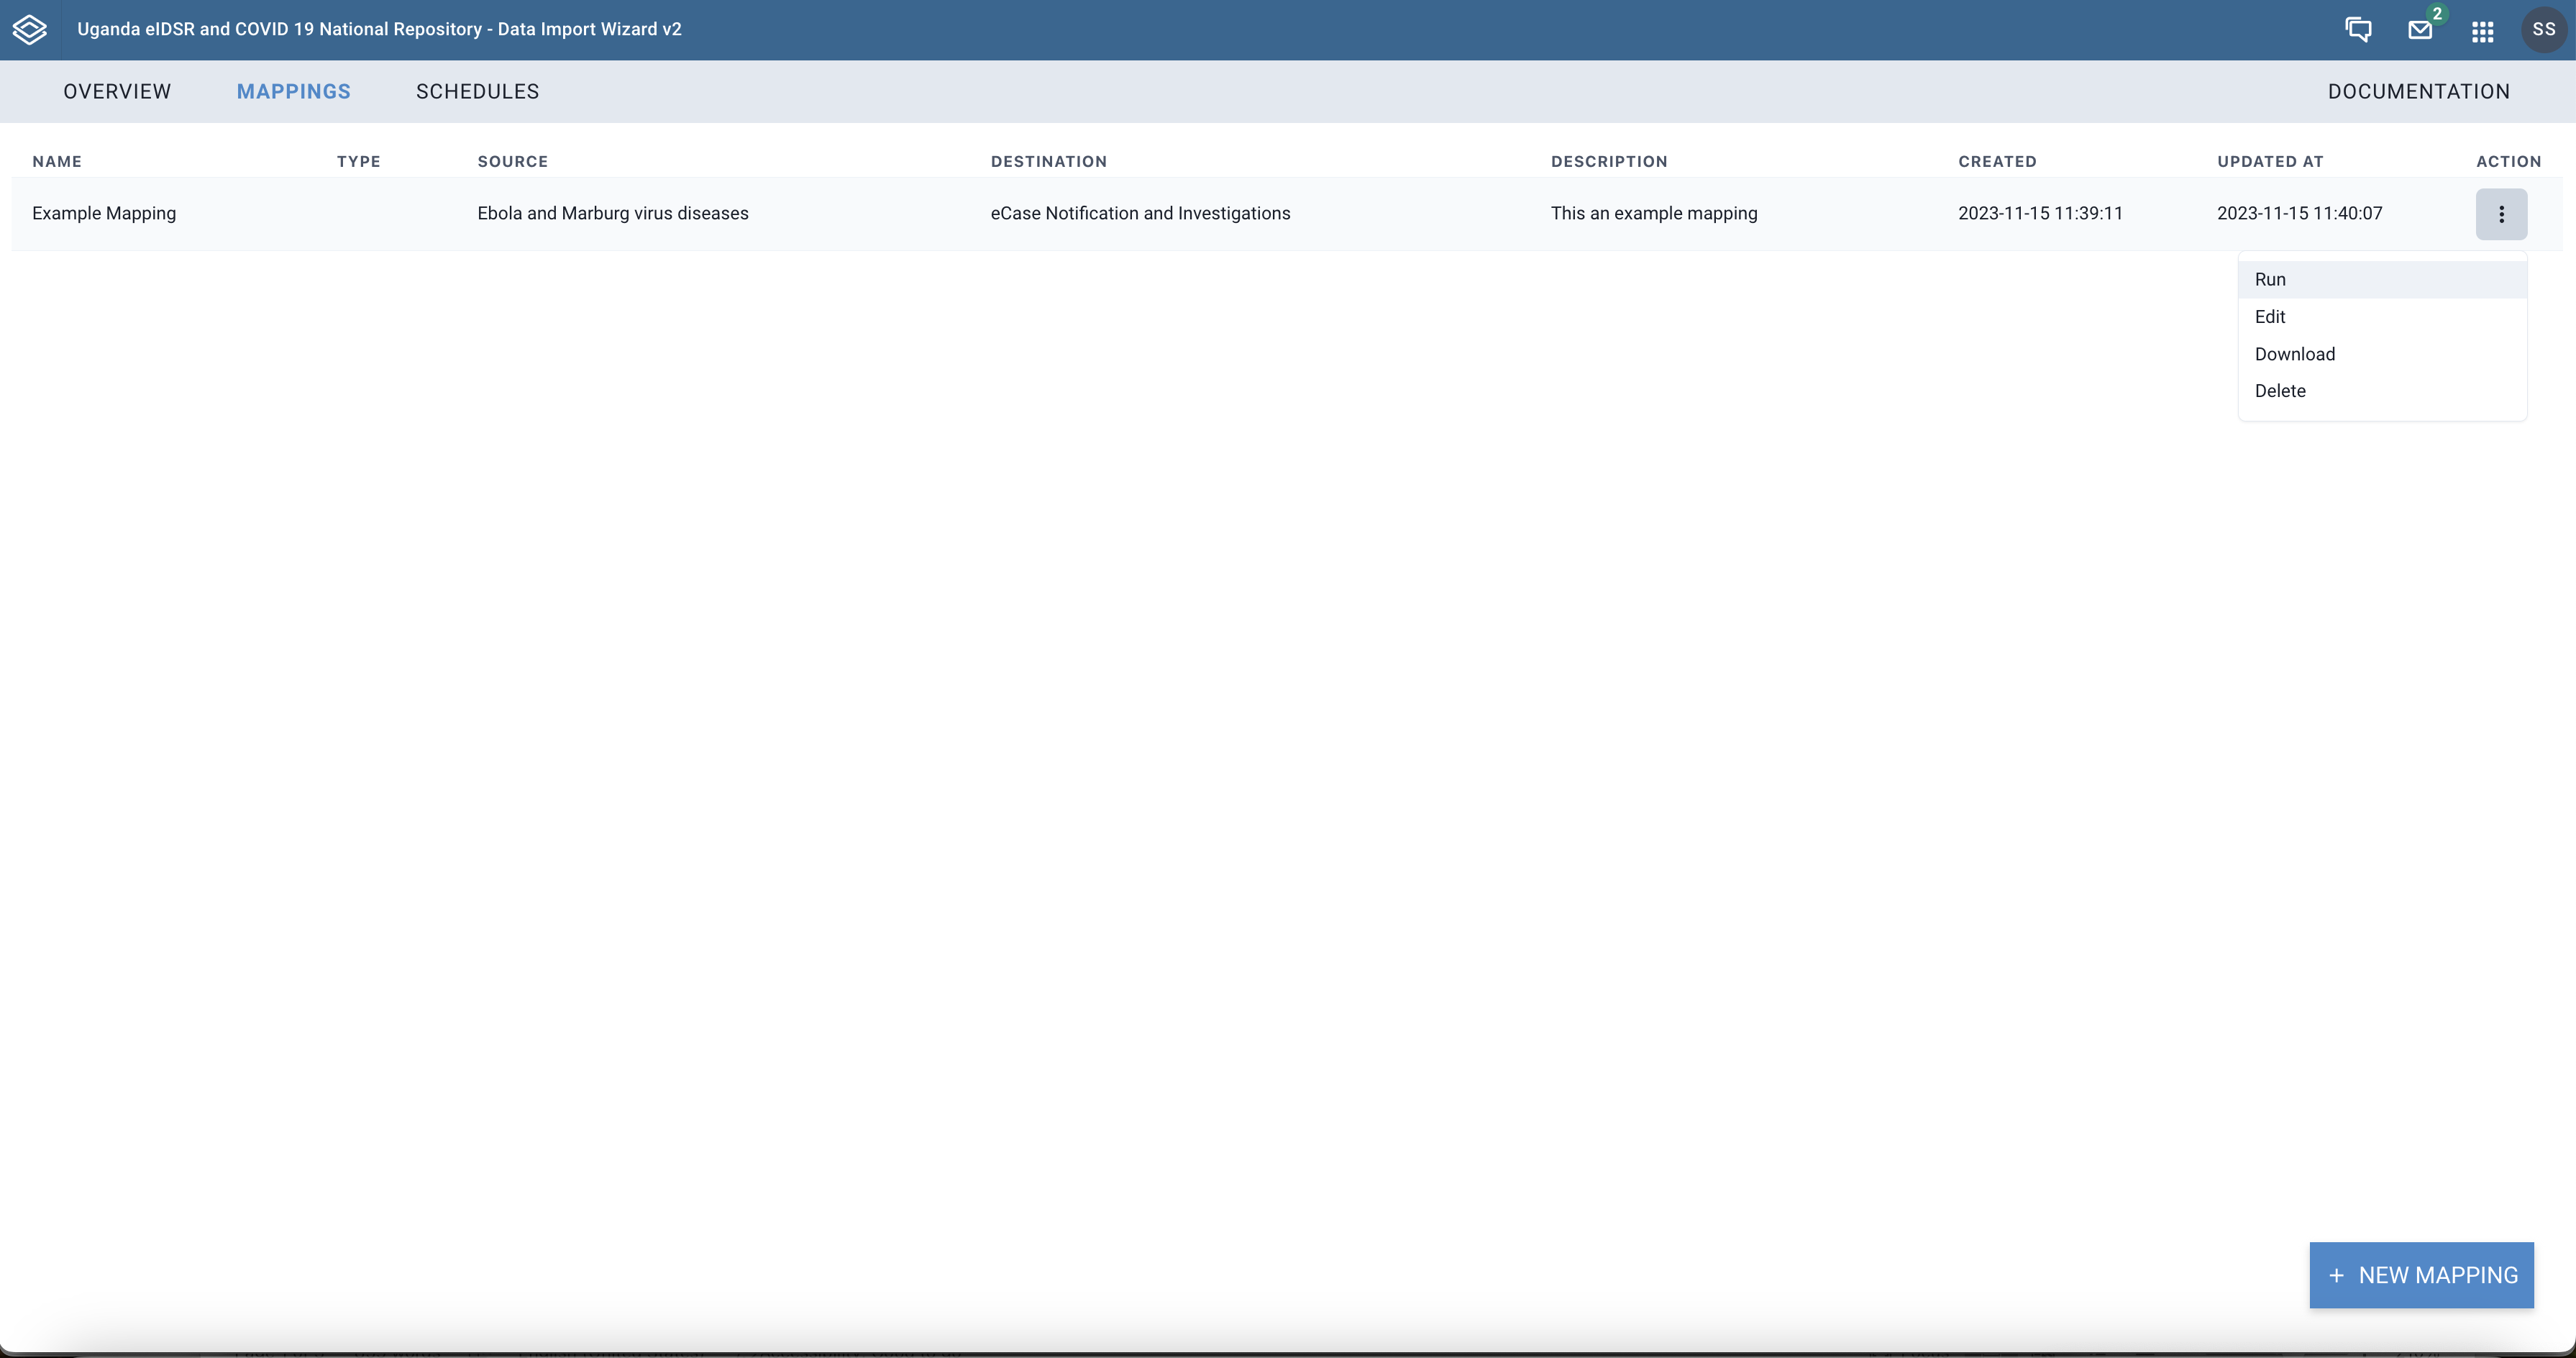 |
|---|
| Mapping Actions |
You can also create a new mapping by hovering over the + Add Mapping button at the bottom-right of the mappings page and click the Individual Data Import link the shows up in the popup. This is the option to use if you intend to use Go.Data as a source or destination system.
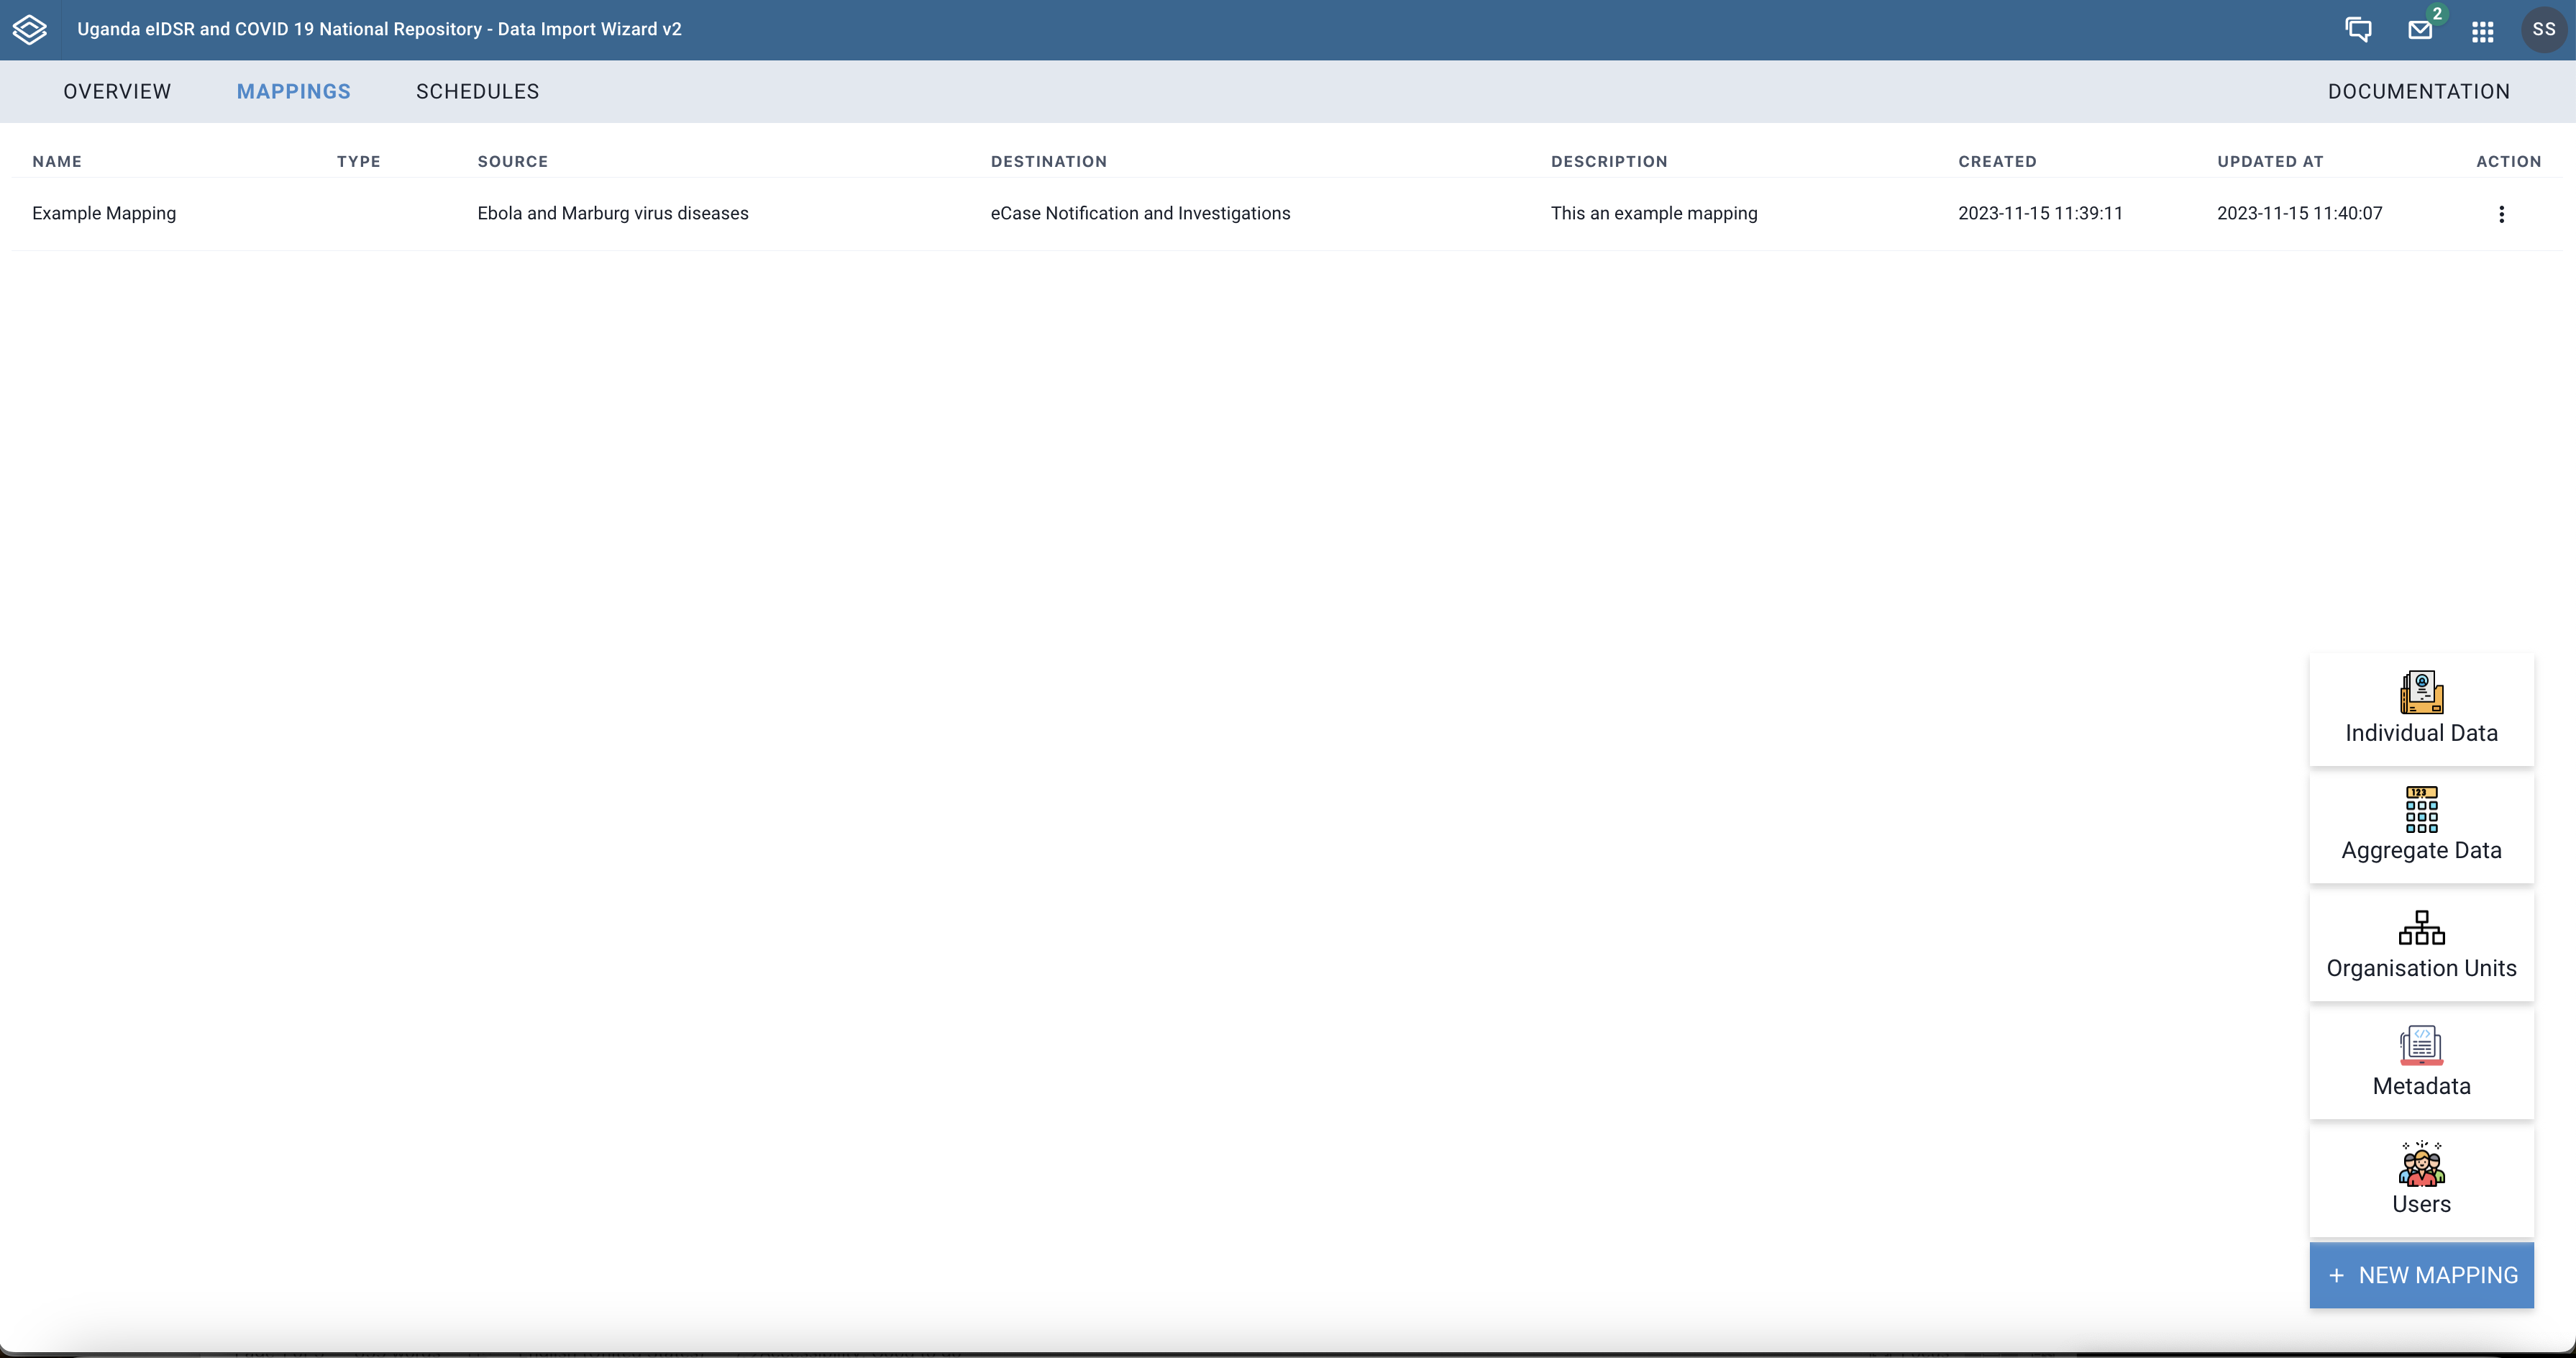 |
|---|
| Creating a new mapping |
Step 1 - Specify import sorce and related configurations
In this step, you provide details for where you intend to import data from. You will have to specify the name, description of the mapping, import source (Go.Data, Excel, CSV, JSON or API), source authentication credentials, and the active outbreak if the source is Go.Data. Click the Save button at the bottom center of the page to save the provided details.
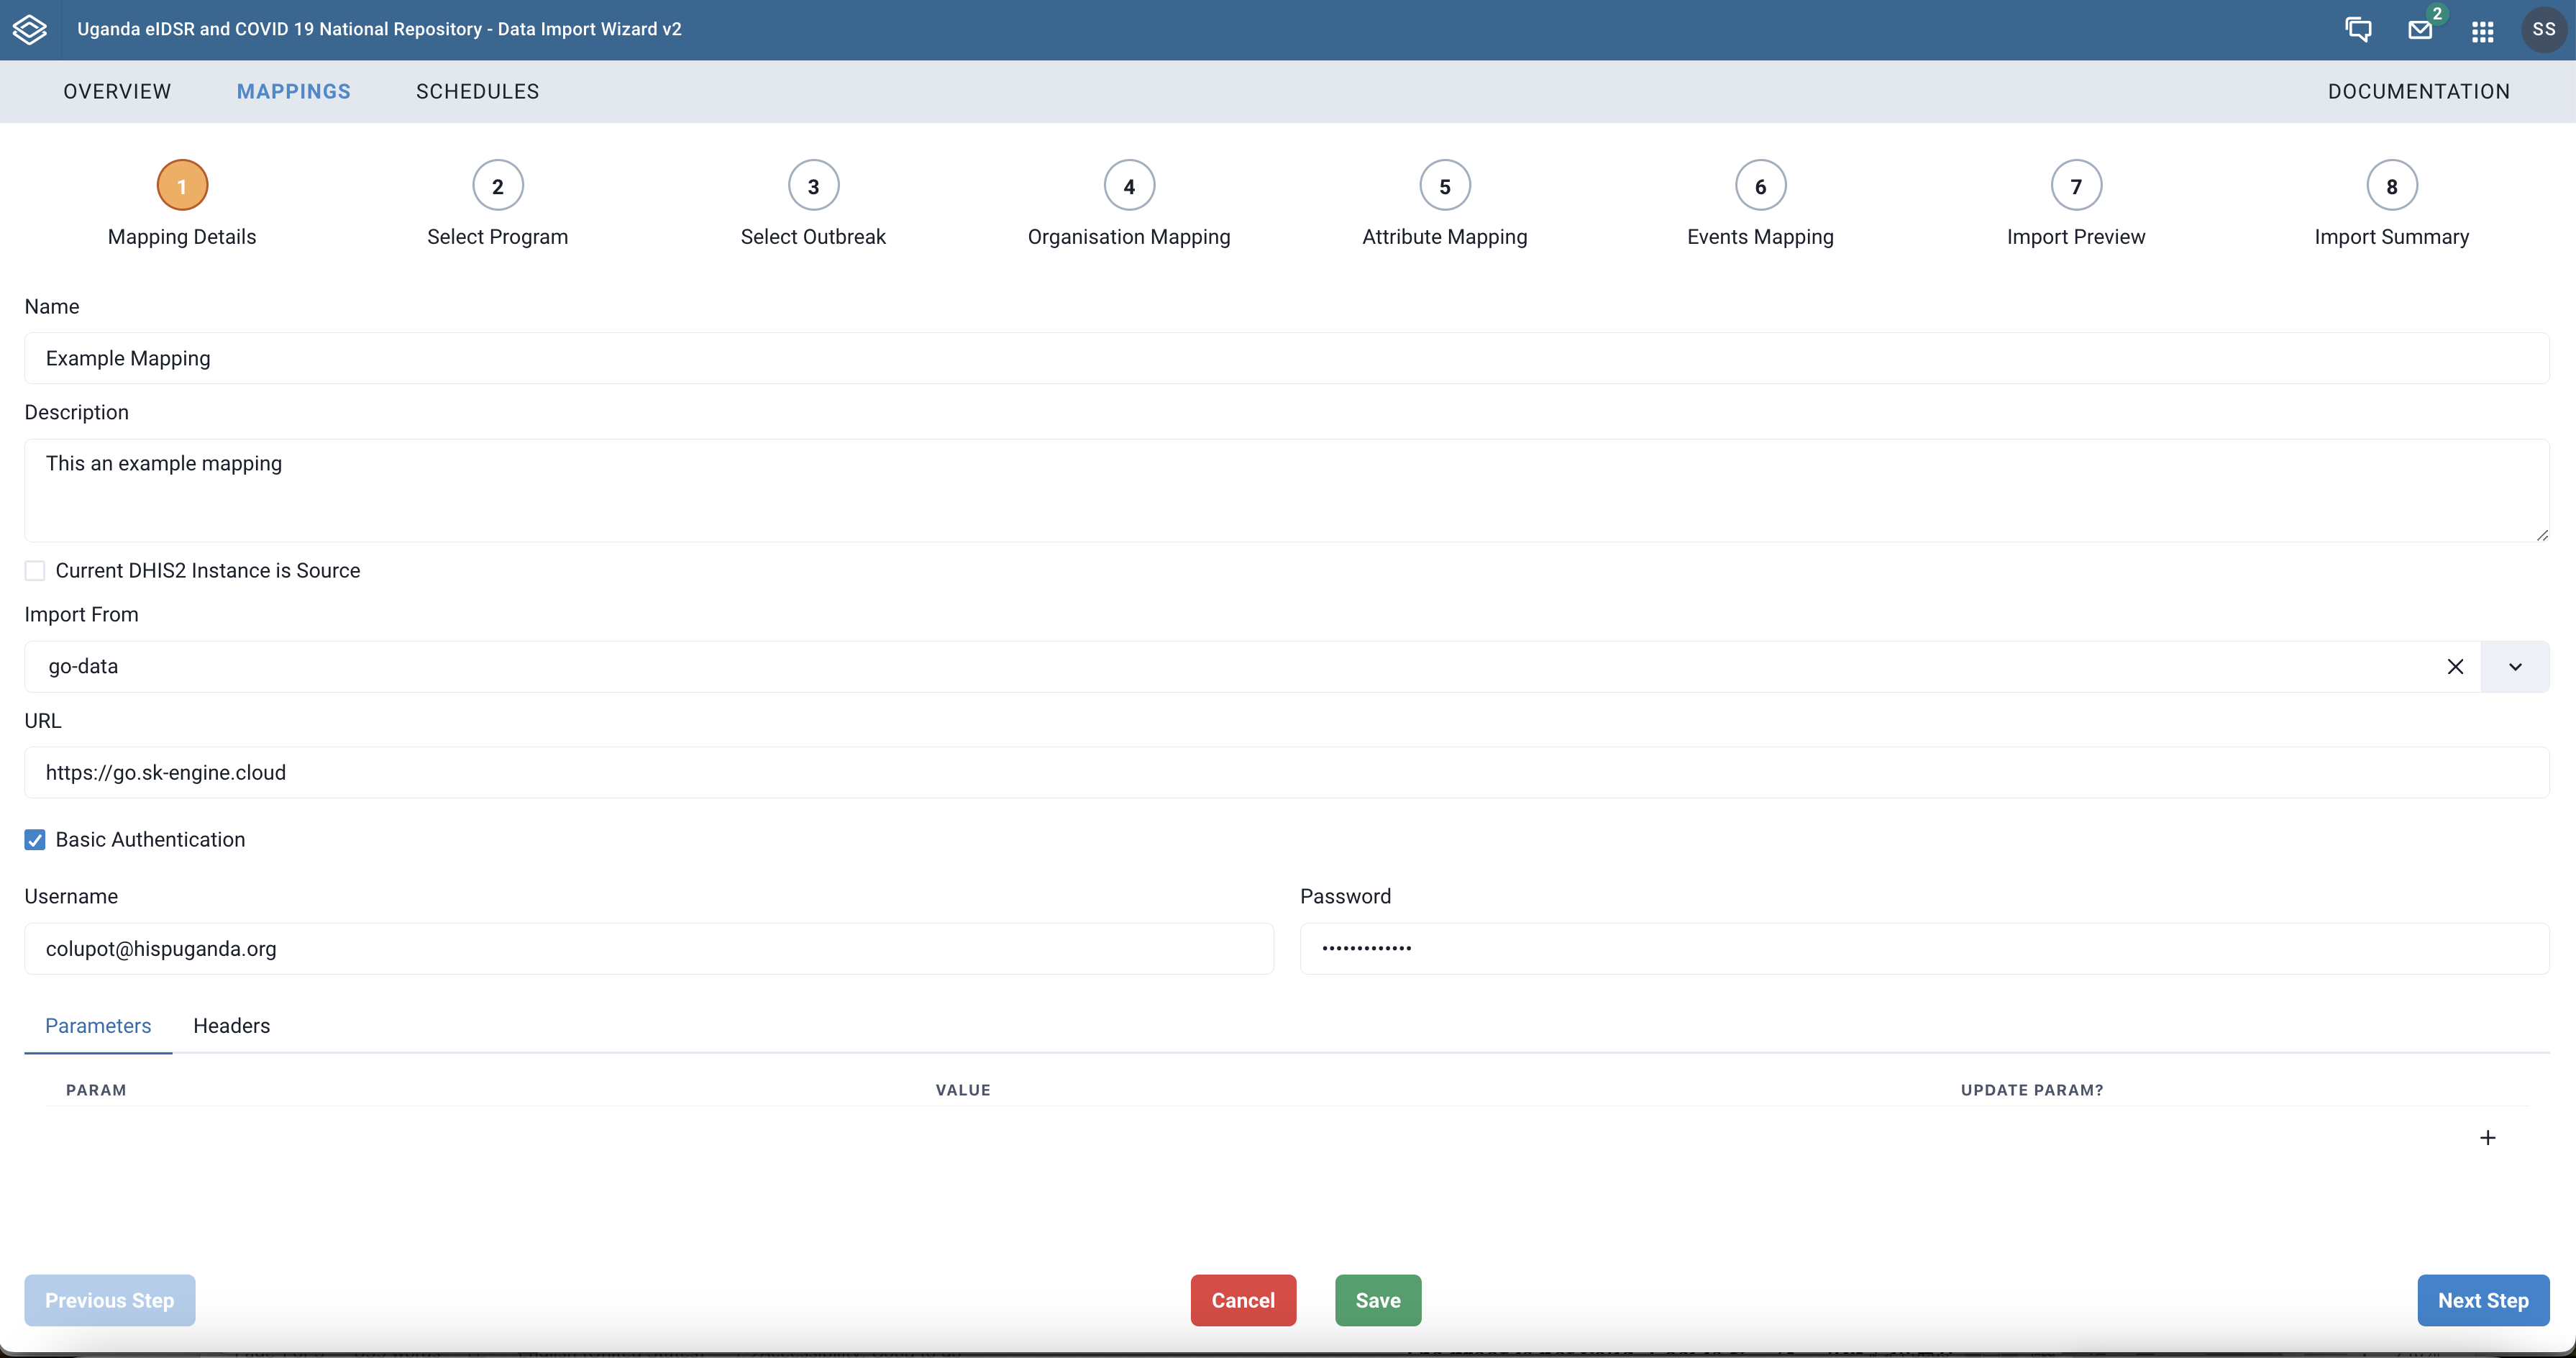 |
|---|
| Import source configuration |
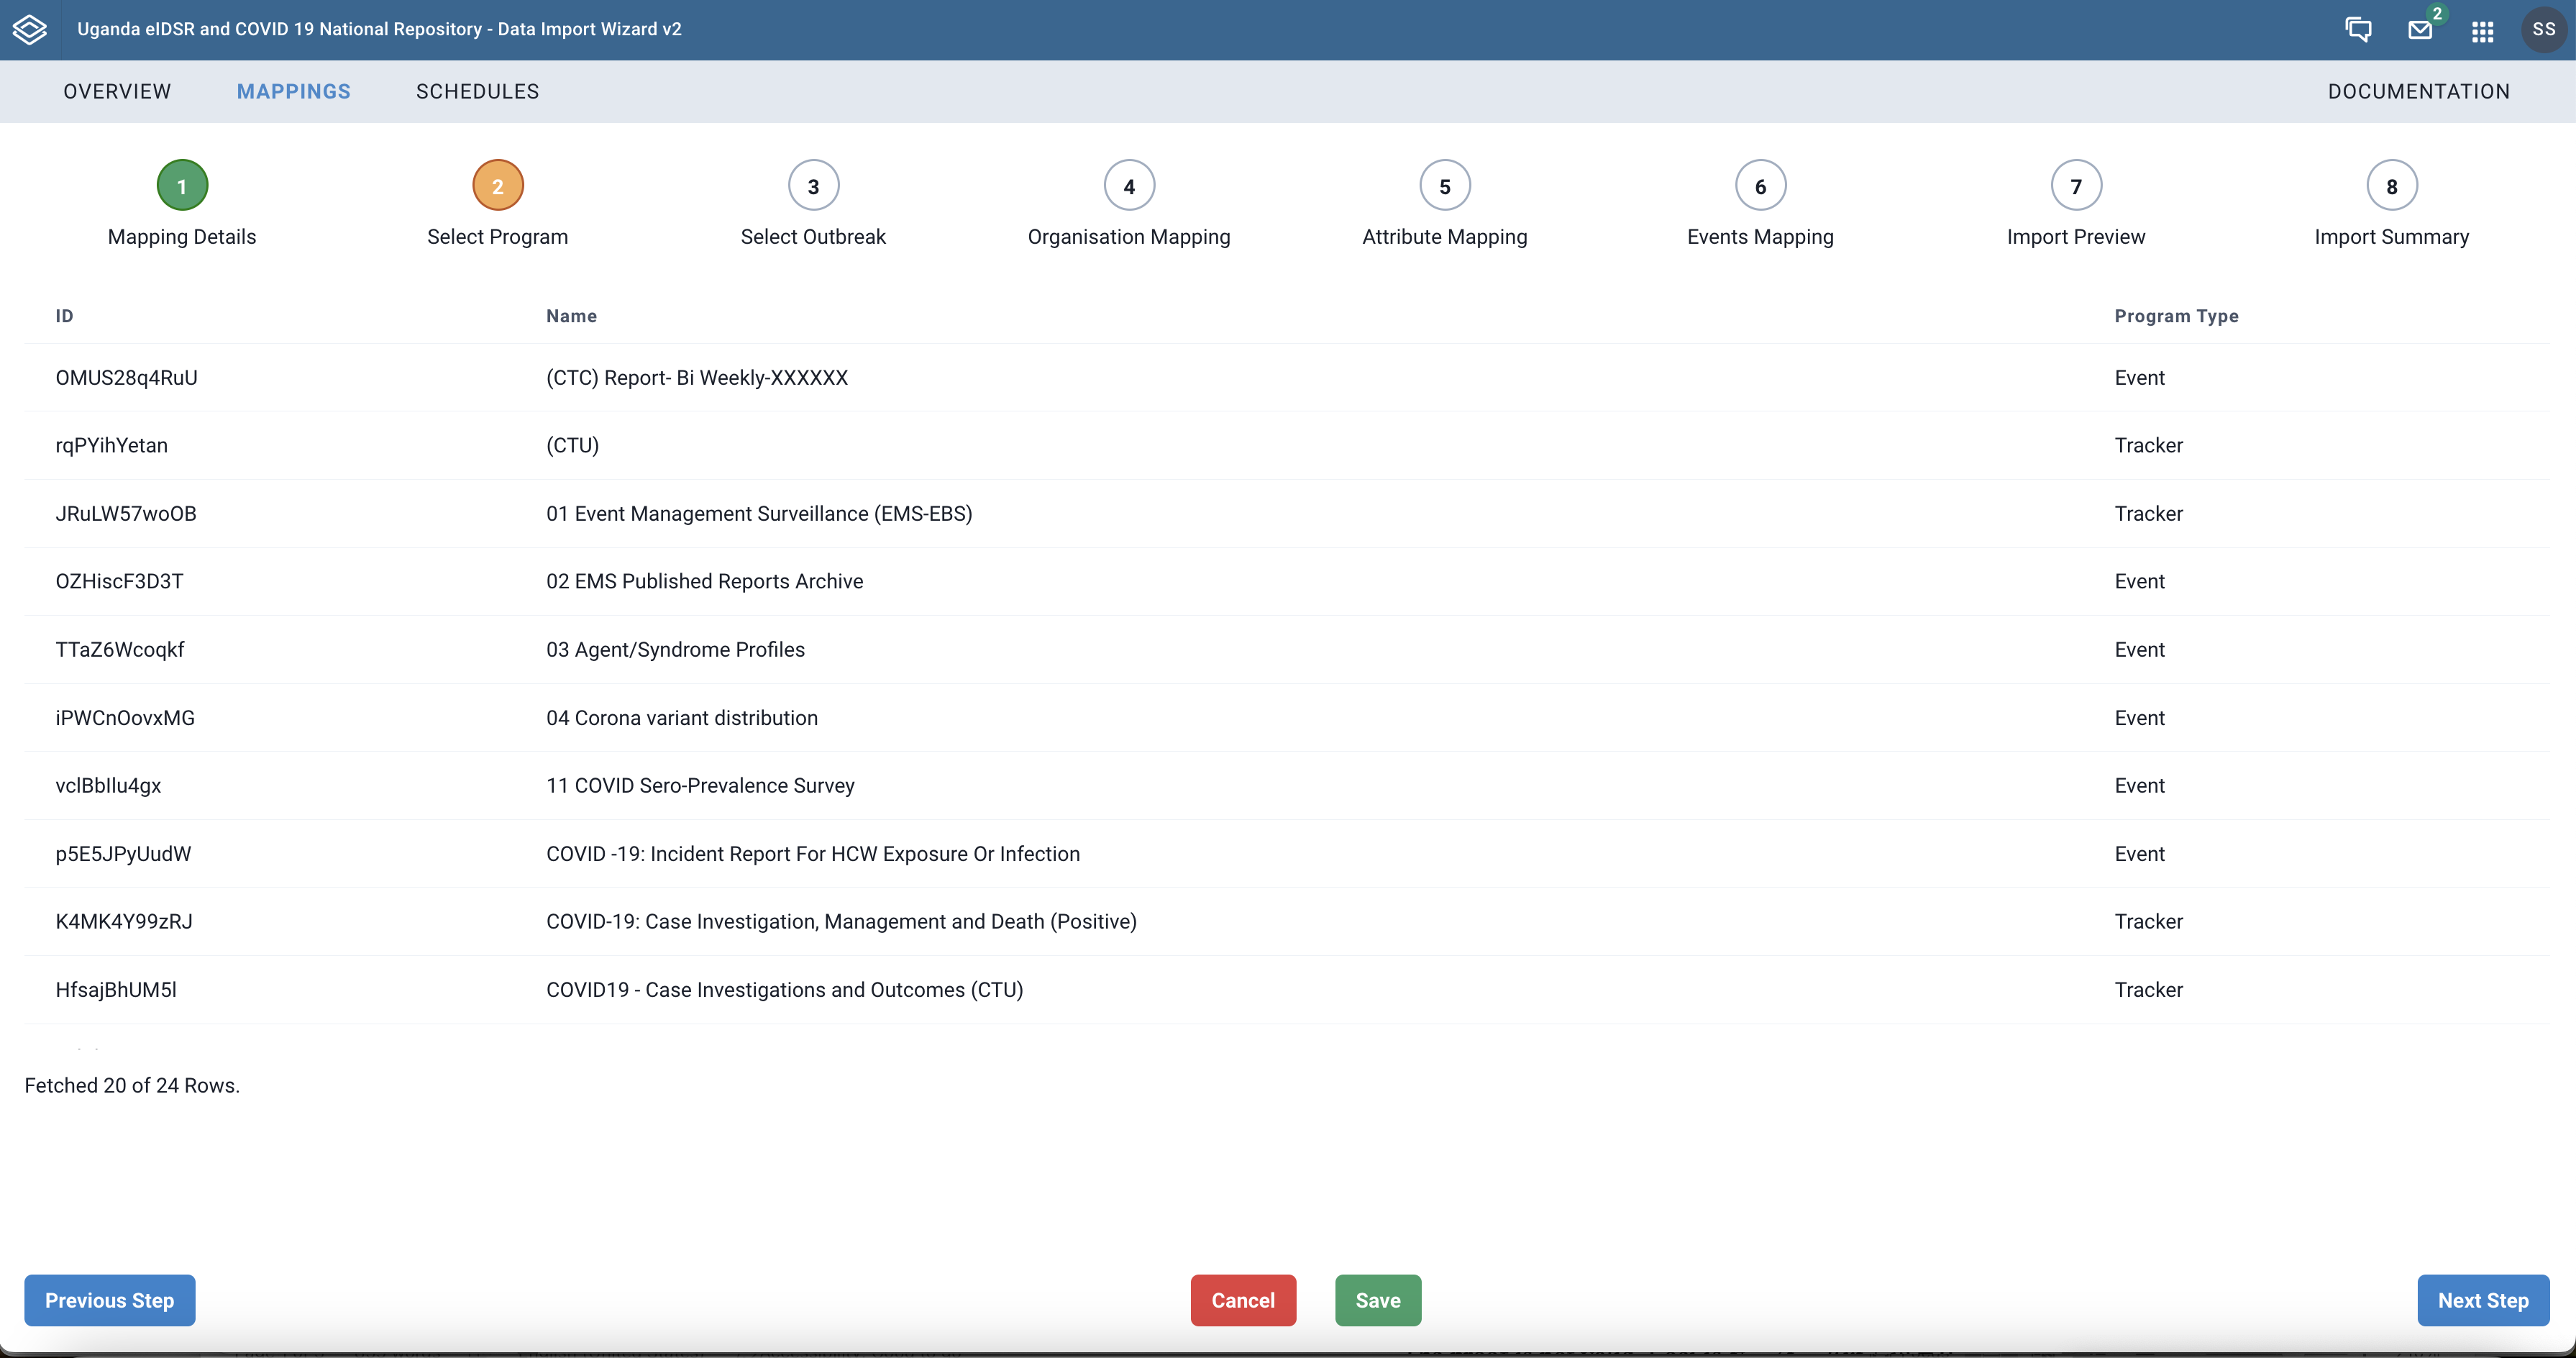
Step 2 - Select DHIS2 program to map metadata
Once you choose to create a new mapping, you then have to select a DHIS2 events program whose related metadata you want to map with. In this step, a list of available DHIS2 programs is provided. Select by clicking the row corresponding to the desired program and proceed to the next step.
 |
|---|
| DHIS2 tracker program listing |
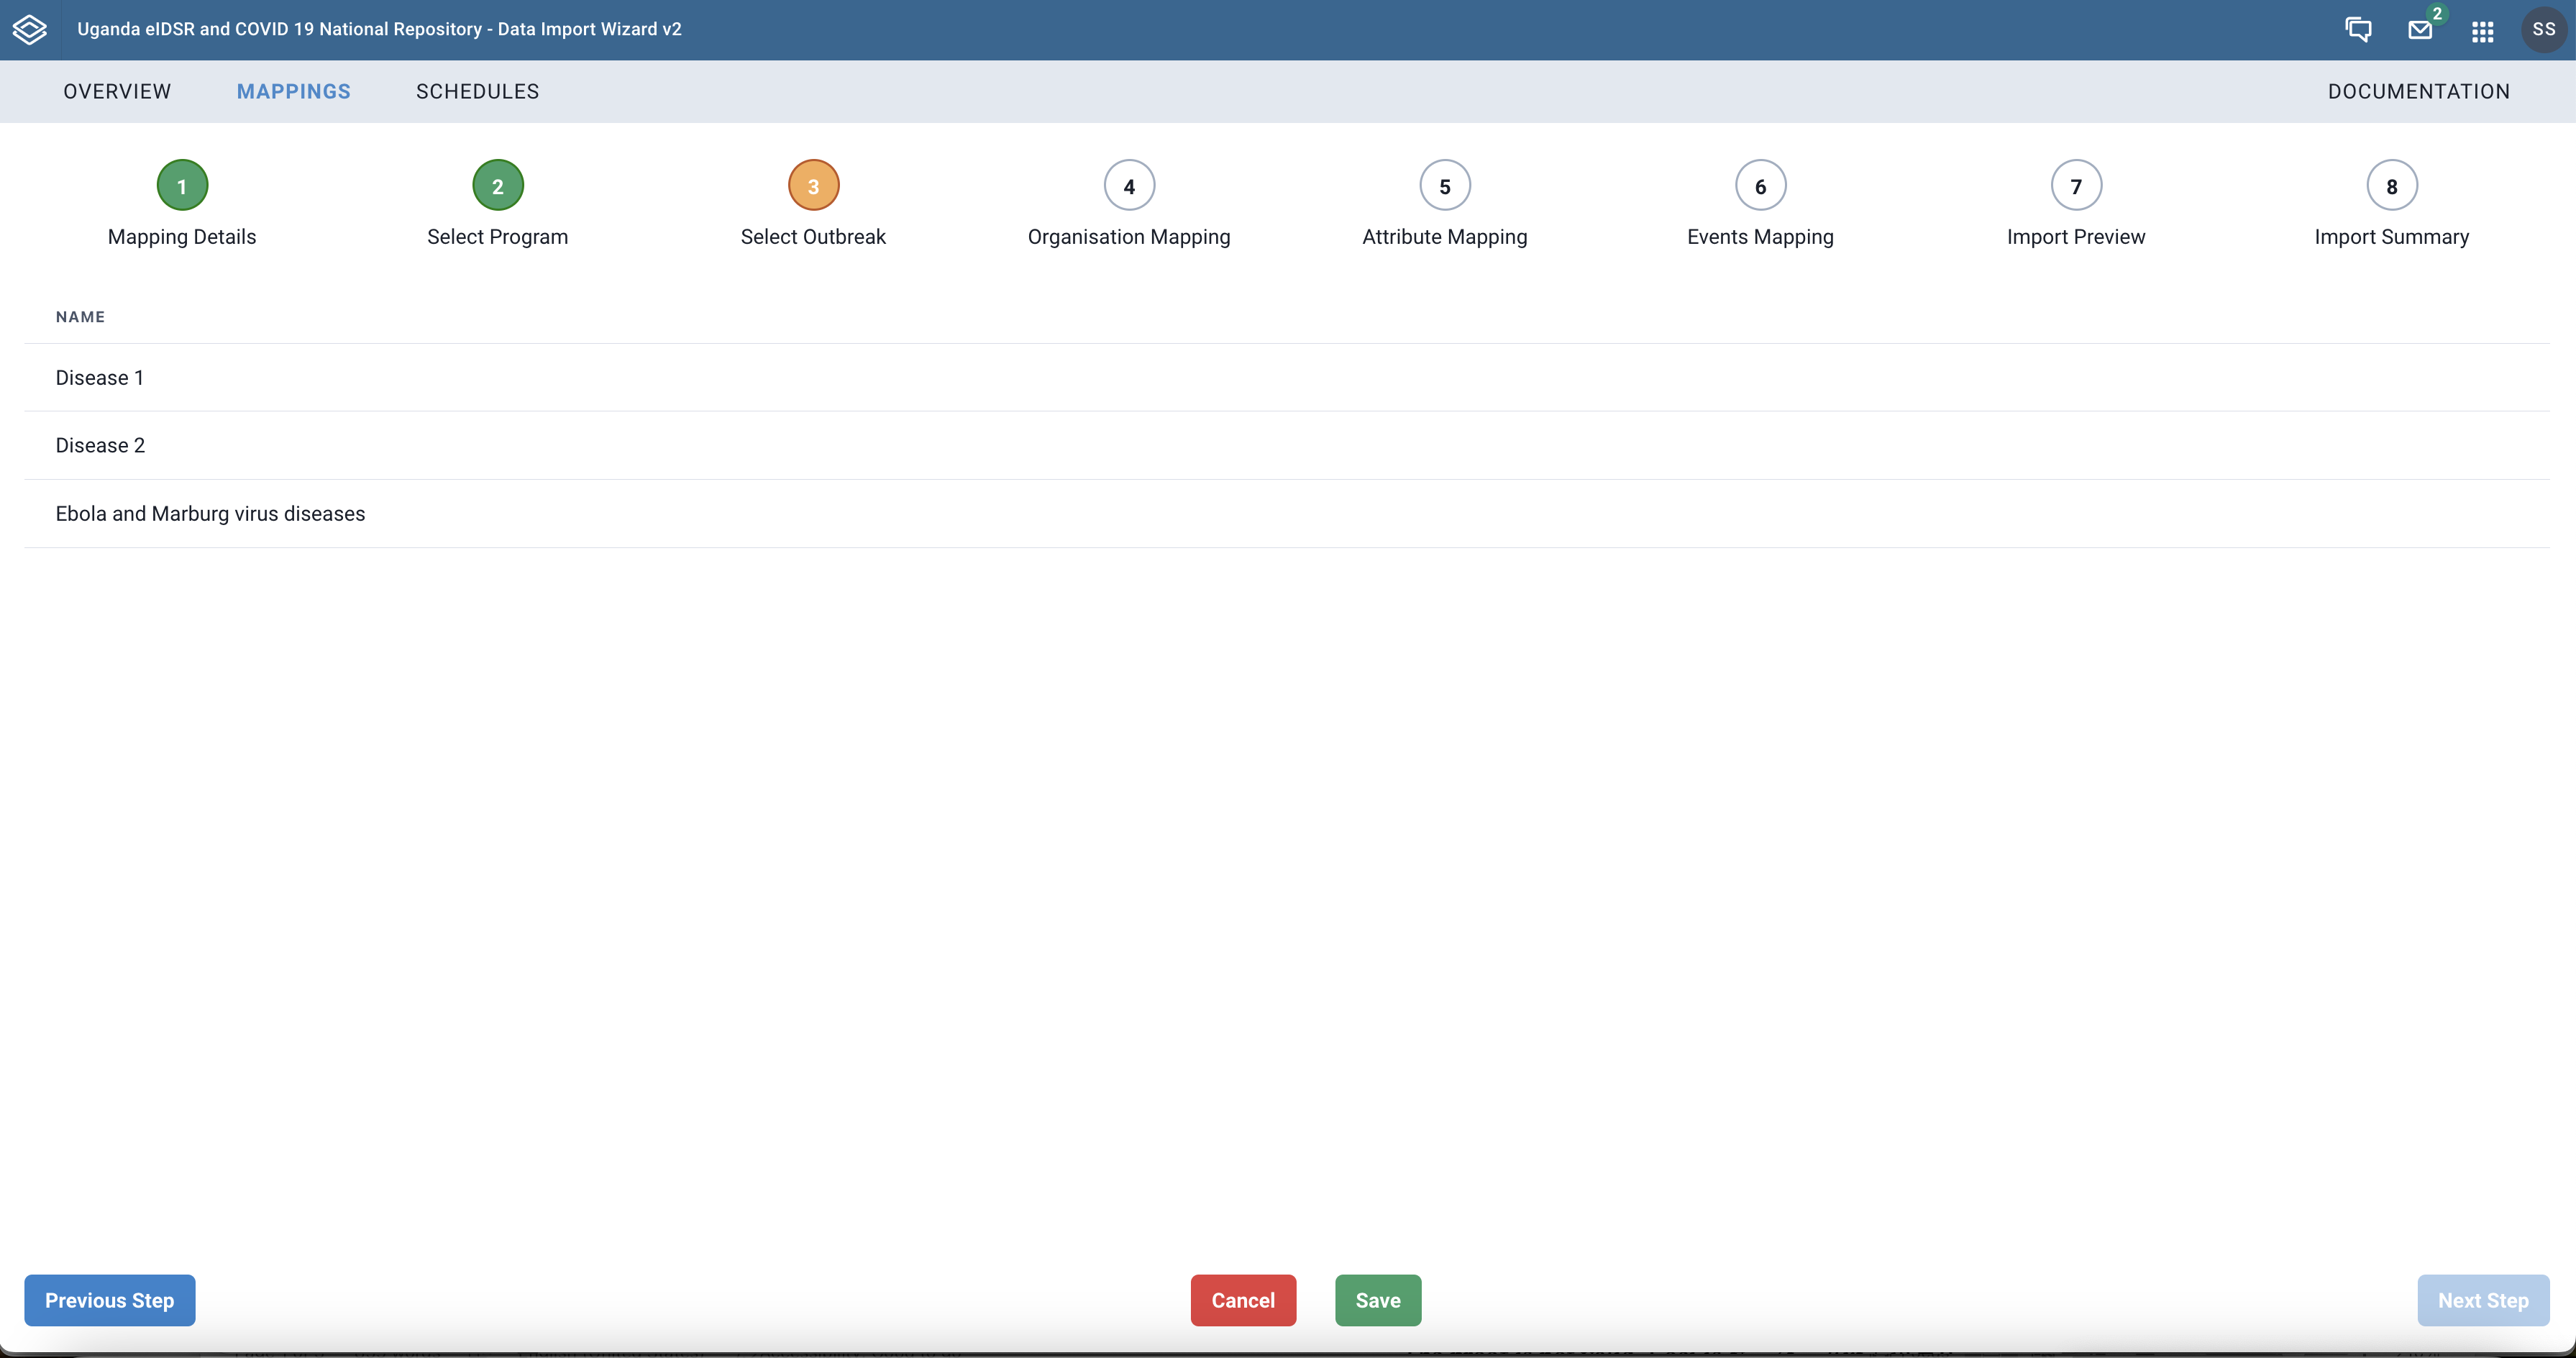
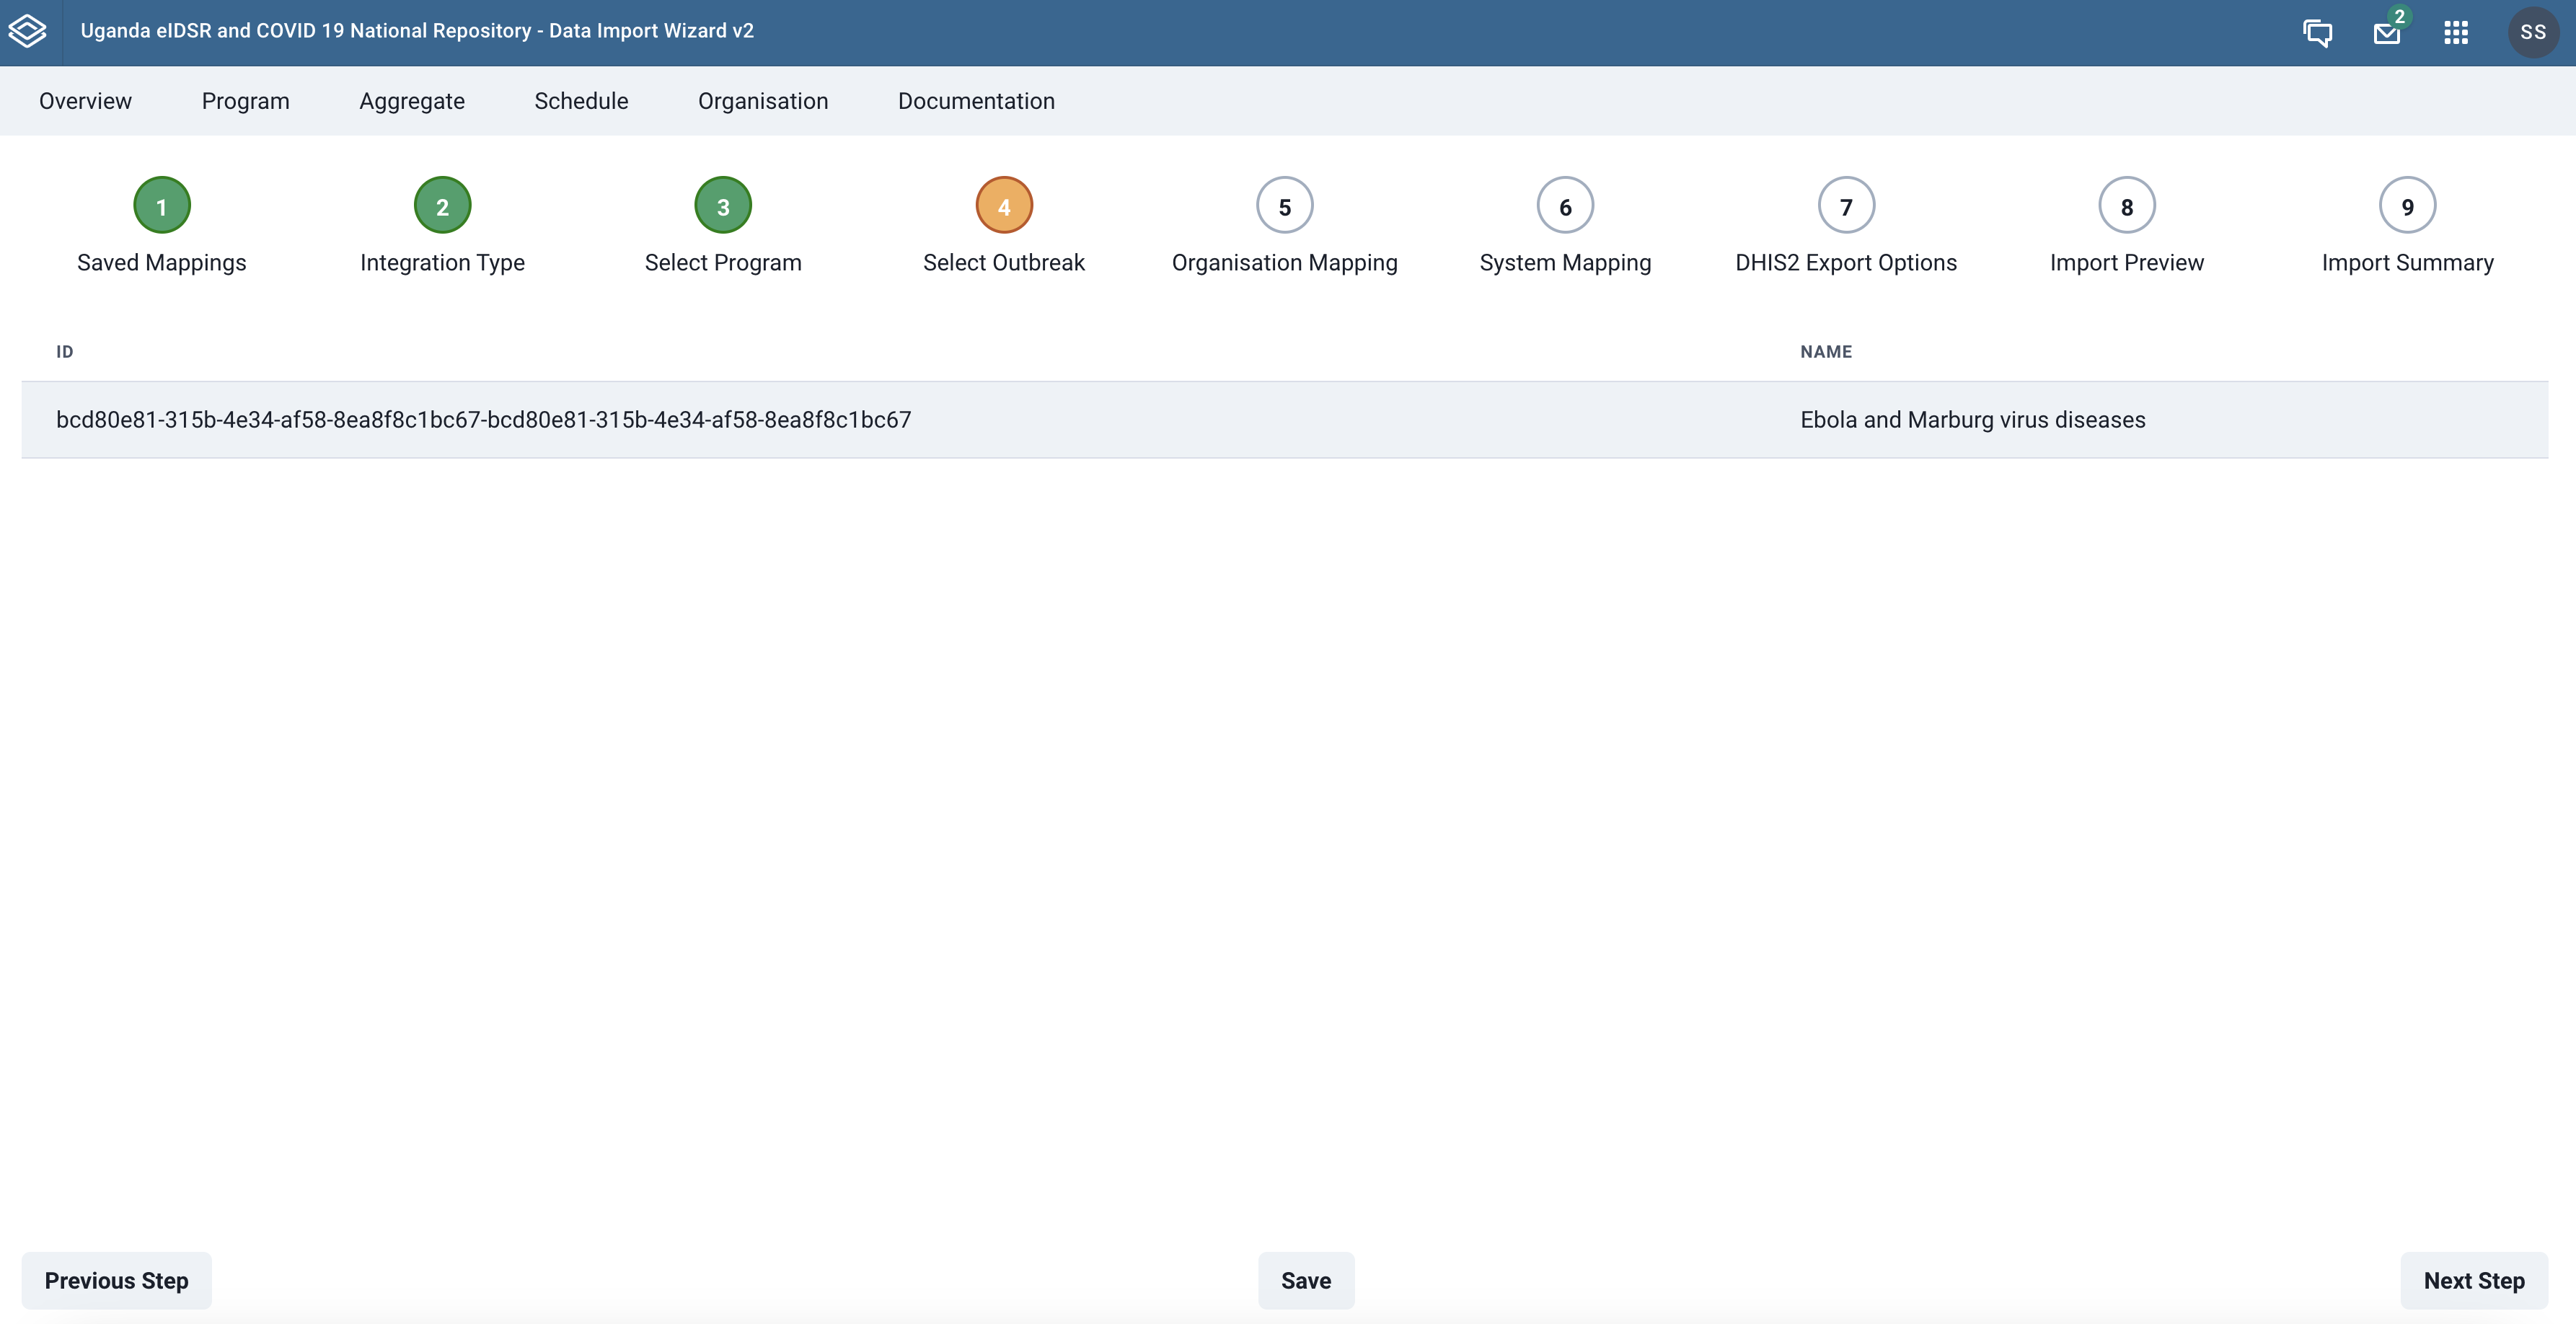
Step 3 - Select Go.Data outbreak
After selecting a DHIS2 events/tracker program whose related metadata you want to map with, you proceed to define a Go.Data outbreak you want to associate the selected program with. In this step, a list of available Go.Data outbreaks is provided. Select the desired outbreak to proceed to the next step. If you are working with a previously saved mapping, the corresponding event/tracker program will be highlighted.
 |
|---|
| Go.Data outbreaks listing |
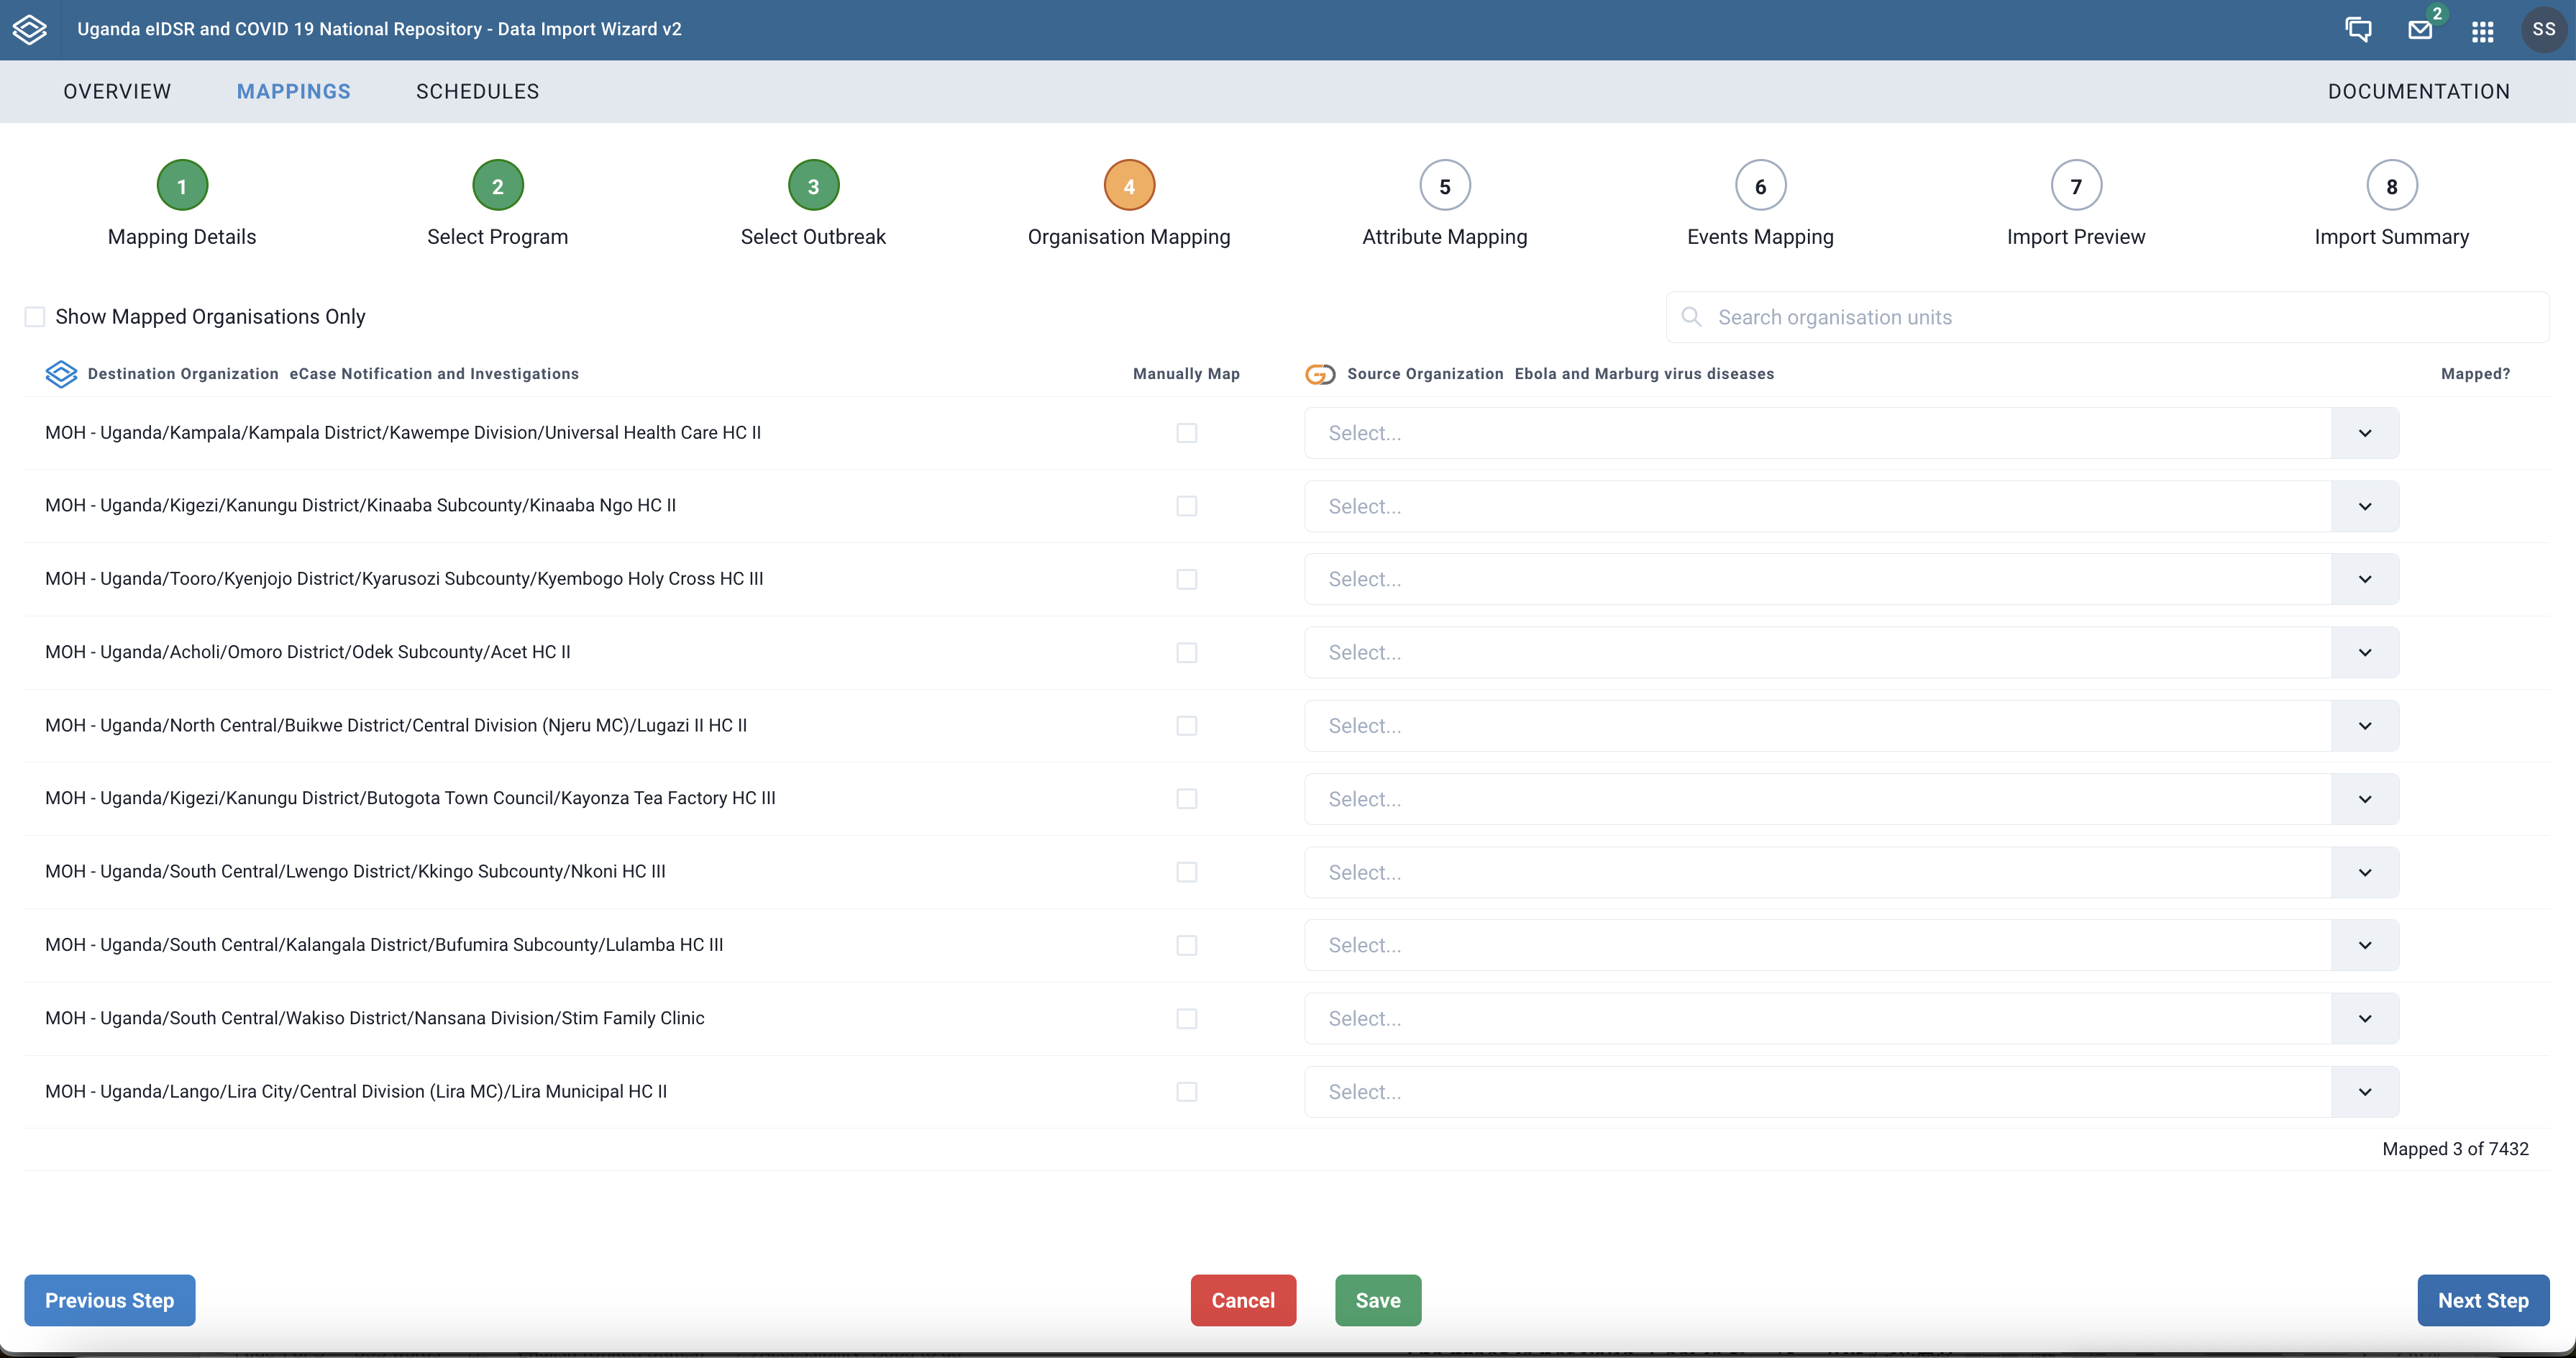
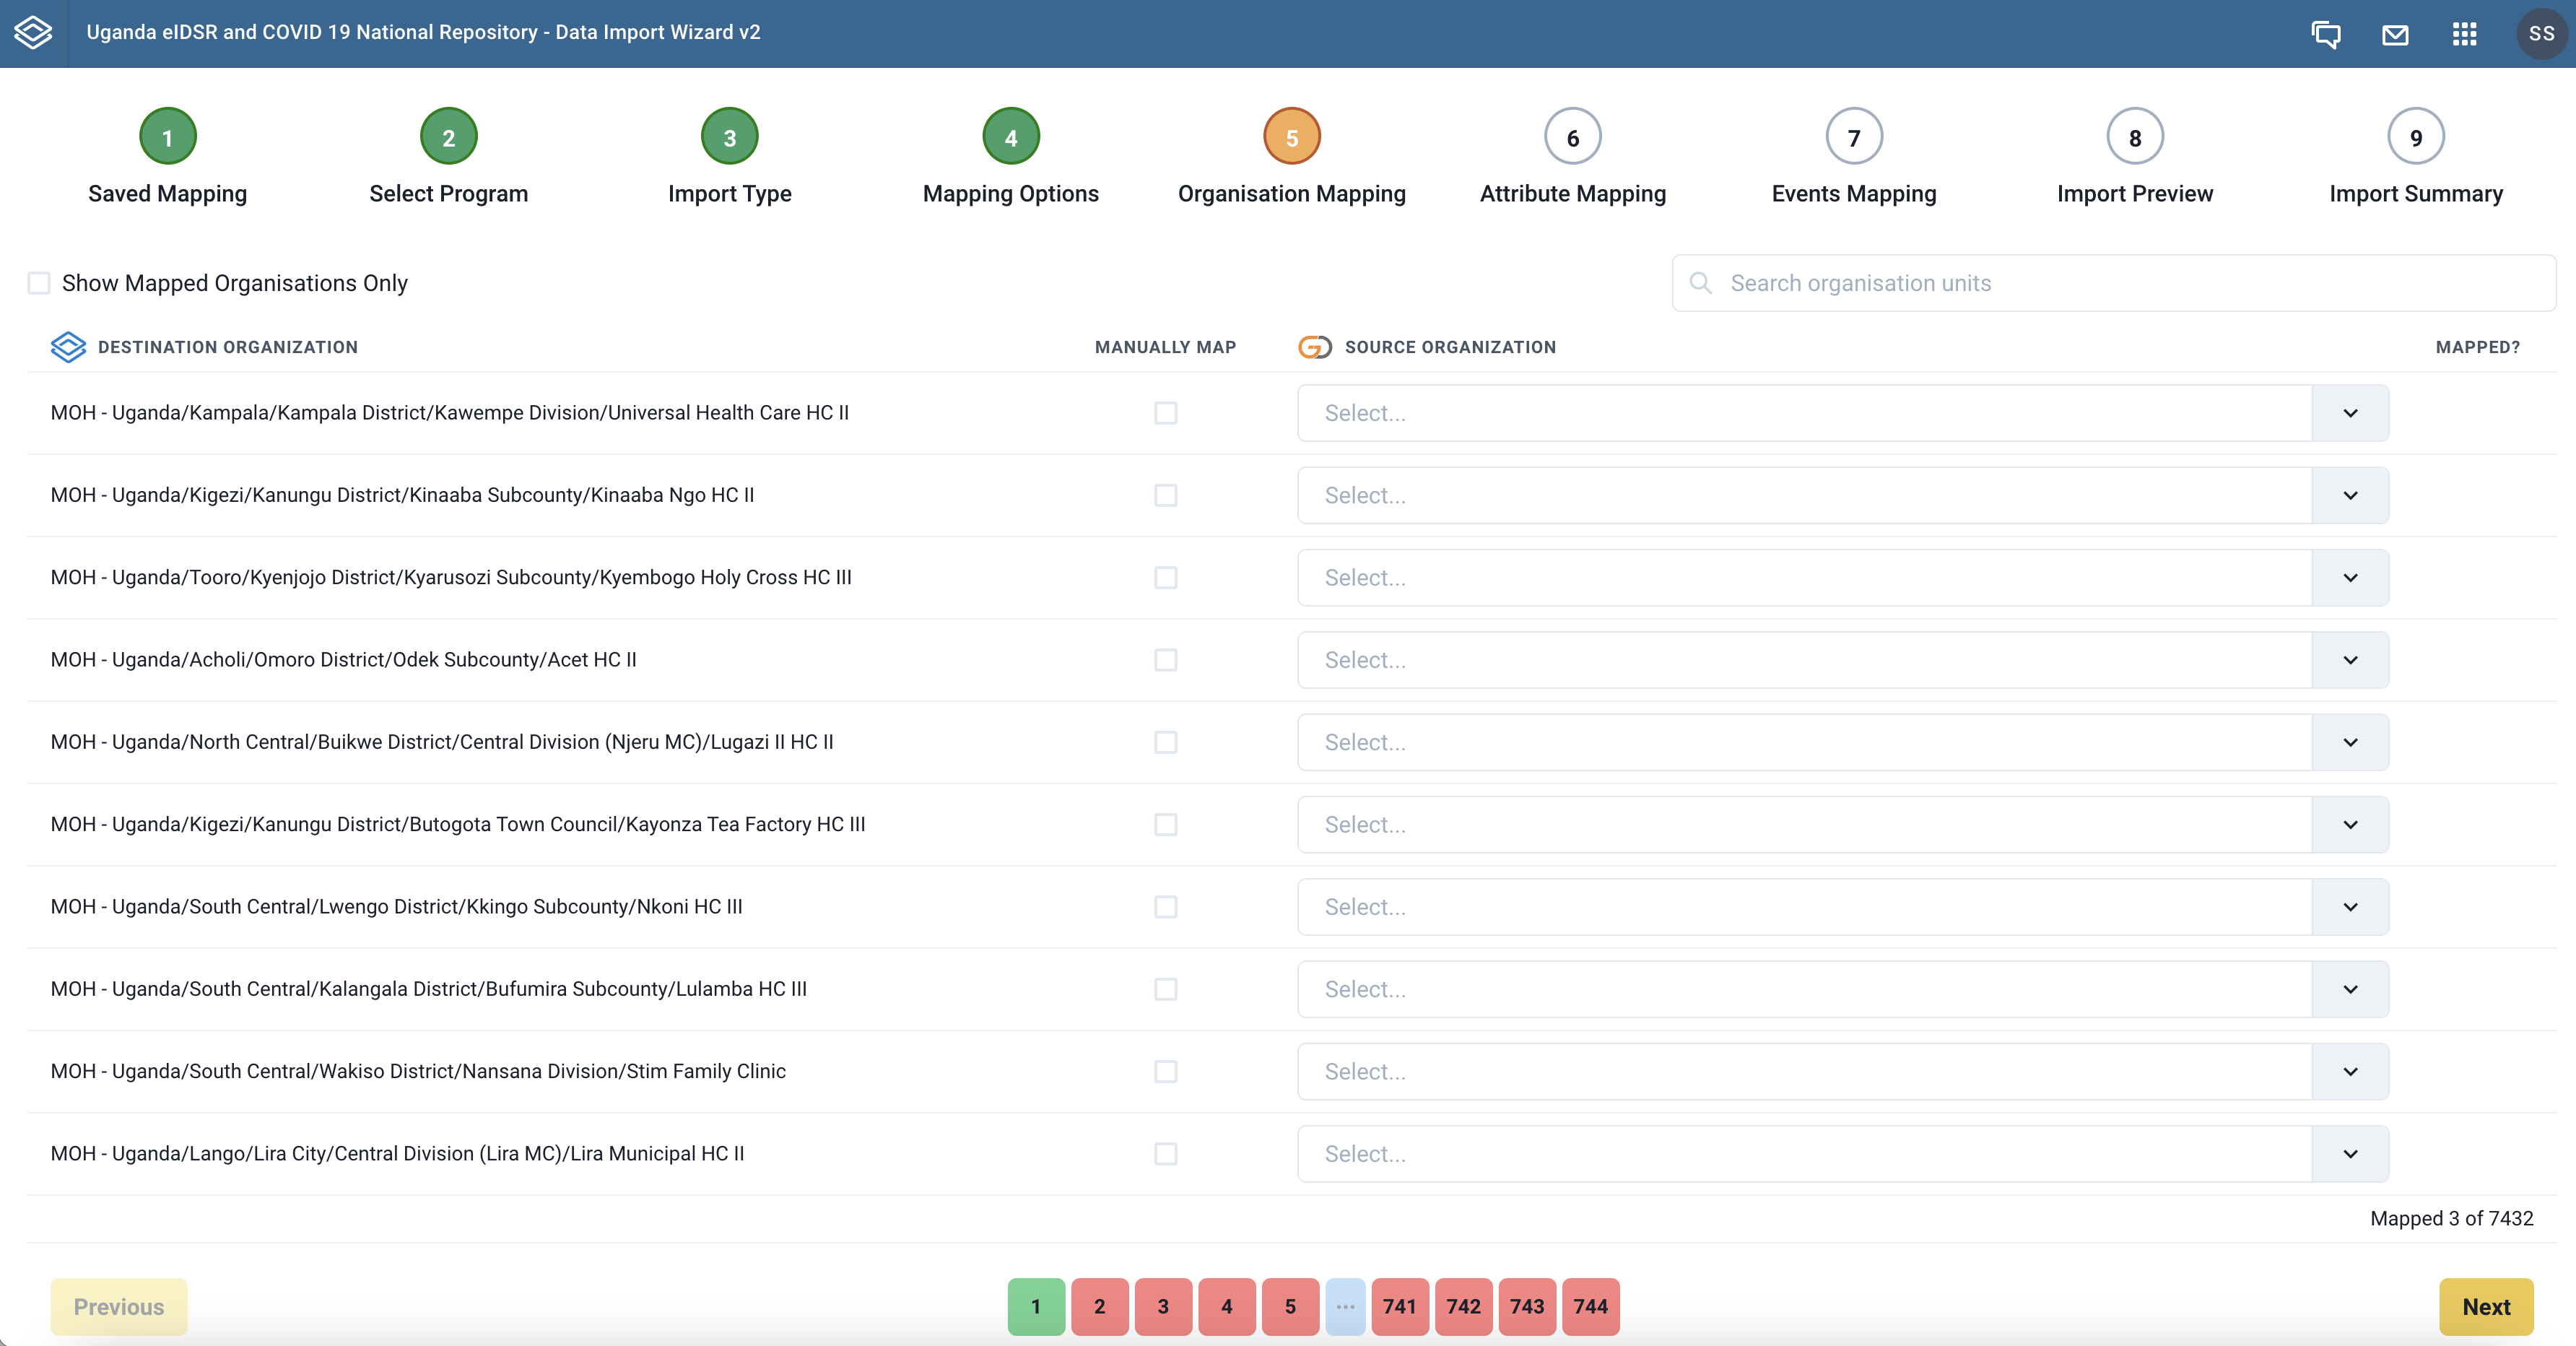
Step 4 - Mapping locations with DHIS2 Organisation Units
This step shows the list of organisation units in DHIS2 and makes a provision for selecting a field that is used for mapping each organisation unit to a Go.Data location.
 |
|---|
| List of organisation units to map |
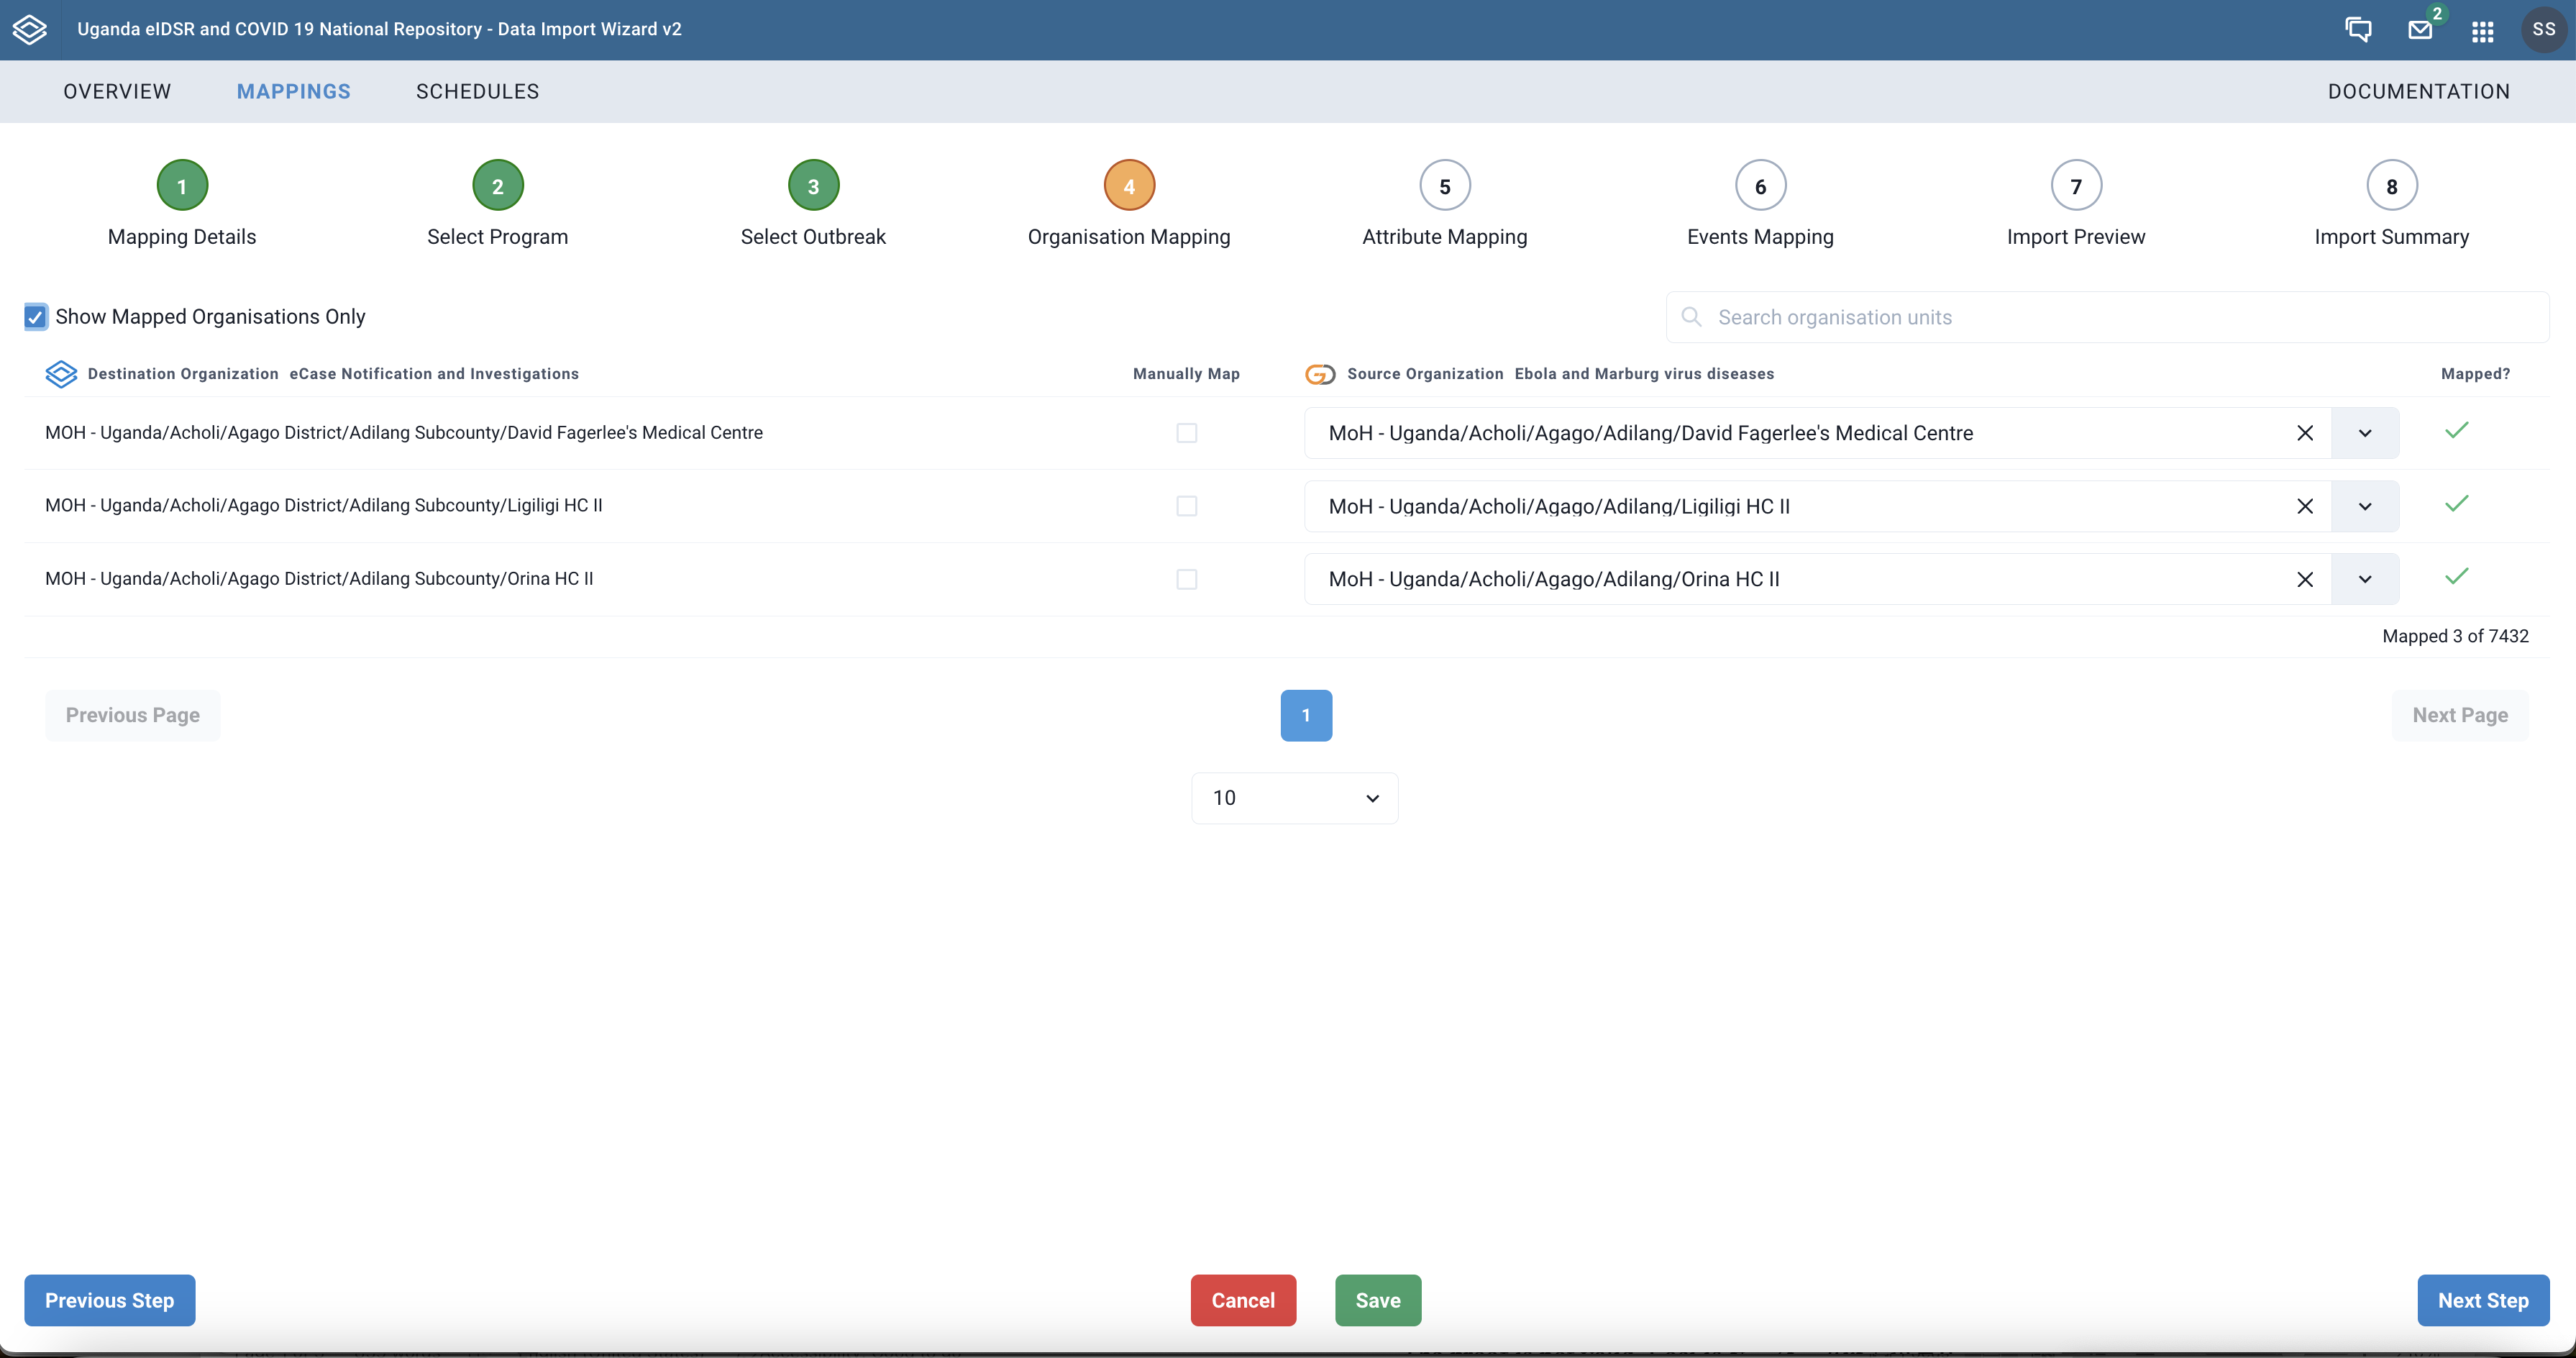
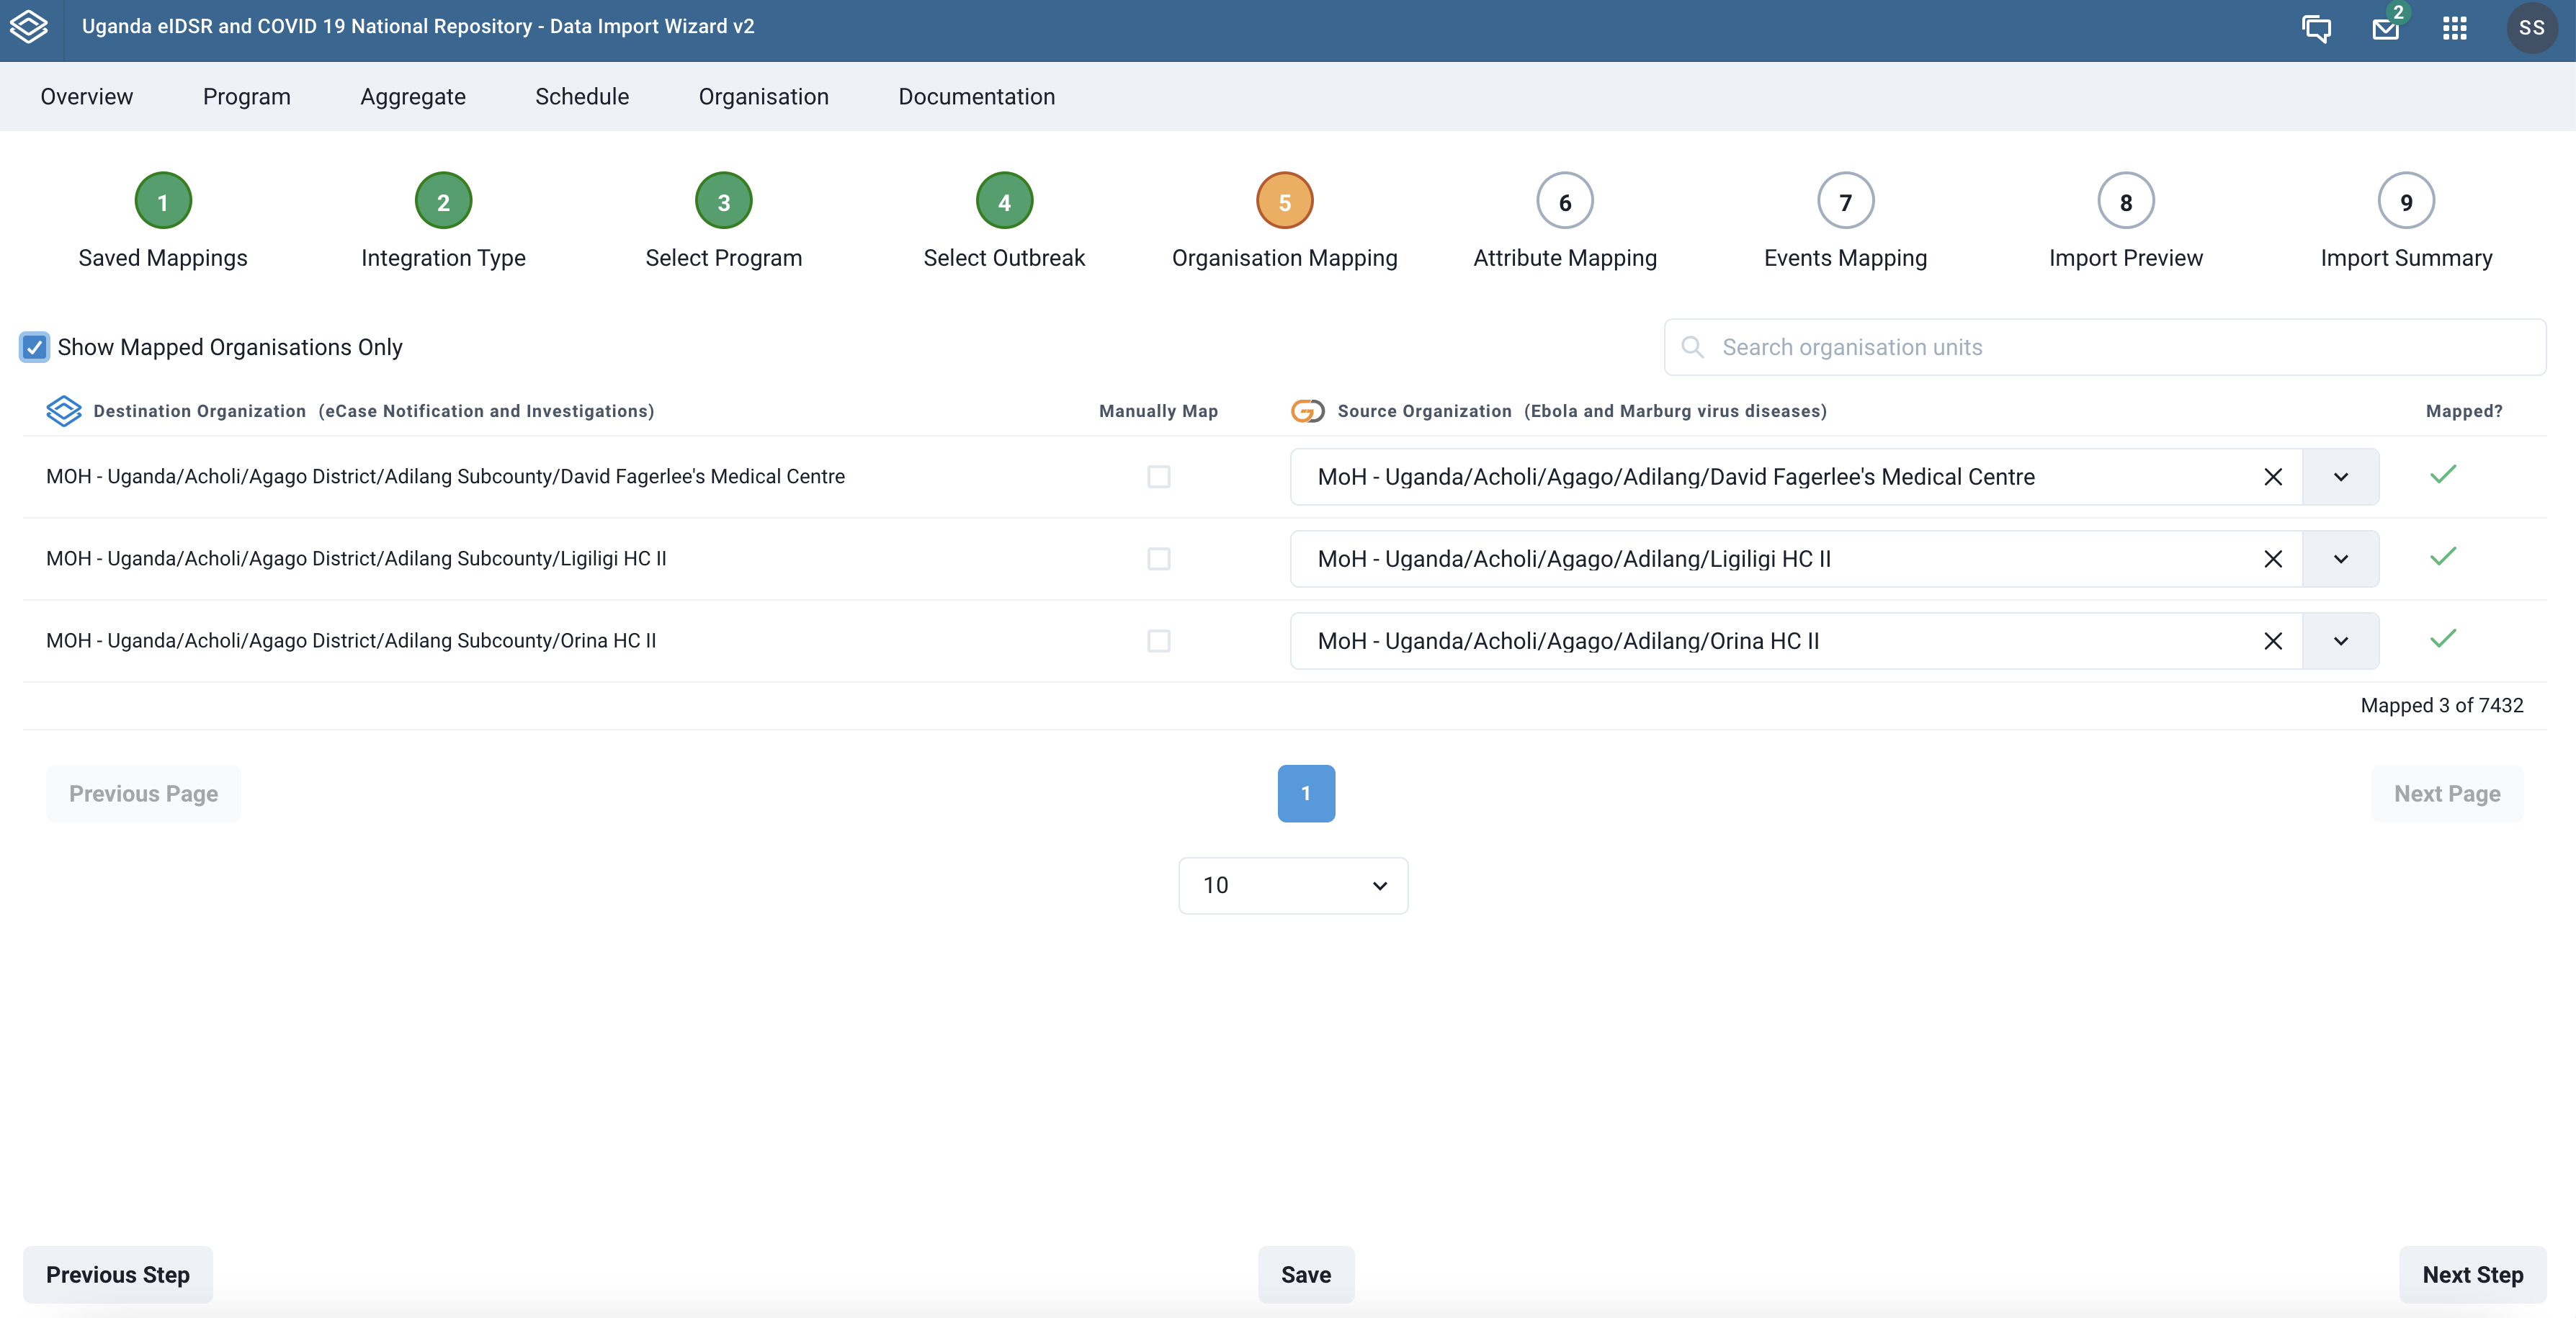
After mapping locations, you can check the Show Mapped Organisations Only checkbox to display the ones mapped so far. Remeber to hit the Save button to persist your current mapping.
 |
|---|
| Listing of mapped organisation units |
You can also search through the organisation units using the search bar at the top right. This should help you to quickly look up an organisation unit you want to map. The listing will include the organisation units that match the search term.
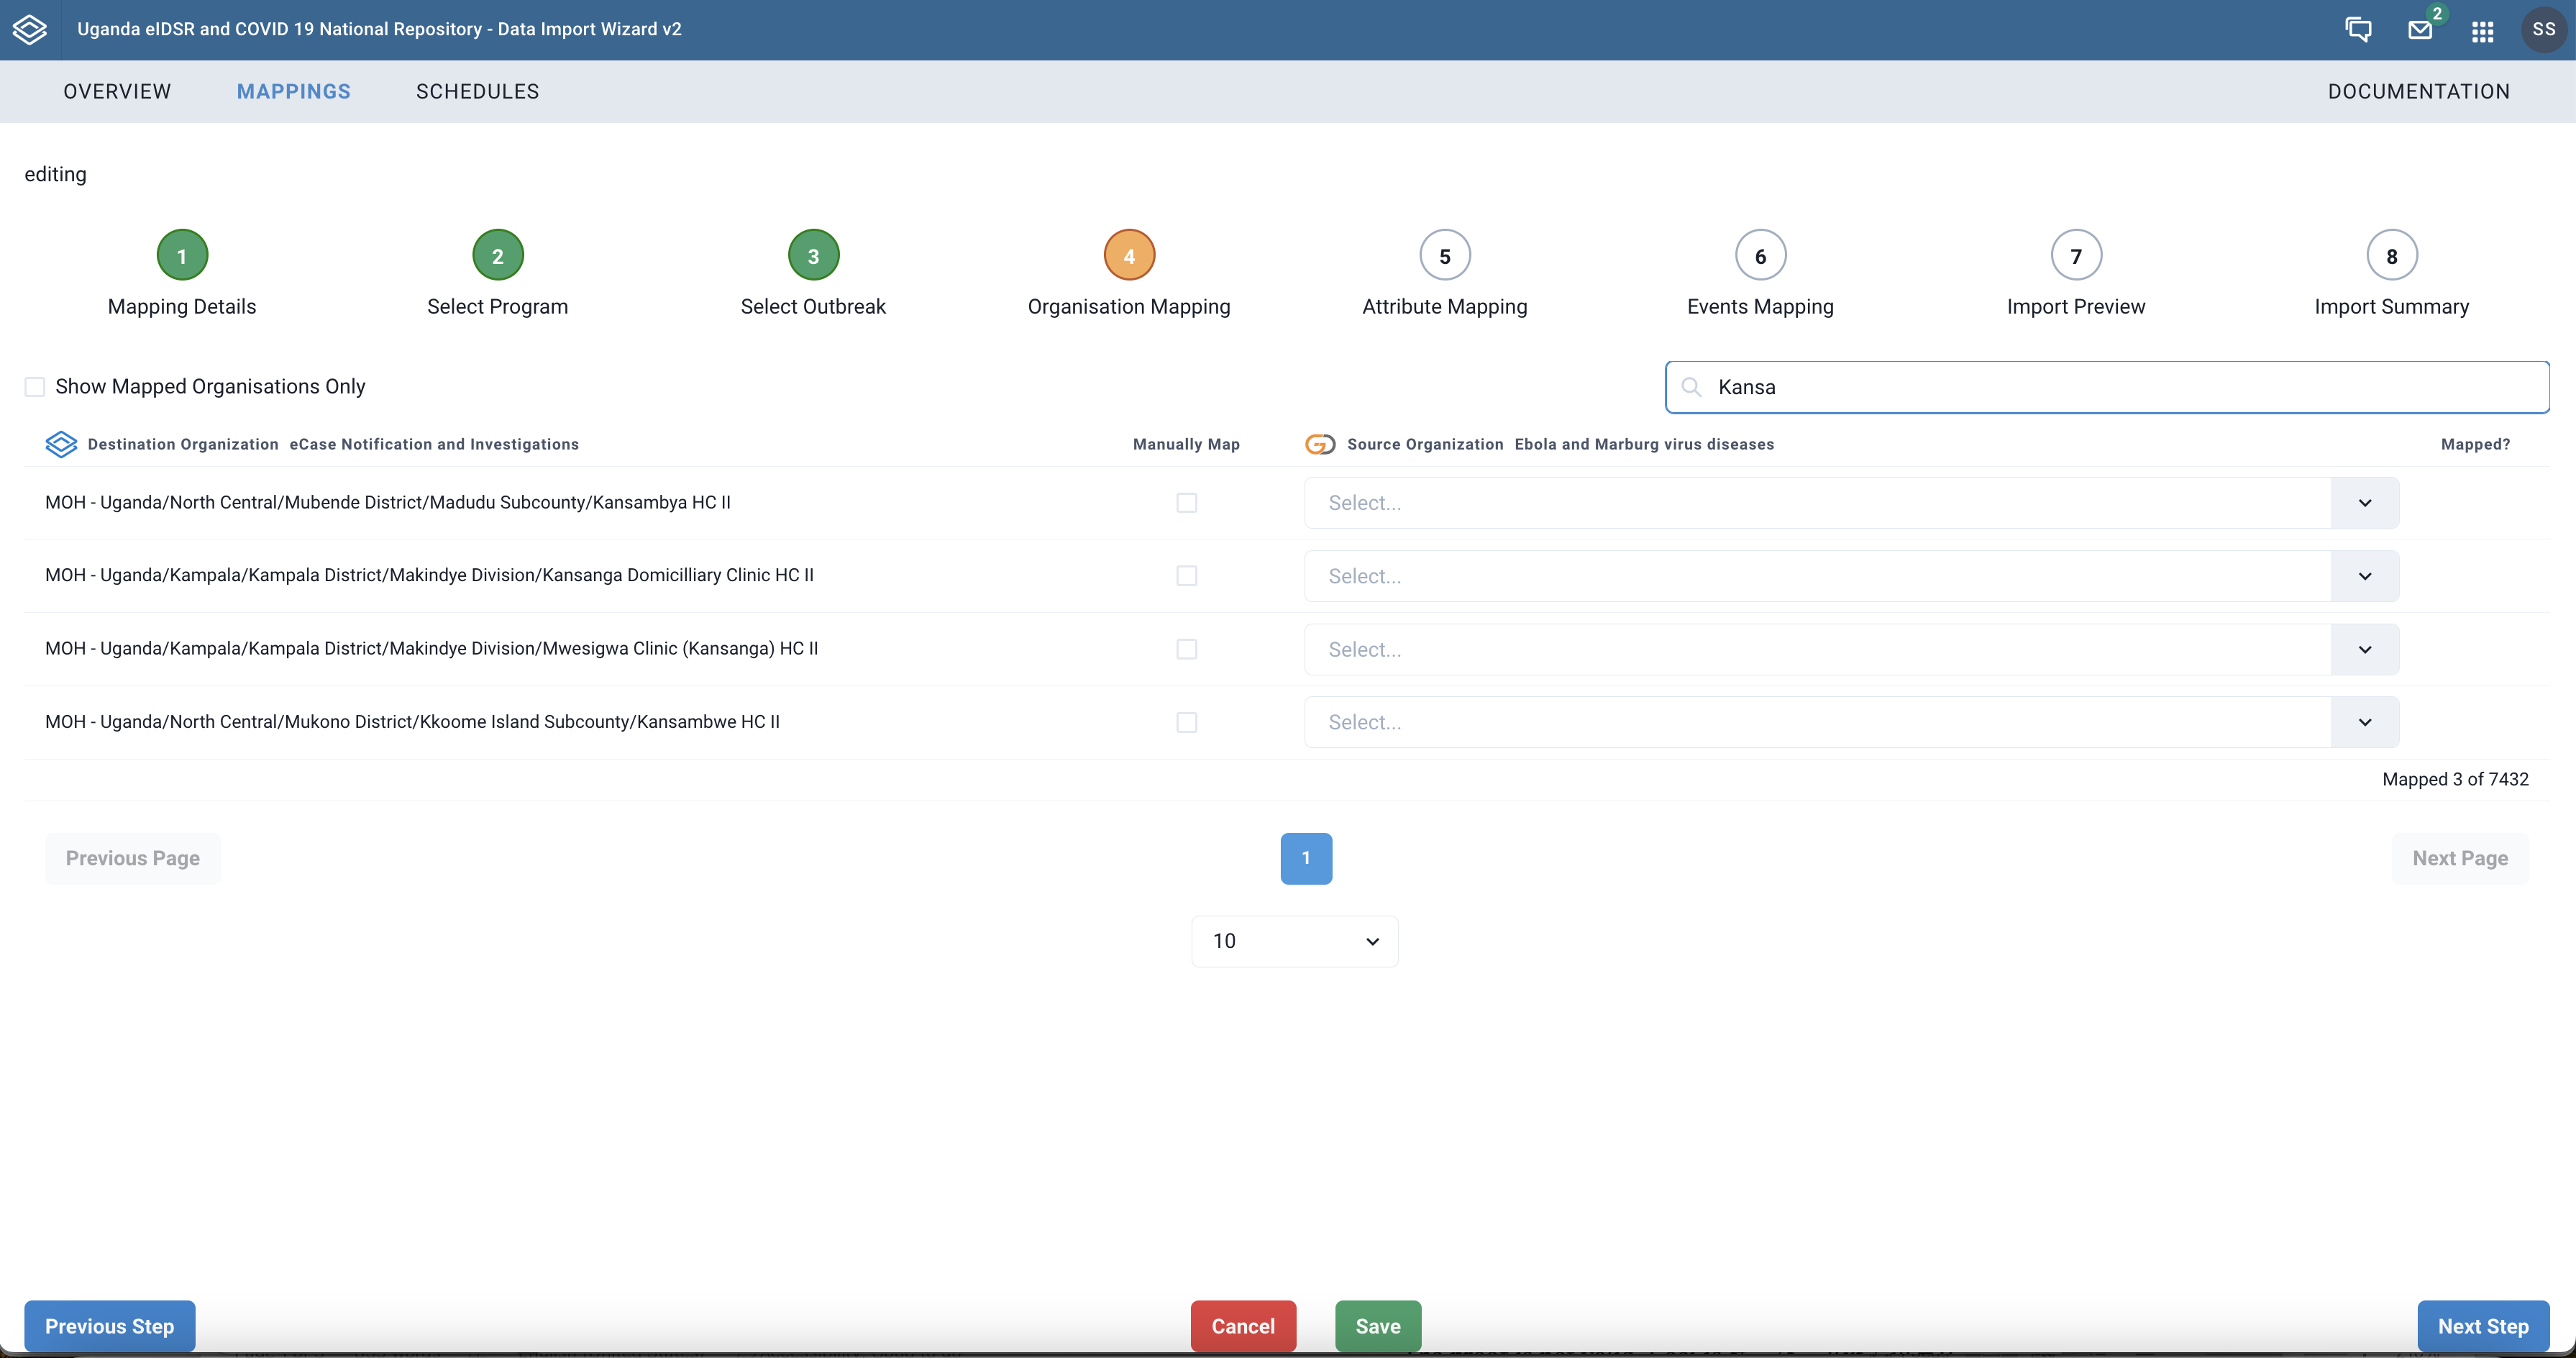 |
|---|
| Searching organisation units |
If the source location ids match the DHIS organisation unit ids, the import wizard will auto map for you the organisation units.
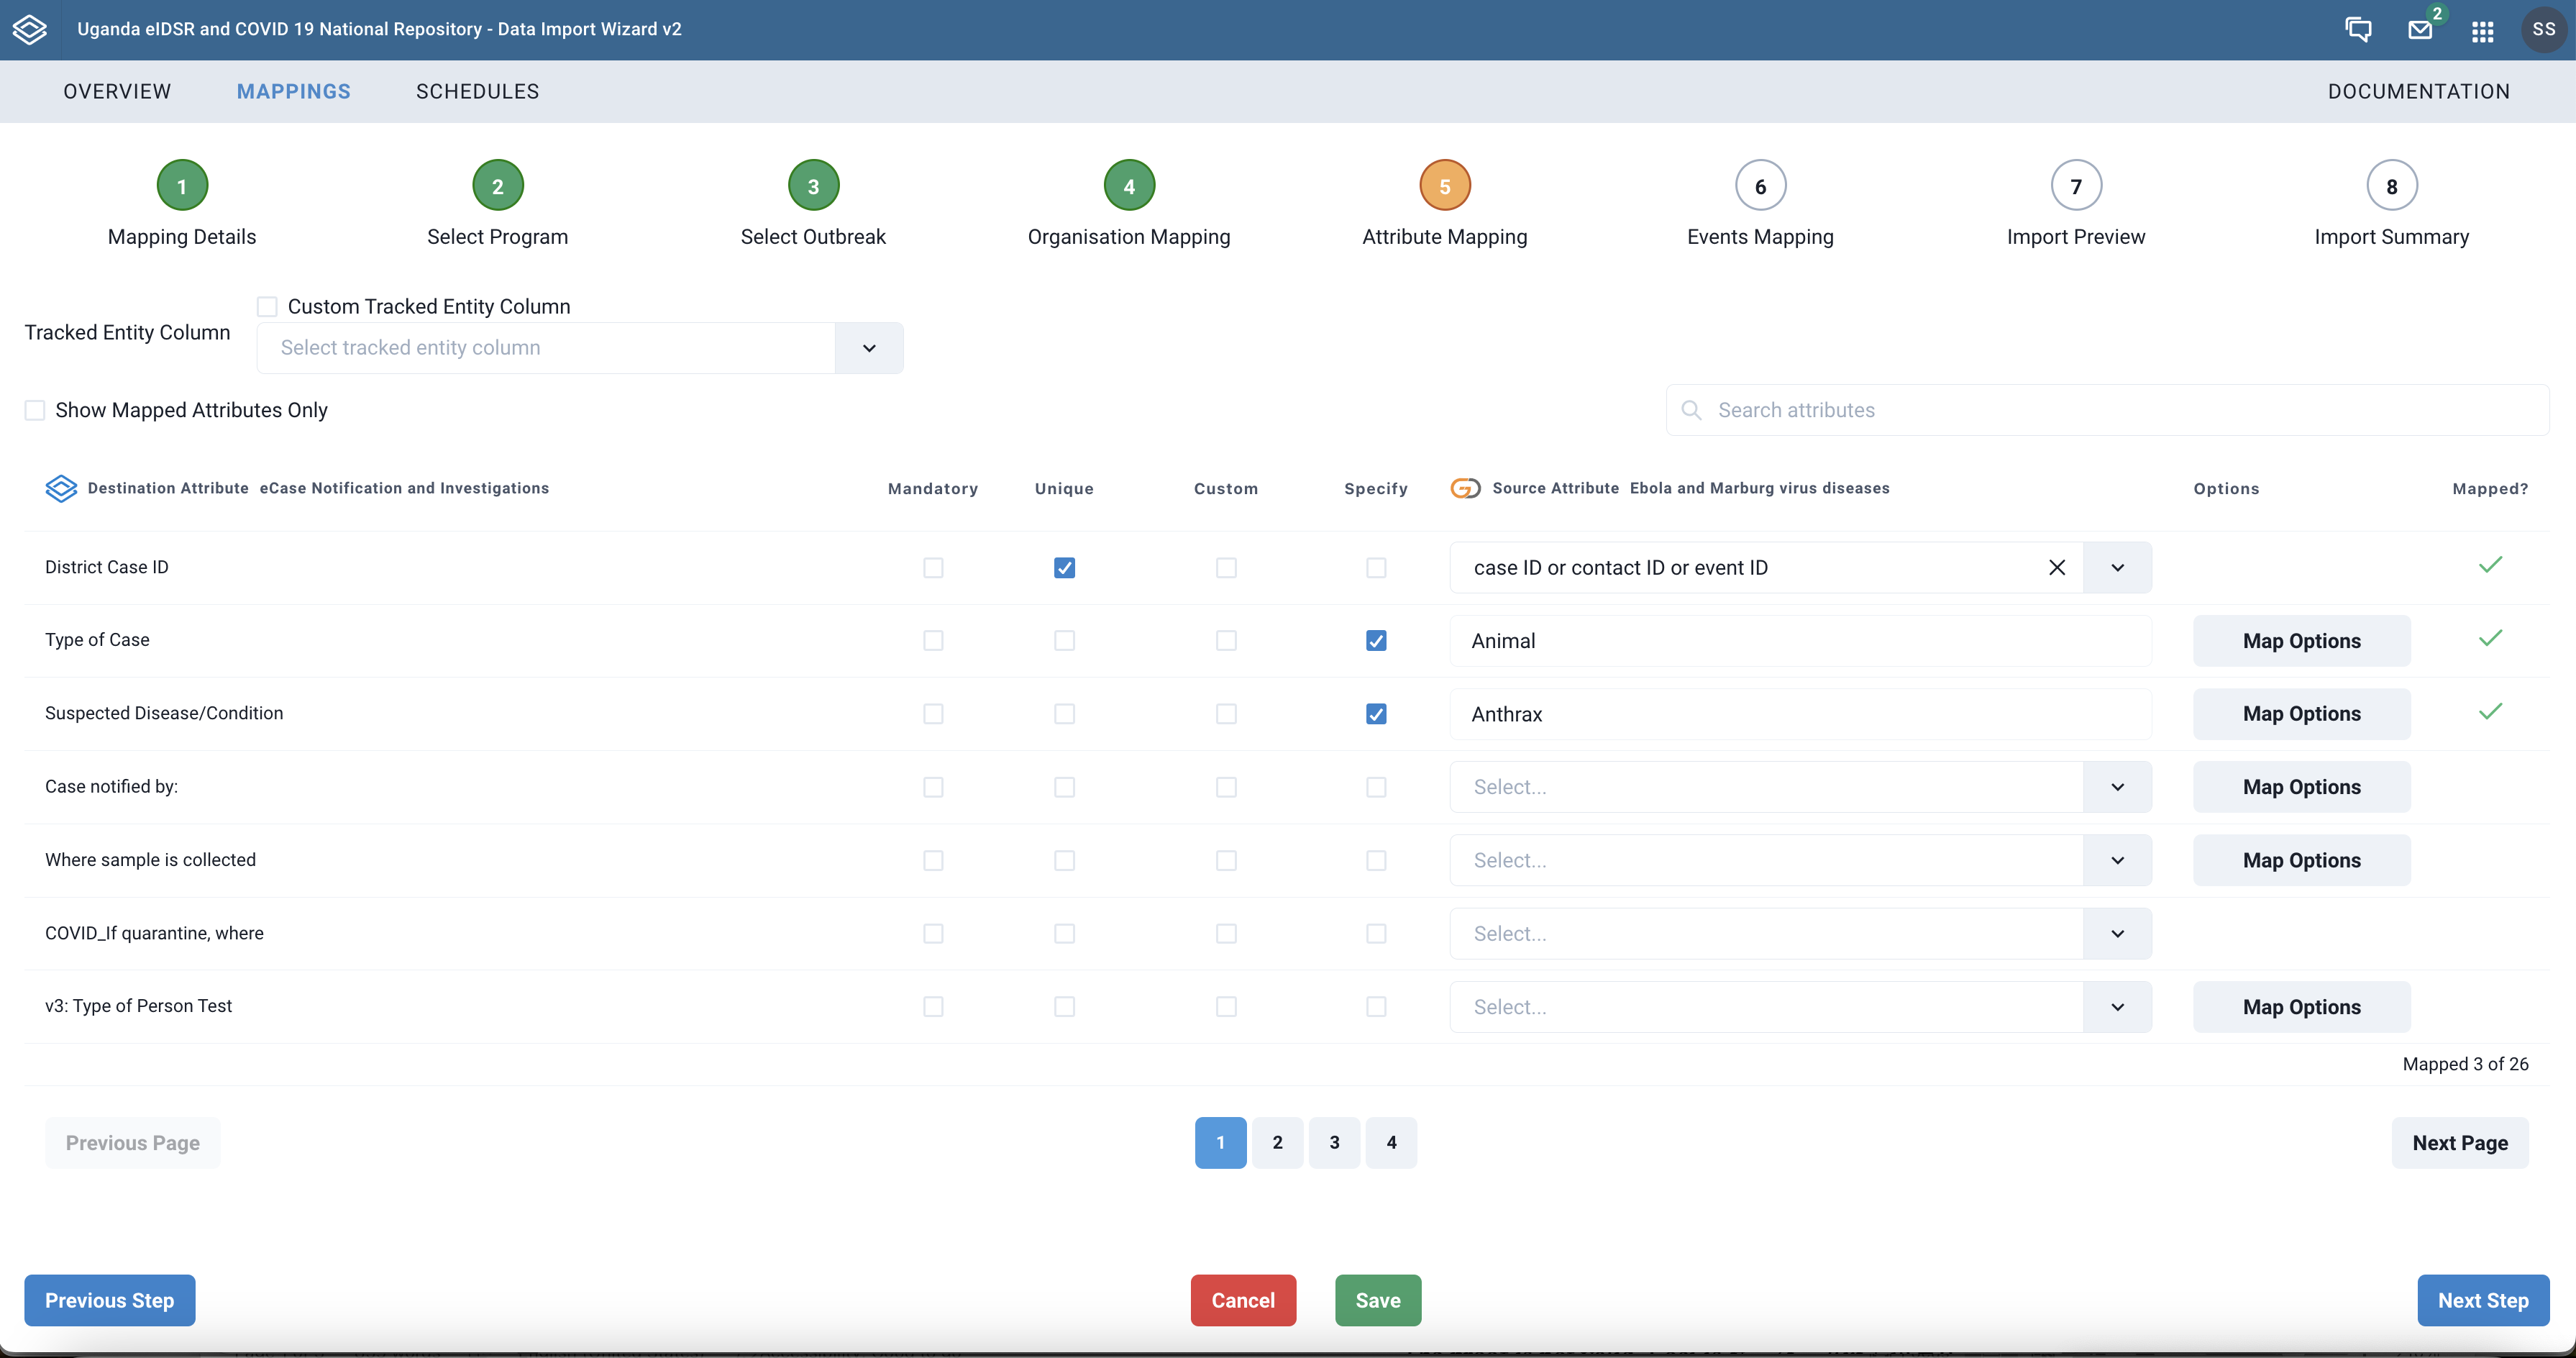
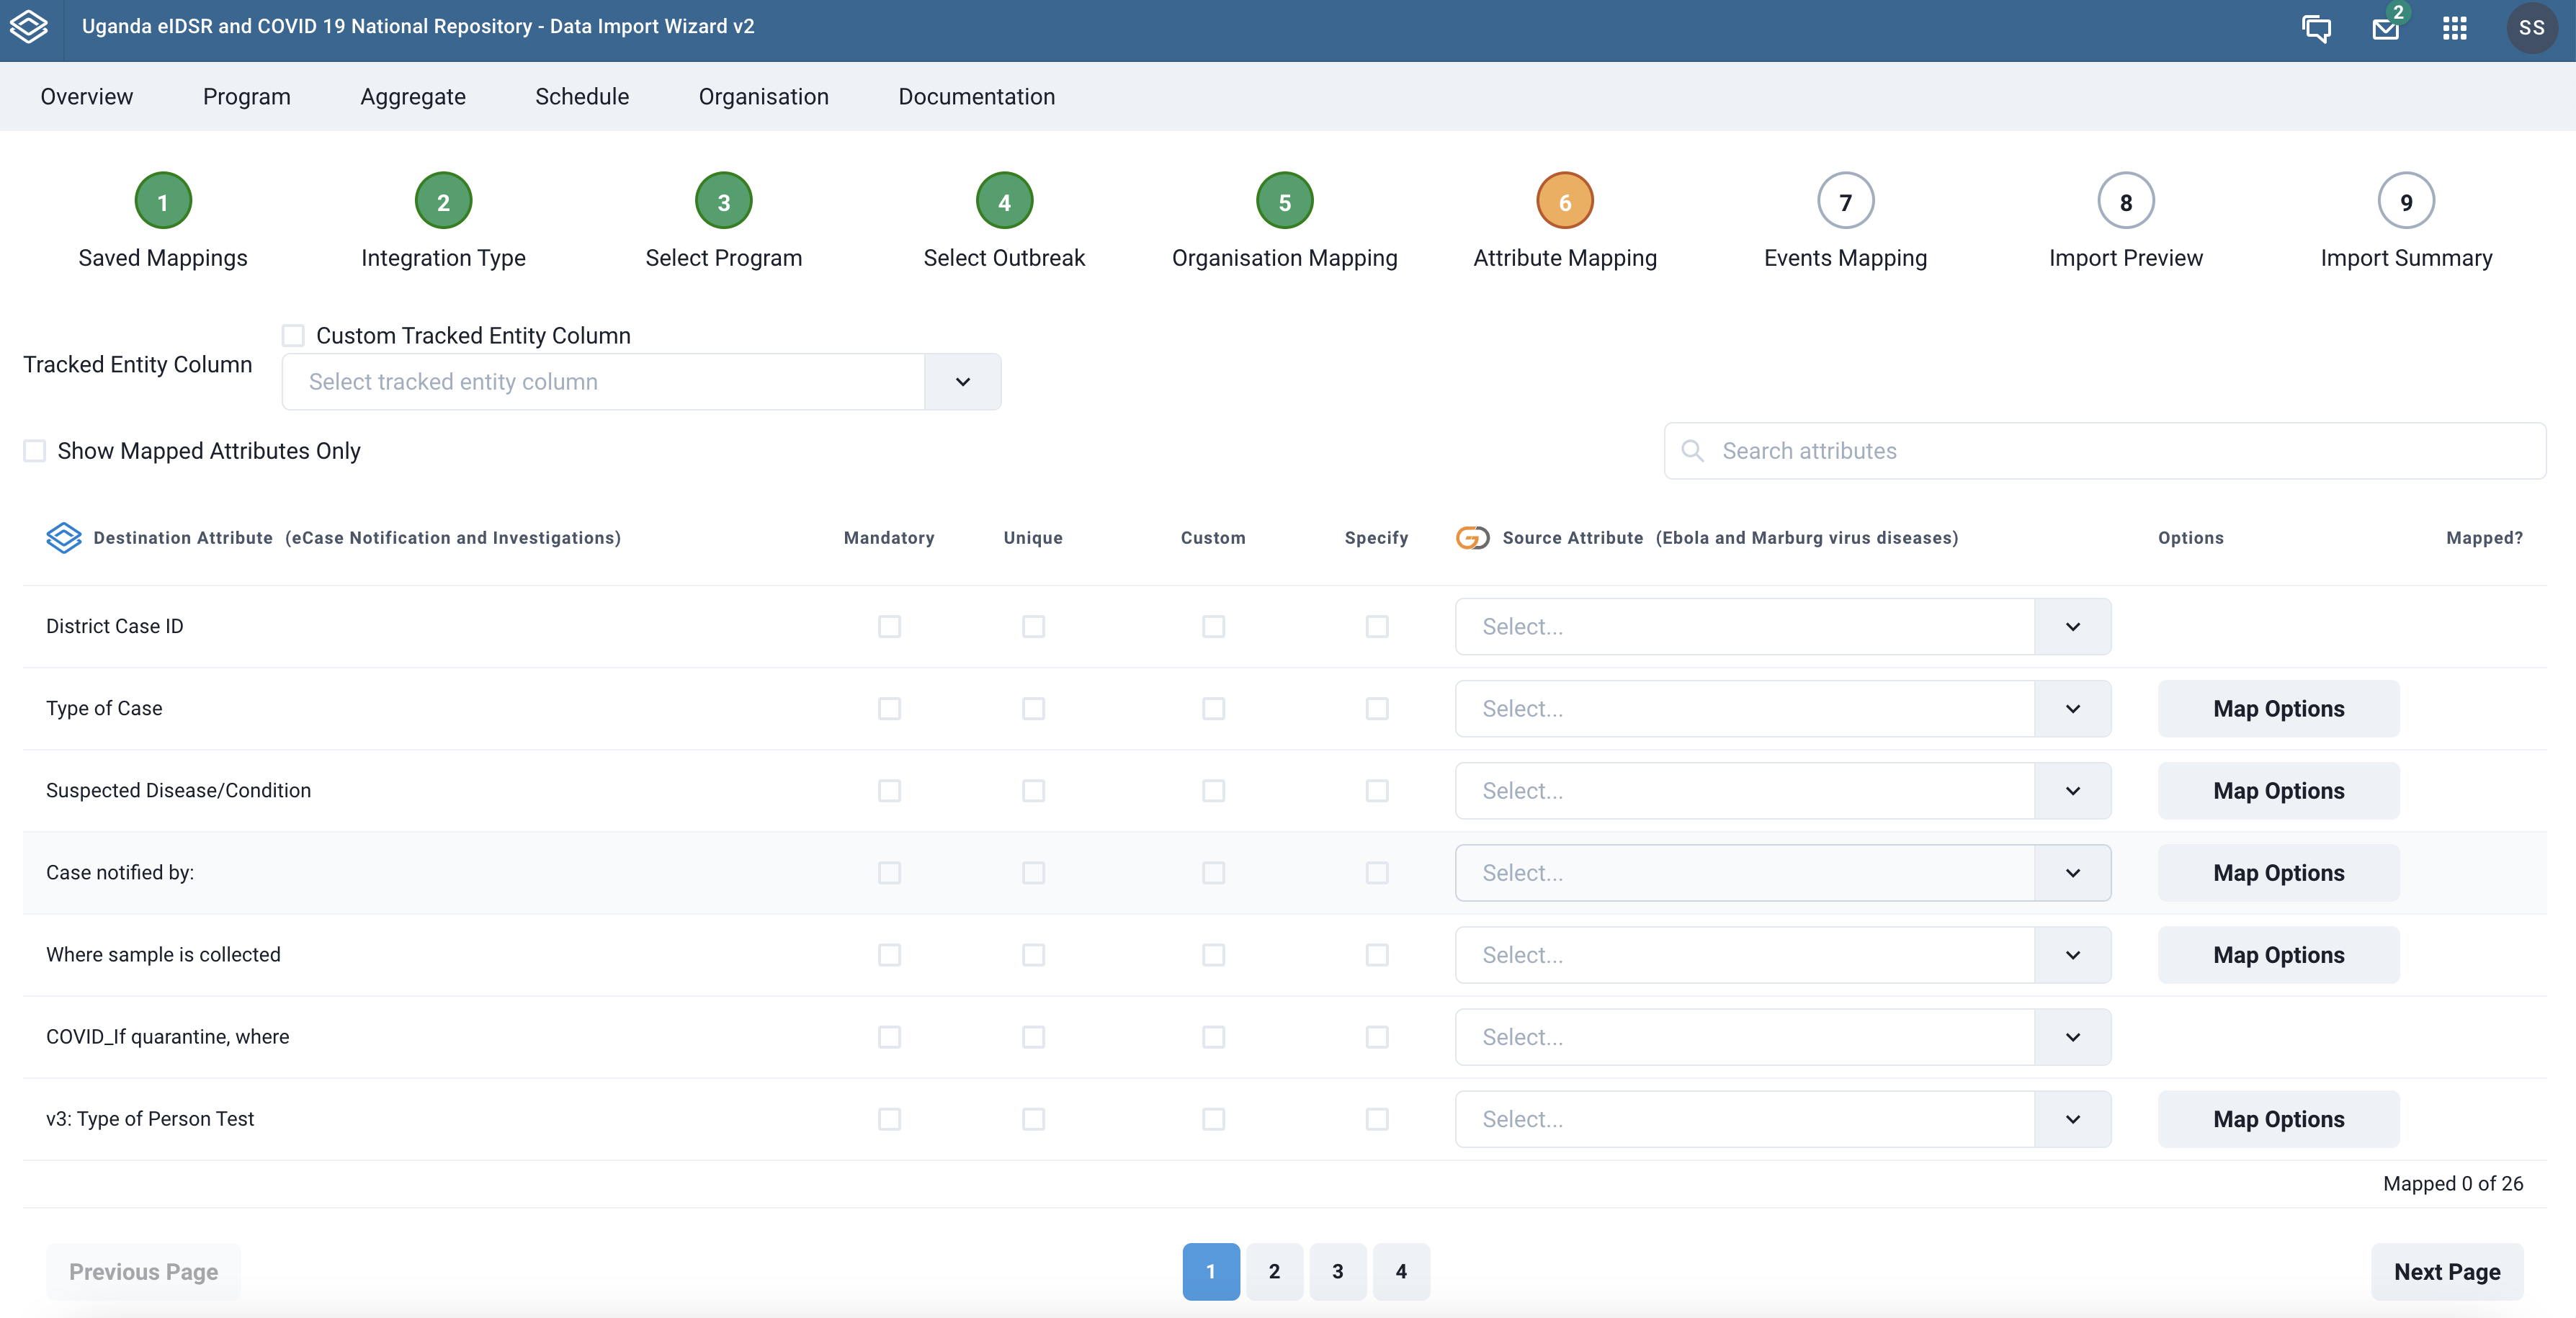
Step 5 - Map tracked entity attributes
In this step we match the tracked entity attributes for the DHIS 2 program with attributes from the source. Typically, a list of attributes in DHIS2 is displayed in a table where a select field is provided to aid the matching.
First, you choose the Tracked Entity Column in your source data from the dropdown provided or you check the Custom Tracked Entity Column checkbox to specify a custom expression used to access it in your source data.
The attributes listed in the table can be marked as either mandatory, unique, custom, or specific by ticking the corresponding checkboxes in the table row.
 |
|---|
| Mapping program attributes |
- Mandatory - This implies that the attribute is mandatory in the destination system (DHIS 2)
- Unique - This implies that the attribute is unique in the destination system
- Custom - This is used if you can specify an custom expression to access the attribute in a JSON-based source.
- Specify - This is used when you want to specify a literal value instead of attempting to match with an attribute in the source system.
¶ Using custom expressions
When mapping an attribute, it is also possible to create a custom JSONPath-like mapping by ticking the checkbox in the Custom column. This is especially useful if the value of the attribute being mapped is deeply nested within the JSON object of data for Go.Data or JSON sources.
In the JSON below, if you wanted to map addresses and specifically the locationId of the PALCE_OF_RESIDENCE, you would use addresses[0].locationId as the custom expression to access the first address in your JSON object. addresses[1].locationId would instead match the locationId PLACE_OF_WORK. Note that in the addresses array, PLACE_OF_RESIDENCE is at index 0.
{
  "firstName": "Samuel",
  "addresses":[
    {
      "typeId": "PLACE_OF_RESIDENCE"
      "locationId": "1234567"
    },
    {
      "typeId": "PLACE_OF_WORK",
      "locationId": "9867654"
    }
  ]
}
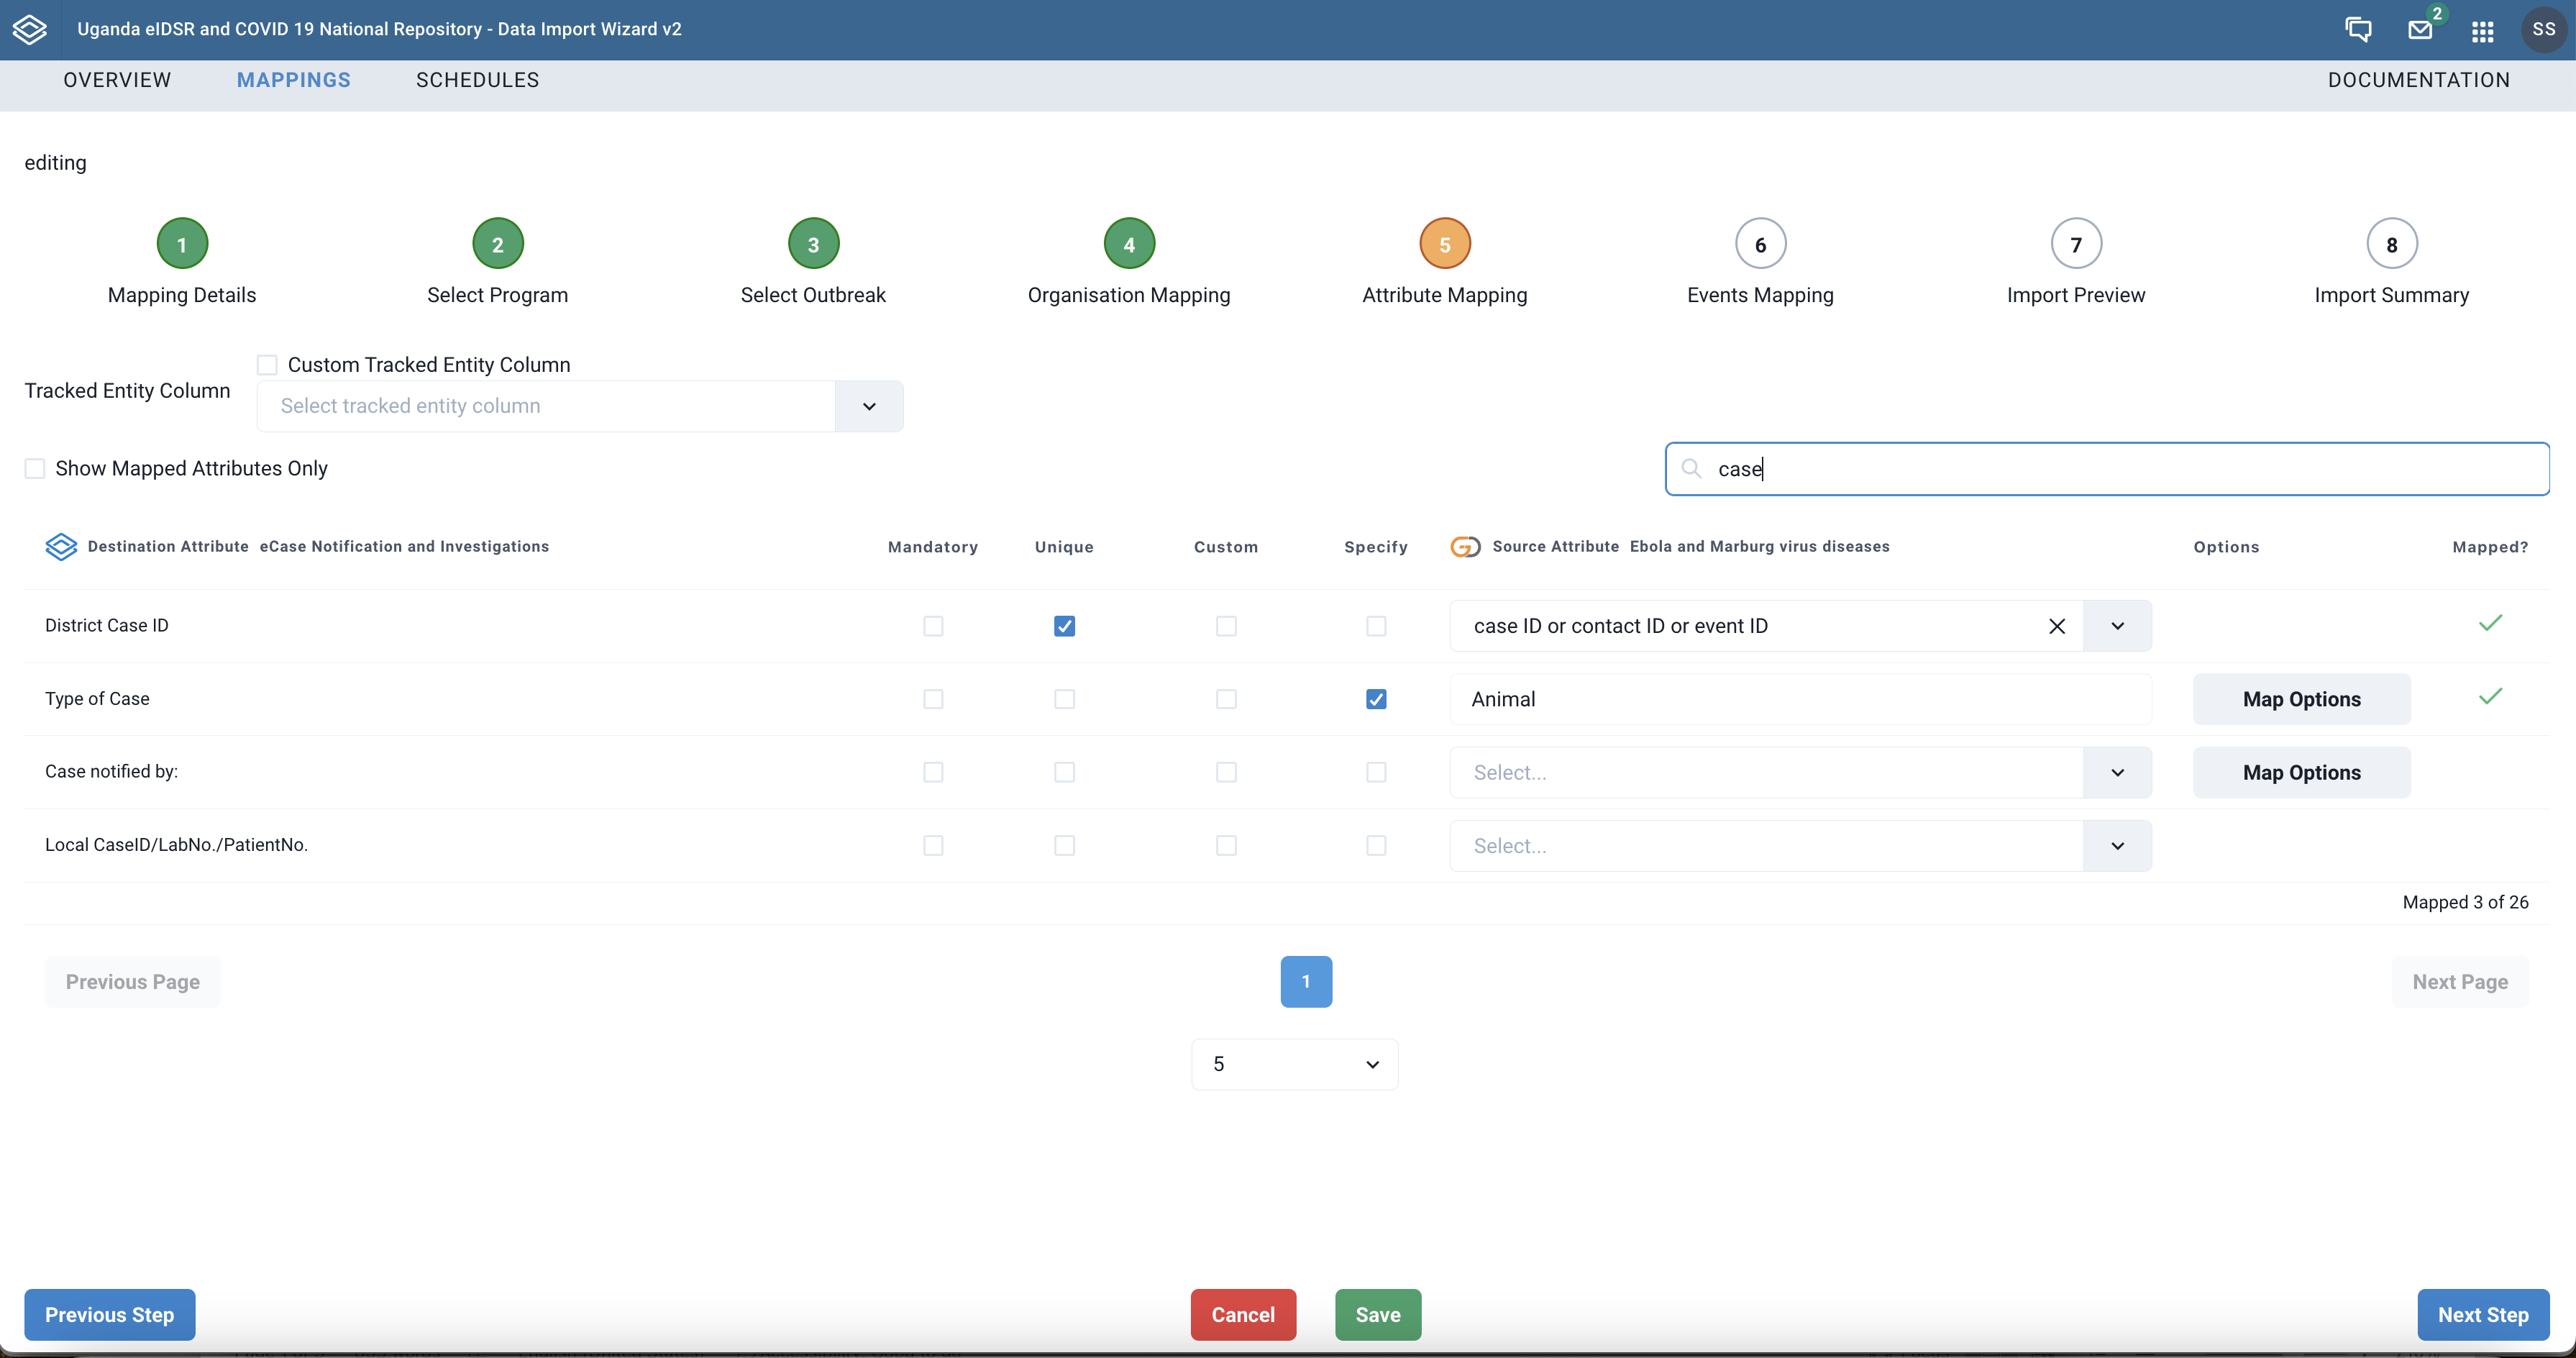
¶ Searching attributes
There is also a provision for a free-form search field that can be used to search through DHIS2 program attributes so that you can quickly map a specific one. In the image below we use the case search term to filter out attributes with case in the name.
 |
|---|
| Searching through attributes |
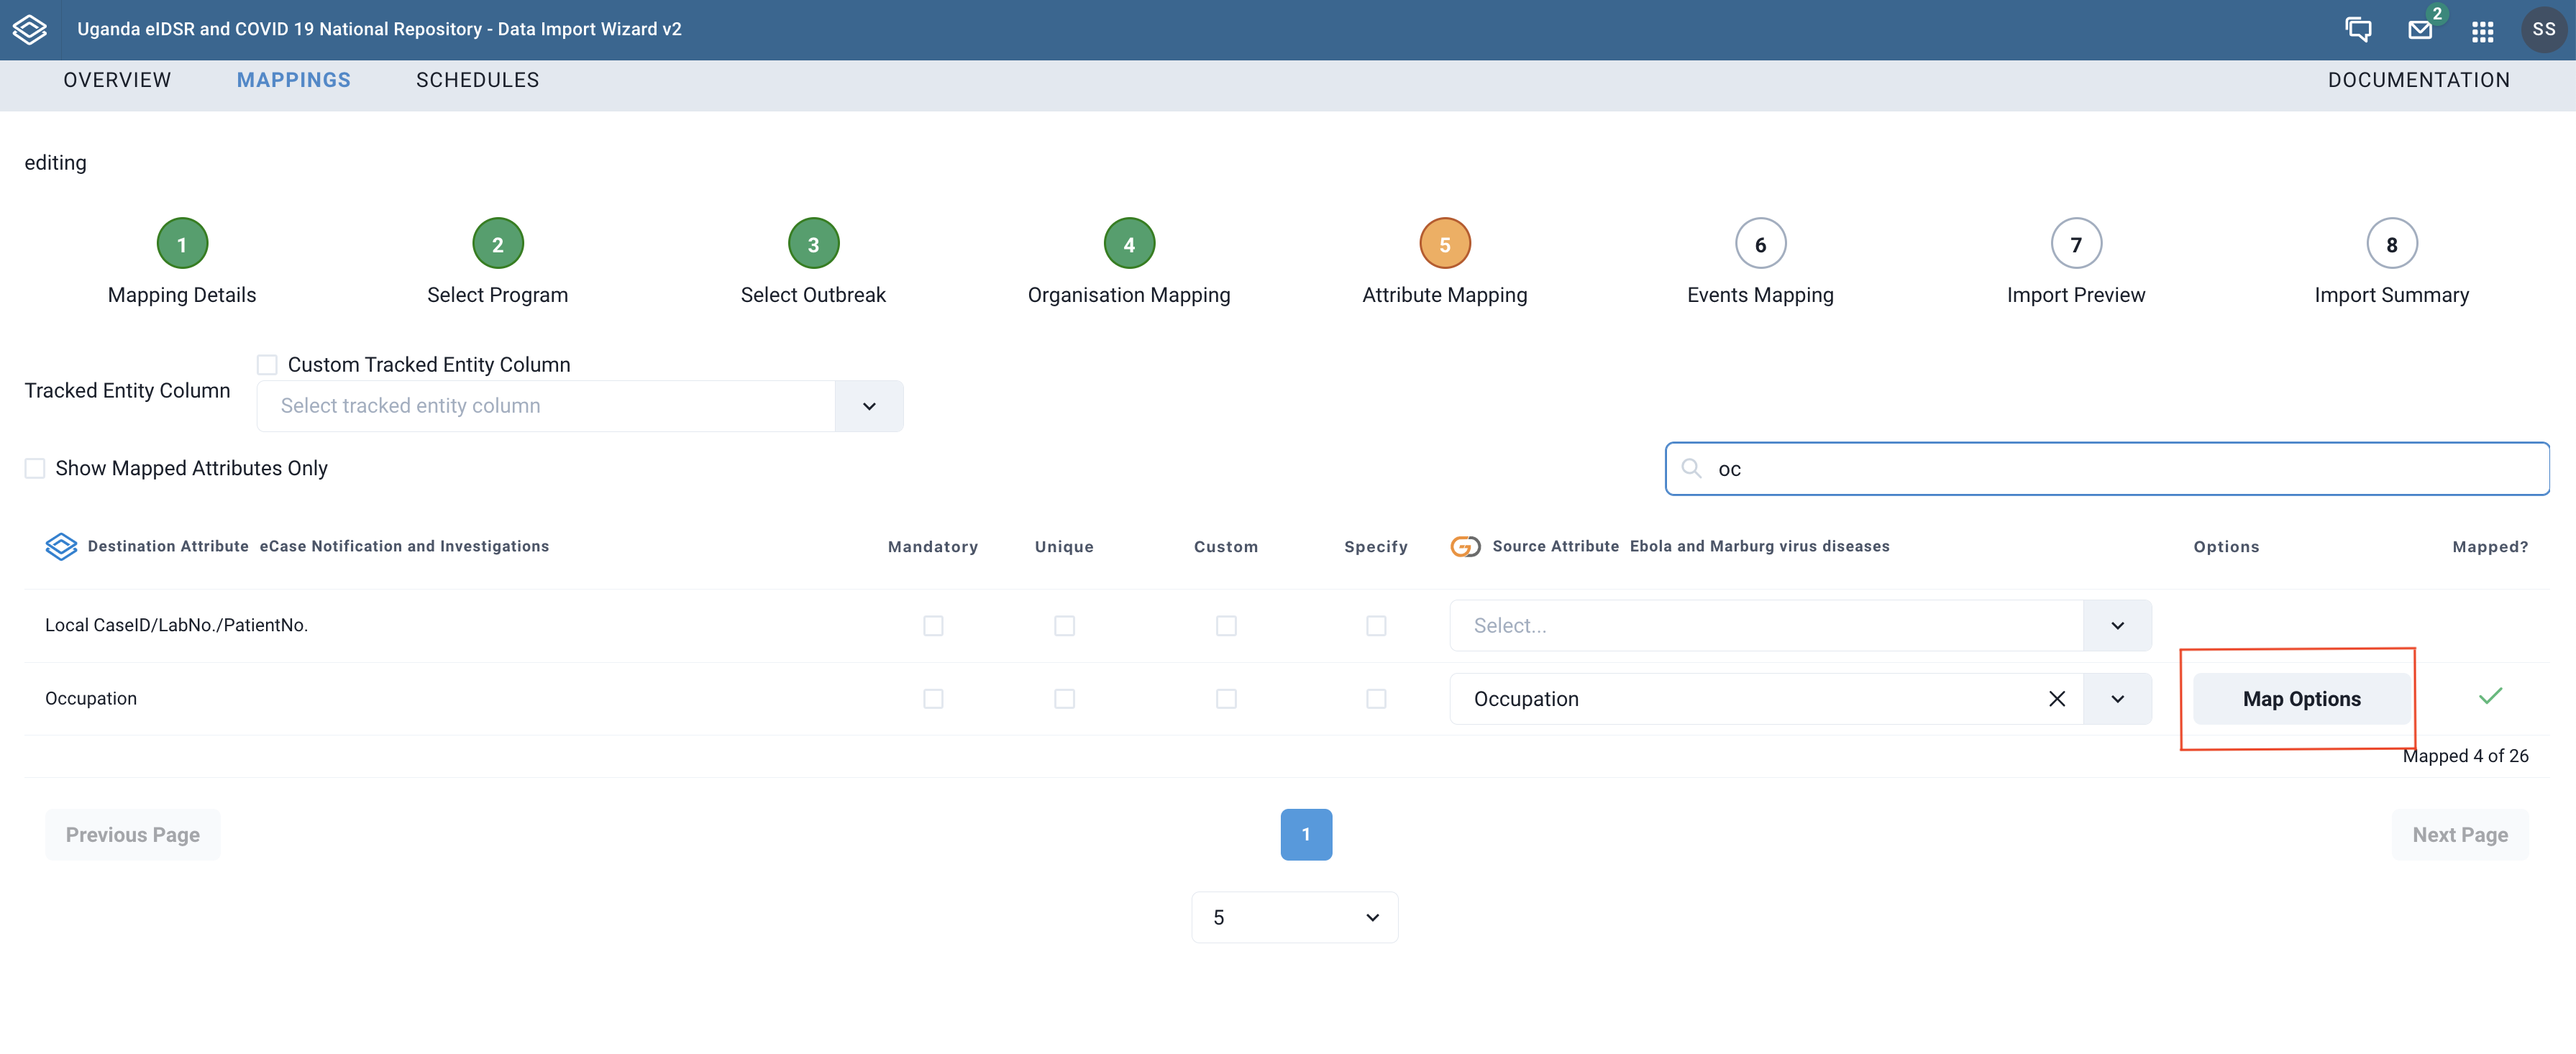
¶ Map Options
Sometimes you could be mapping an attribute which has an Option Set in DHIS2. In such a case, when you select the appropriate attribute from the source system, you have a Map Options button in the Options column that you can click to further map the options available as values for the attribute.
 |
|---|
| Attributes - Map Options button |
In the example below, we were trying to map the Occupation attribute in DHIS2 and Go.Data. The values available for occupations may differ in the two systems. Map options help you to align these values.
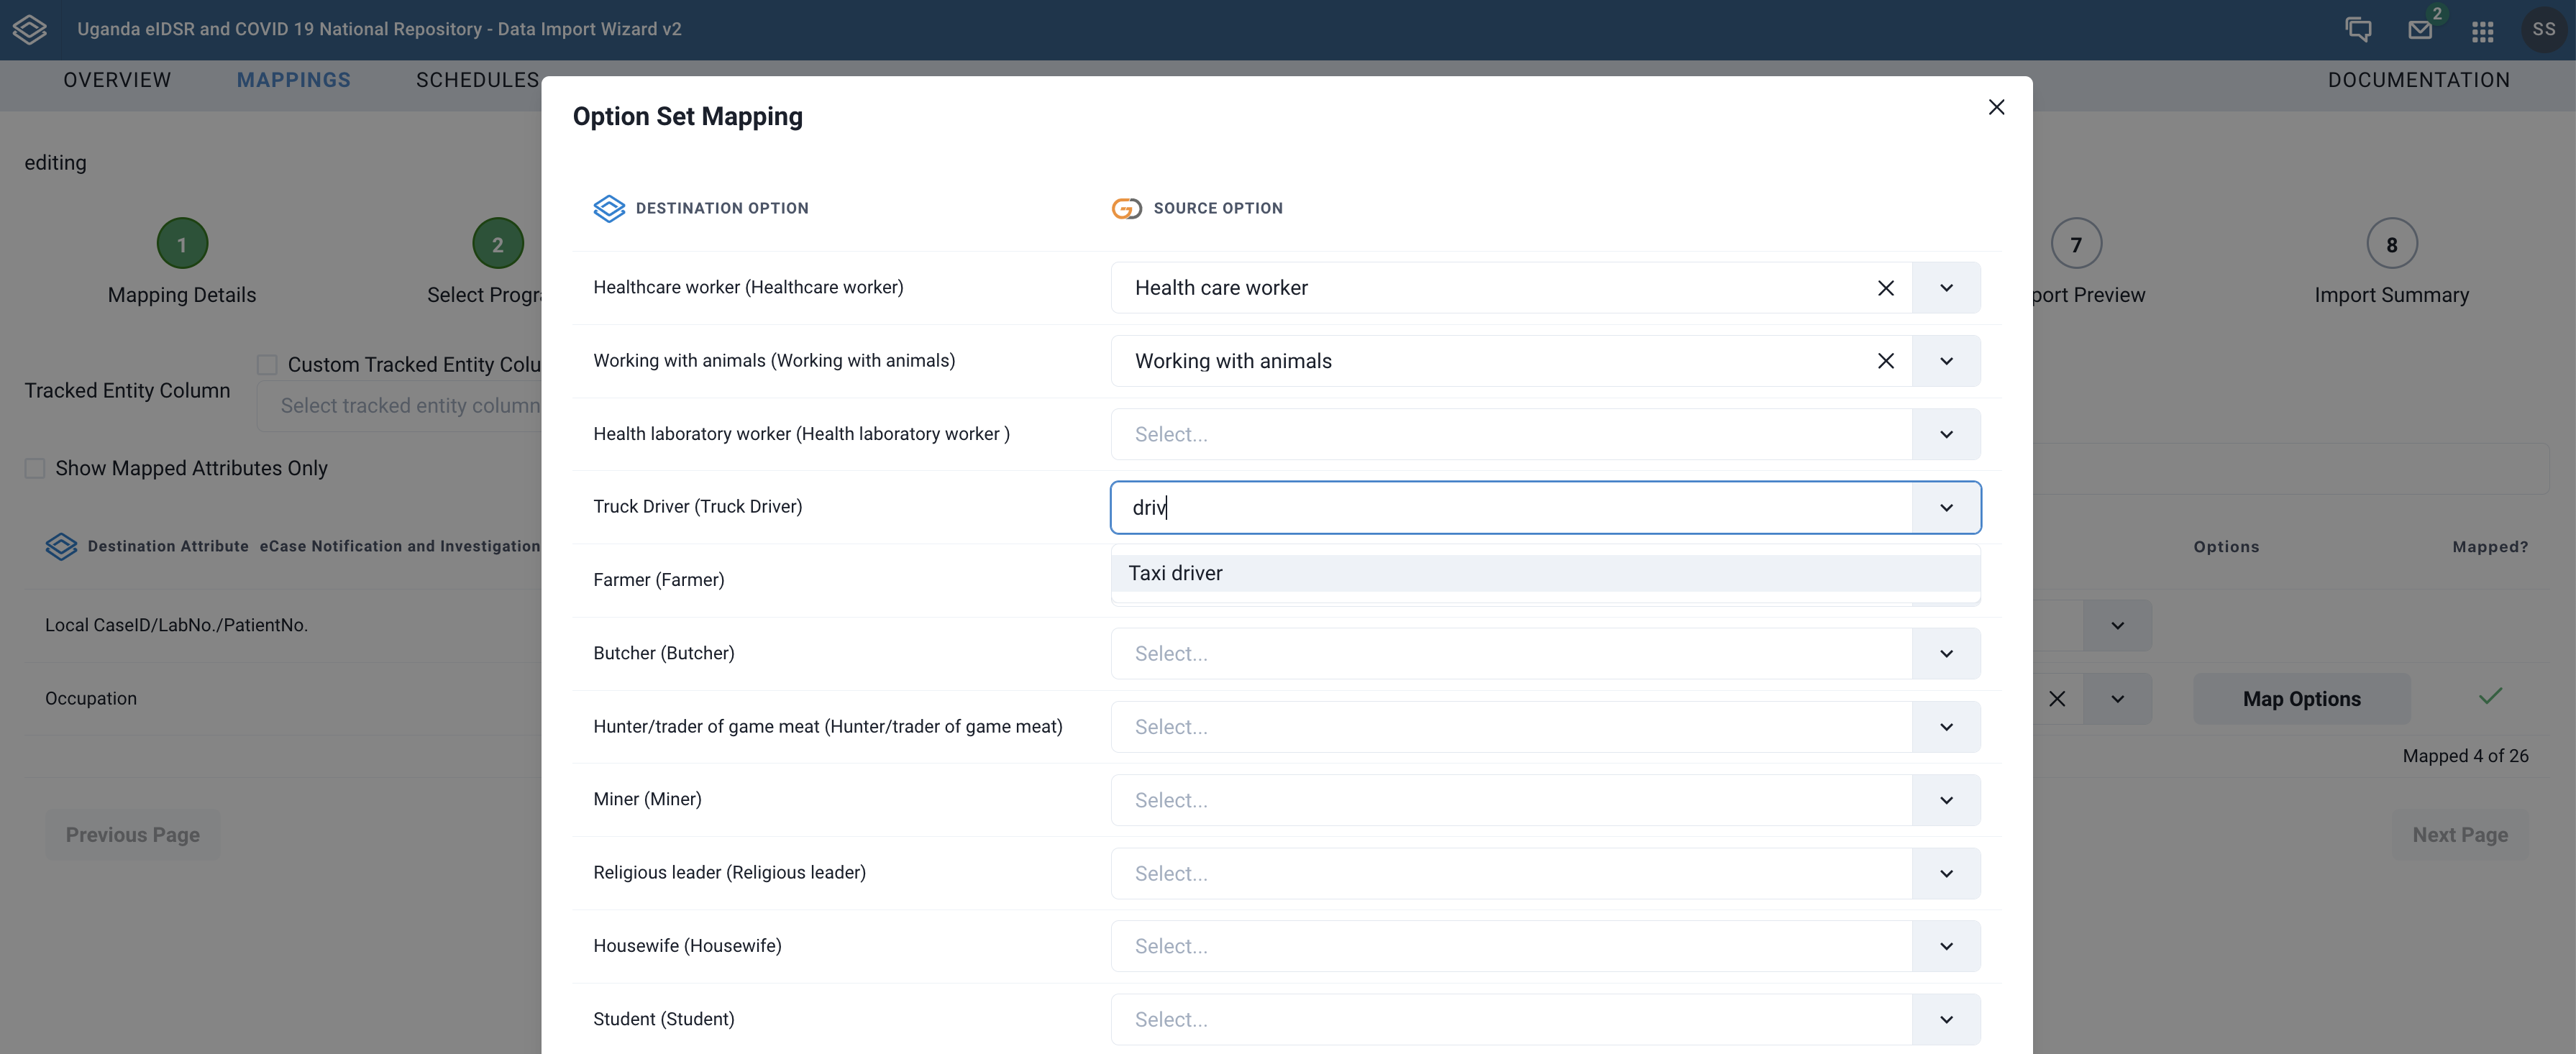 |
|---|
| Mapping attribute option values |
| DHIS2 | Go.Data |
|---|---|
| Healthcare worker (Healthcare worker) | Health care worker |
| Working with animals (Working with animals) | Working with animals |
| Truck Driver (Truck Driver) | Taxi Driver |
In the table above we show the options on the DHIS2 side and the representation in the source system (Go.Data). For DHIS2, we show the Option Lable and the Option Value in parentheses, as they may differ.
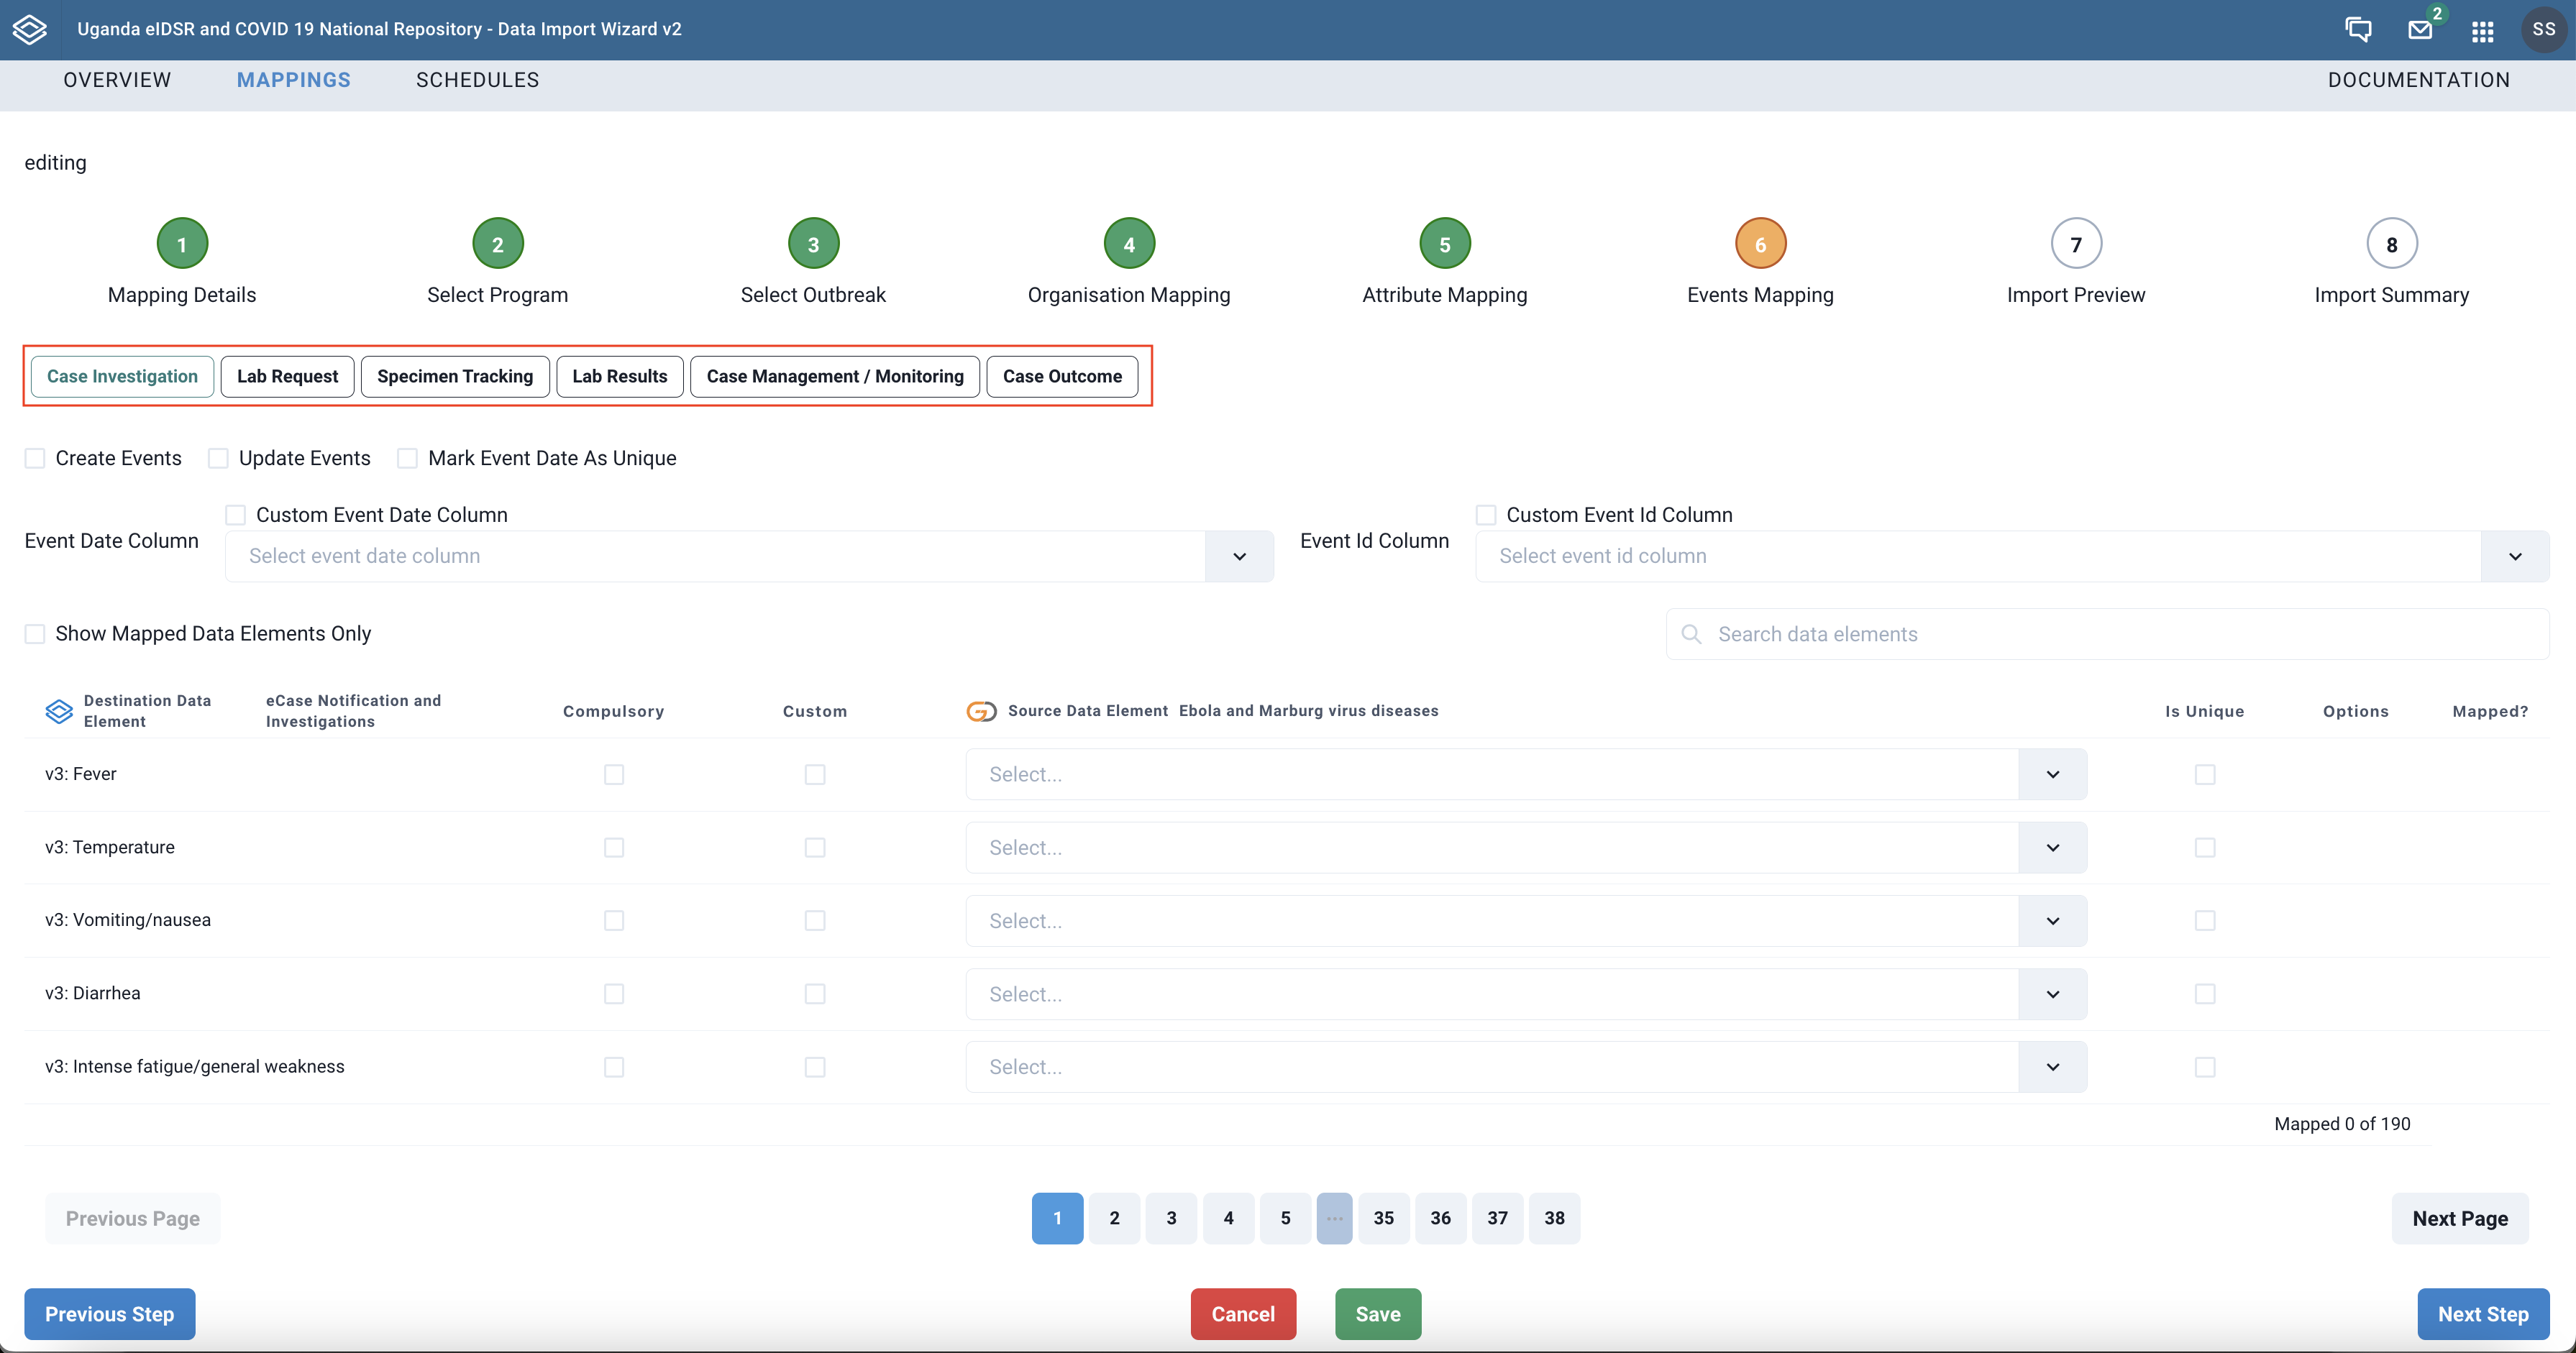
Step 6 - Map data elements in the available program stages
This step focusses on mapping data elements tracked in the different program stages of the DHIS2 event or tracker program to those data elements in the import source.
In addition to the data element mapping, we set some configuration on how the data is imported in the respective program stages. The available configuration options include:
Create Events- specifies whether to create events in current stage upon data importUpdate Events- specifies whether to update to update events when importing dataMark Event Date As Unique- When set, this option ensures that the event date is unique for the tracked entities in the specif program stage.Event Date Column- specifies what the event date maps to in the import source.Event Id Column- specifies what the event ID maps to in the import source. The IDs hould be valid DHIS2 UIDs.
Click on one of the program stages (marked in red in graphic below), right below the steps to see the mapping configurations and the data elements to map for the stage.
 |
|---|
| Event Mapping |
Remember to click the Save button at the bottom center of the page to save the recorded mapping.
Important!
At this point, a saved mapping can be used to schedule data import from Go.Data to DHIS2 even if you do not proceed to the next steps of Import Preview and Import SummaryHowever, if you are importing from Excel, CSV or JSON as a source, you will have to proceed to the next steps.
Step 7 - Preview for the data to be imported
Once the mapping is complete, the application provides a preview for the data to be imported into the DHIS2 tracker or event program.
 |
|---|
| Import Preview |
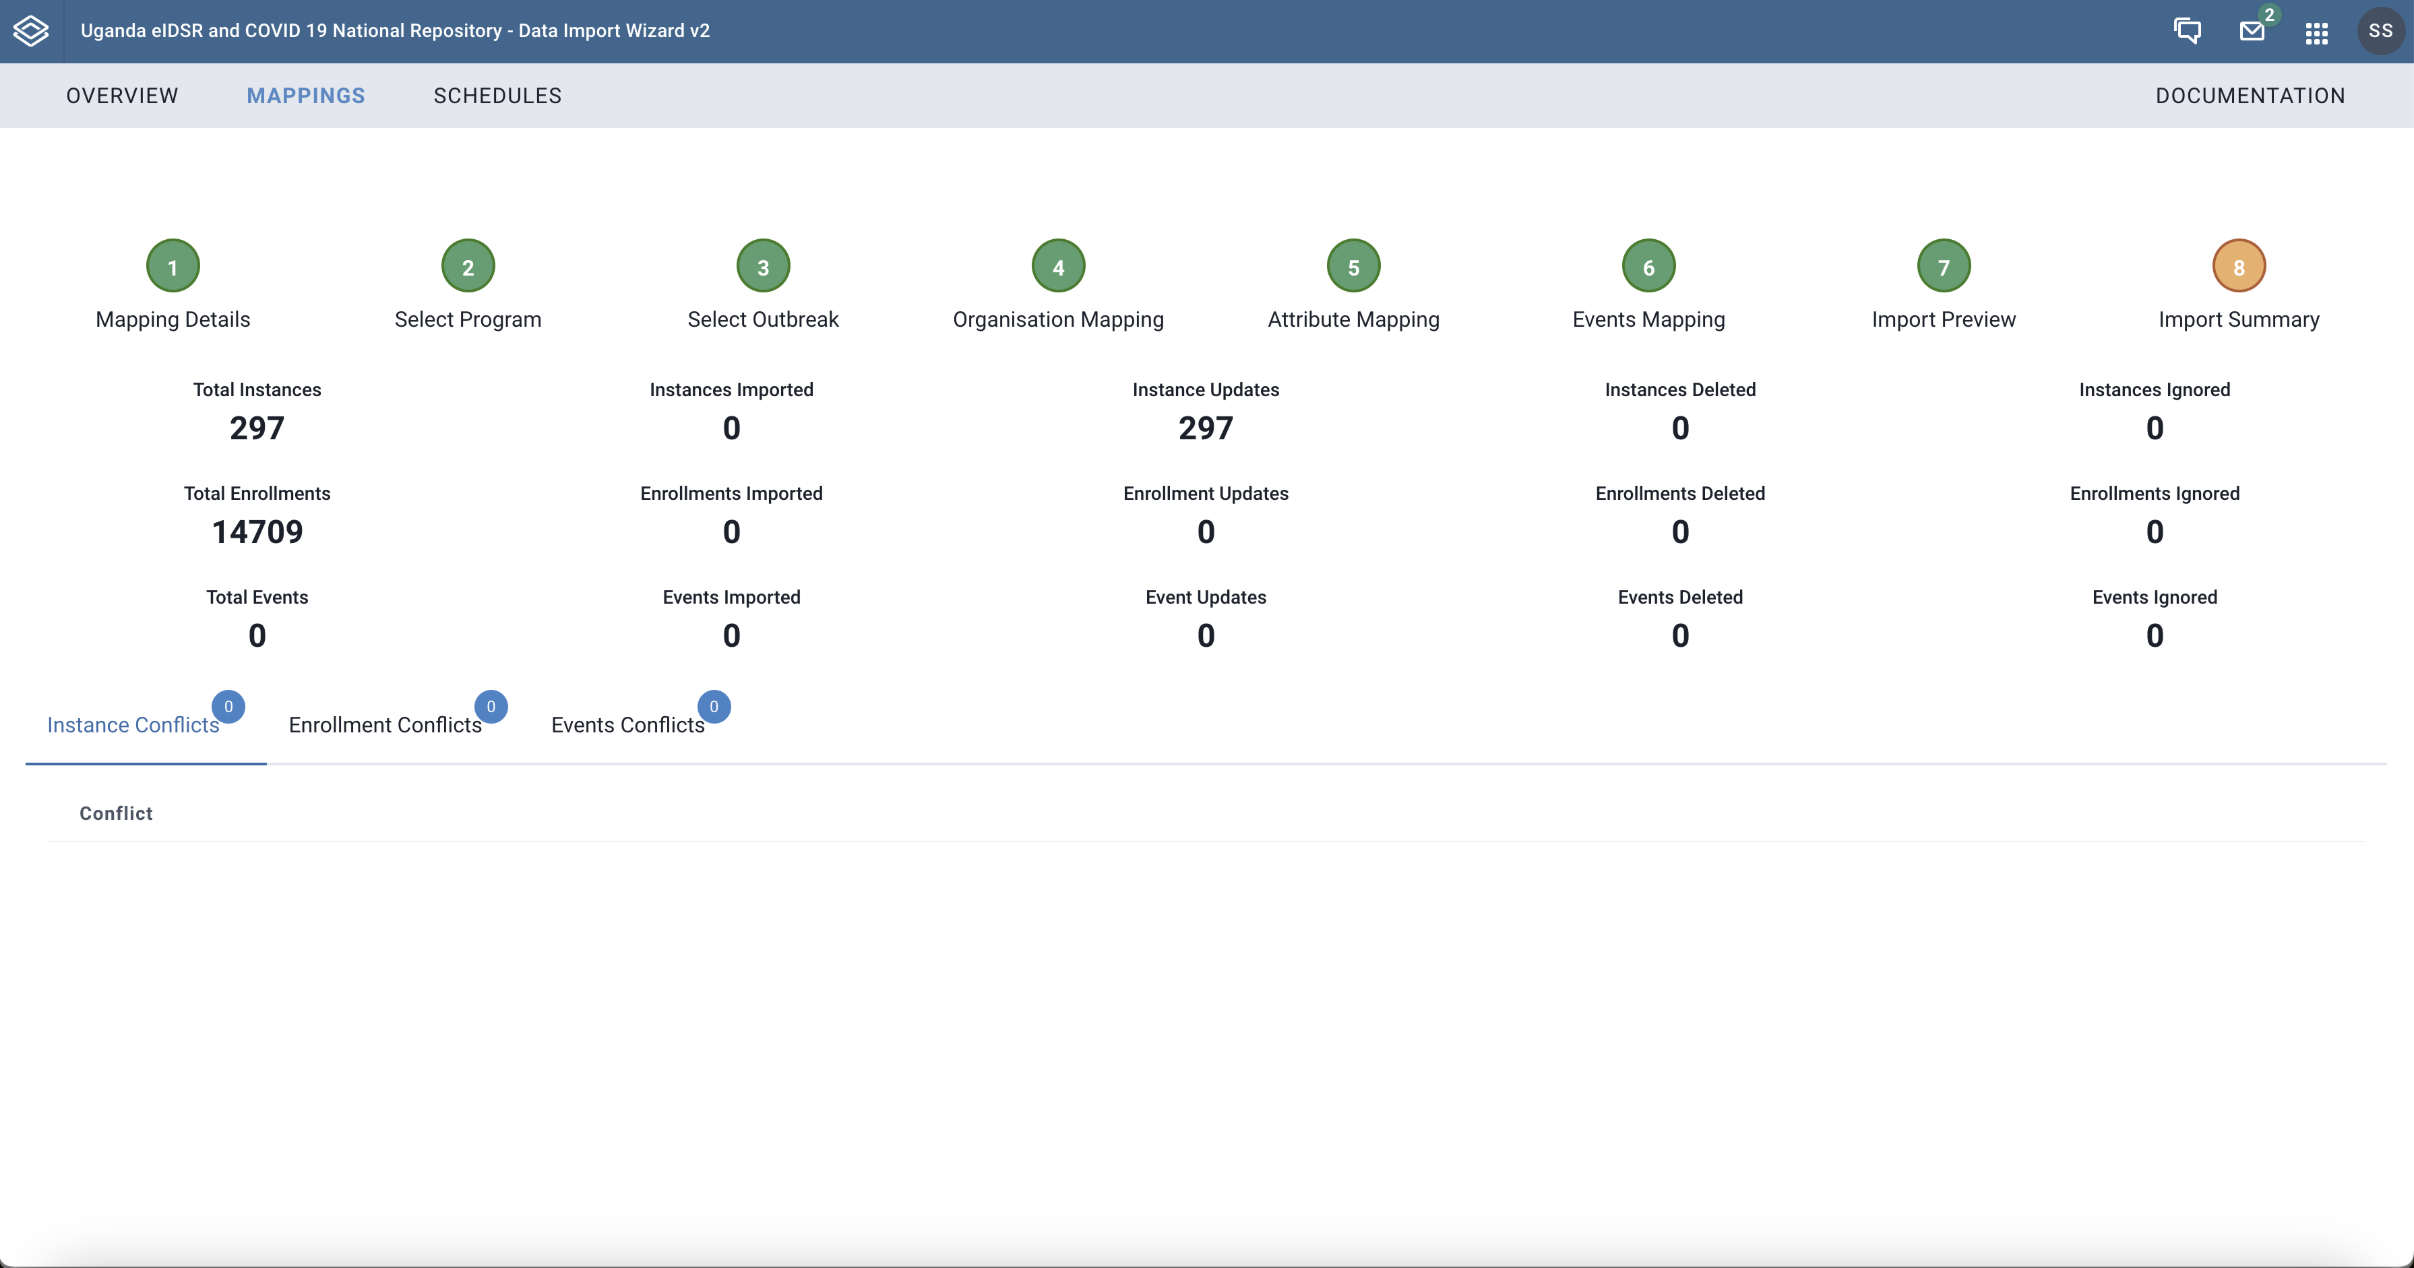
Step 8 - The data import summary
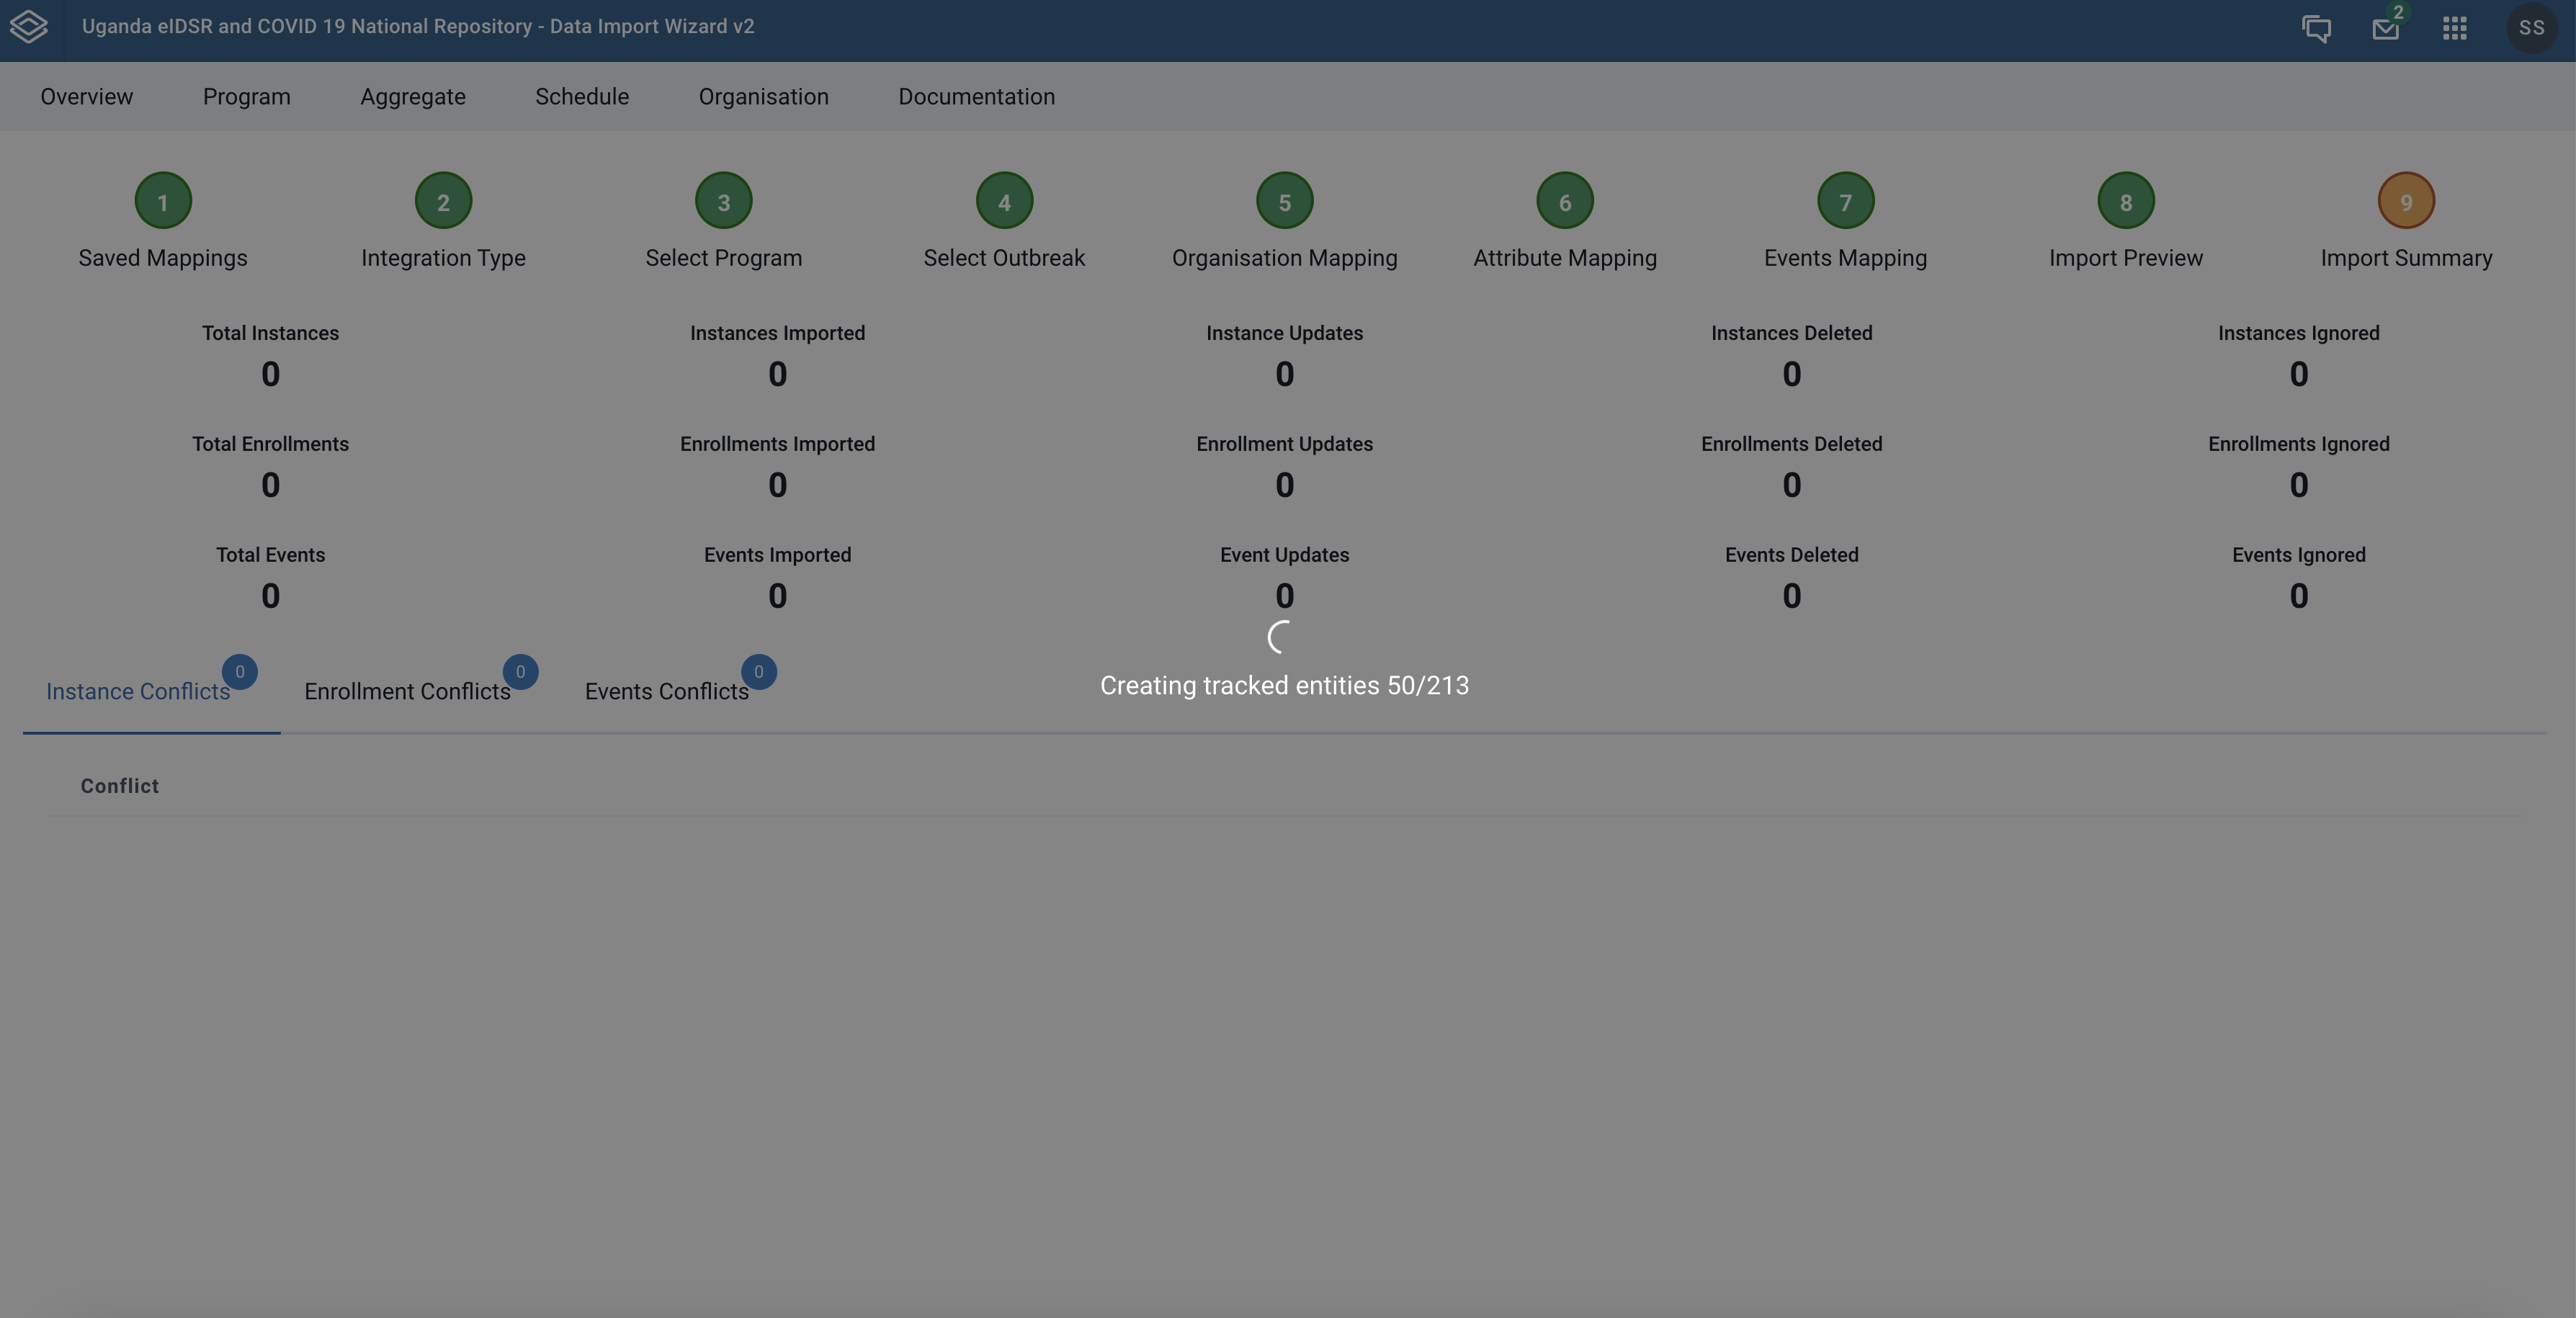 |
|---|
| Import Summarries |
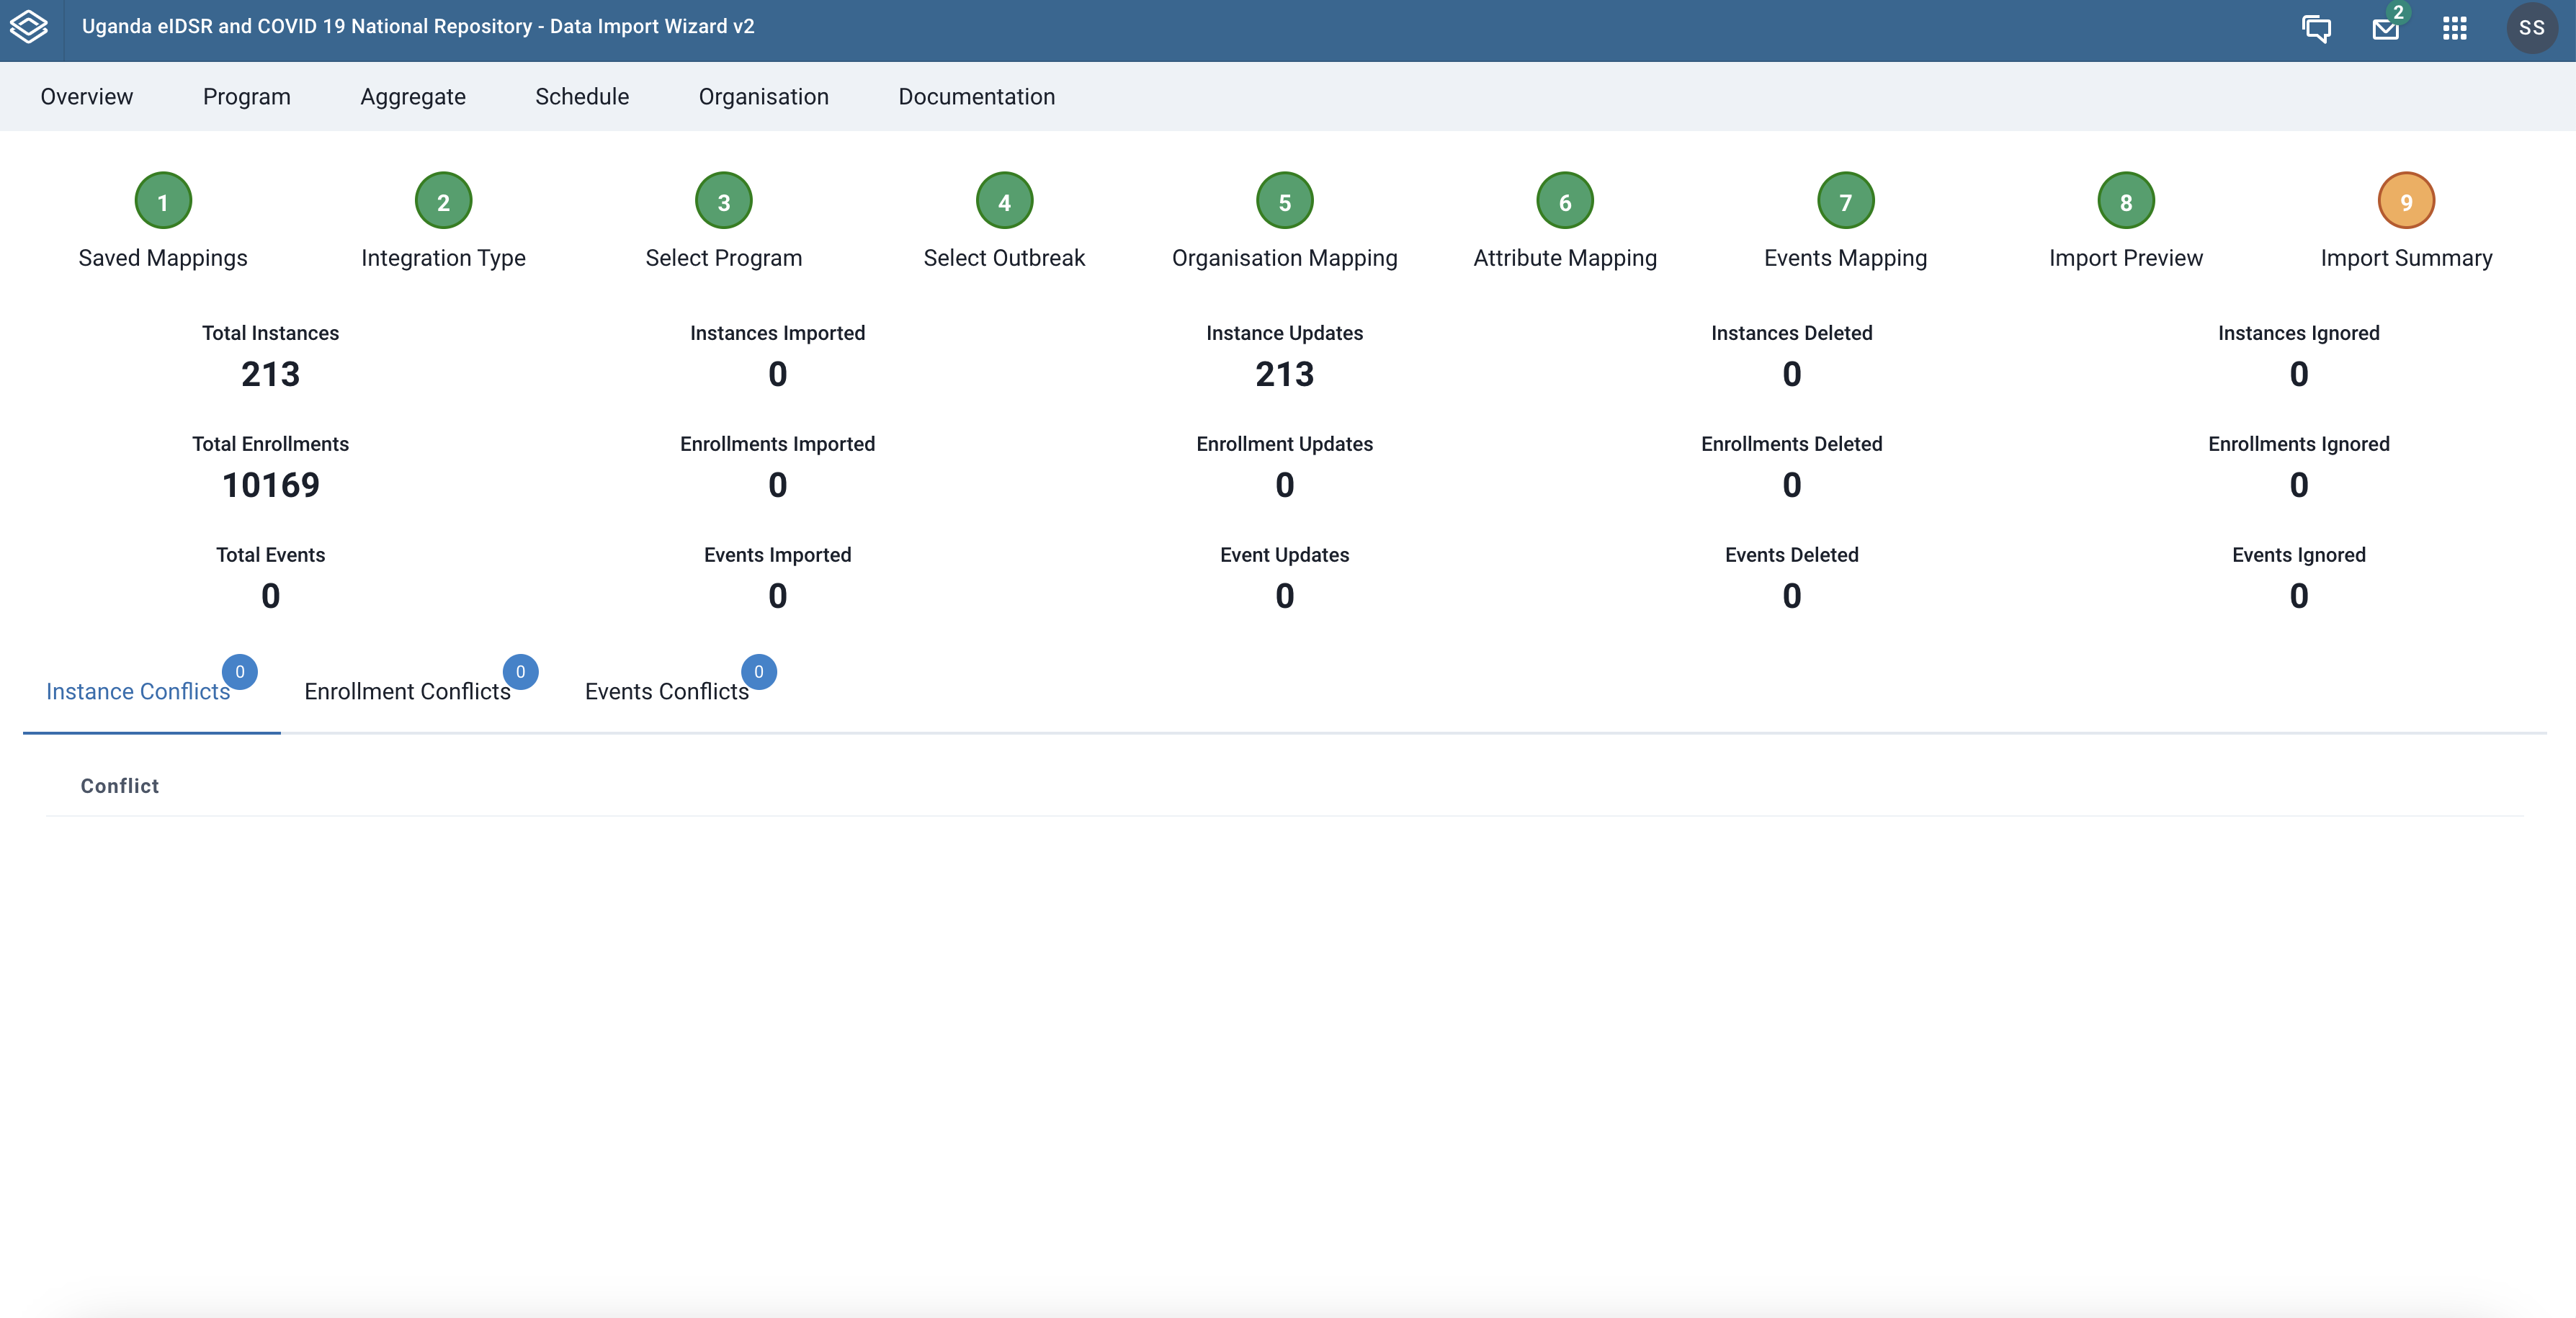 |
|---|
| Import Summaries |
¶ When Go.Data is the destination system
In this section, we describe the process of importing data from a DHIS2 tracker or event program to Go.Data.
Step 1 - Use existing mapping or create a new one
This step lists the previously created mappings that you can choose from to start the data import. You can also create a new mapping by clicking the Create New Mapping button at the bottom right corner of the page.
 |
|---|
| Saved mapping step |
Step 2 - Specify import sorce and related configurations
In this step you provide details for where you intend to import data from. You have to specify the name, description of the mapping, import source (Excel, CSV, JSON, API or DHIS2), source authentication credentials. You also have to check the Current DHIS2 instance is source checkbox when DHIS2 is the source system. Click the Save button at the bottom center of the page to save the provided details.
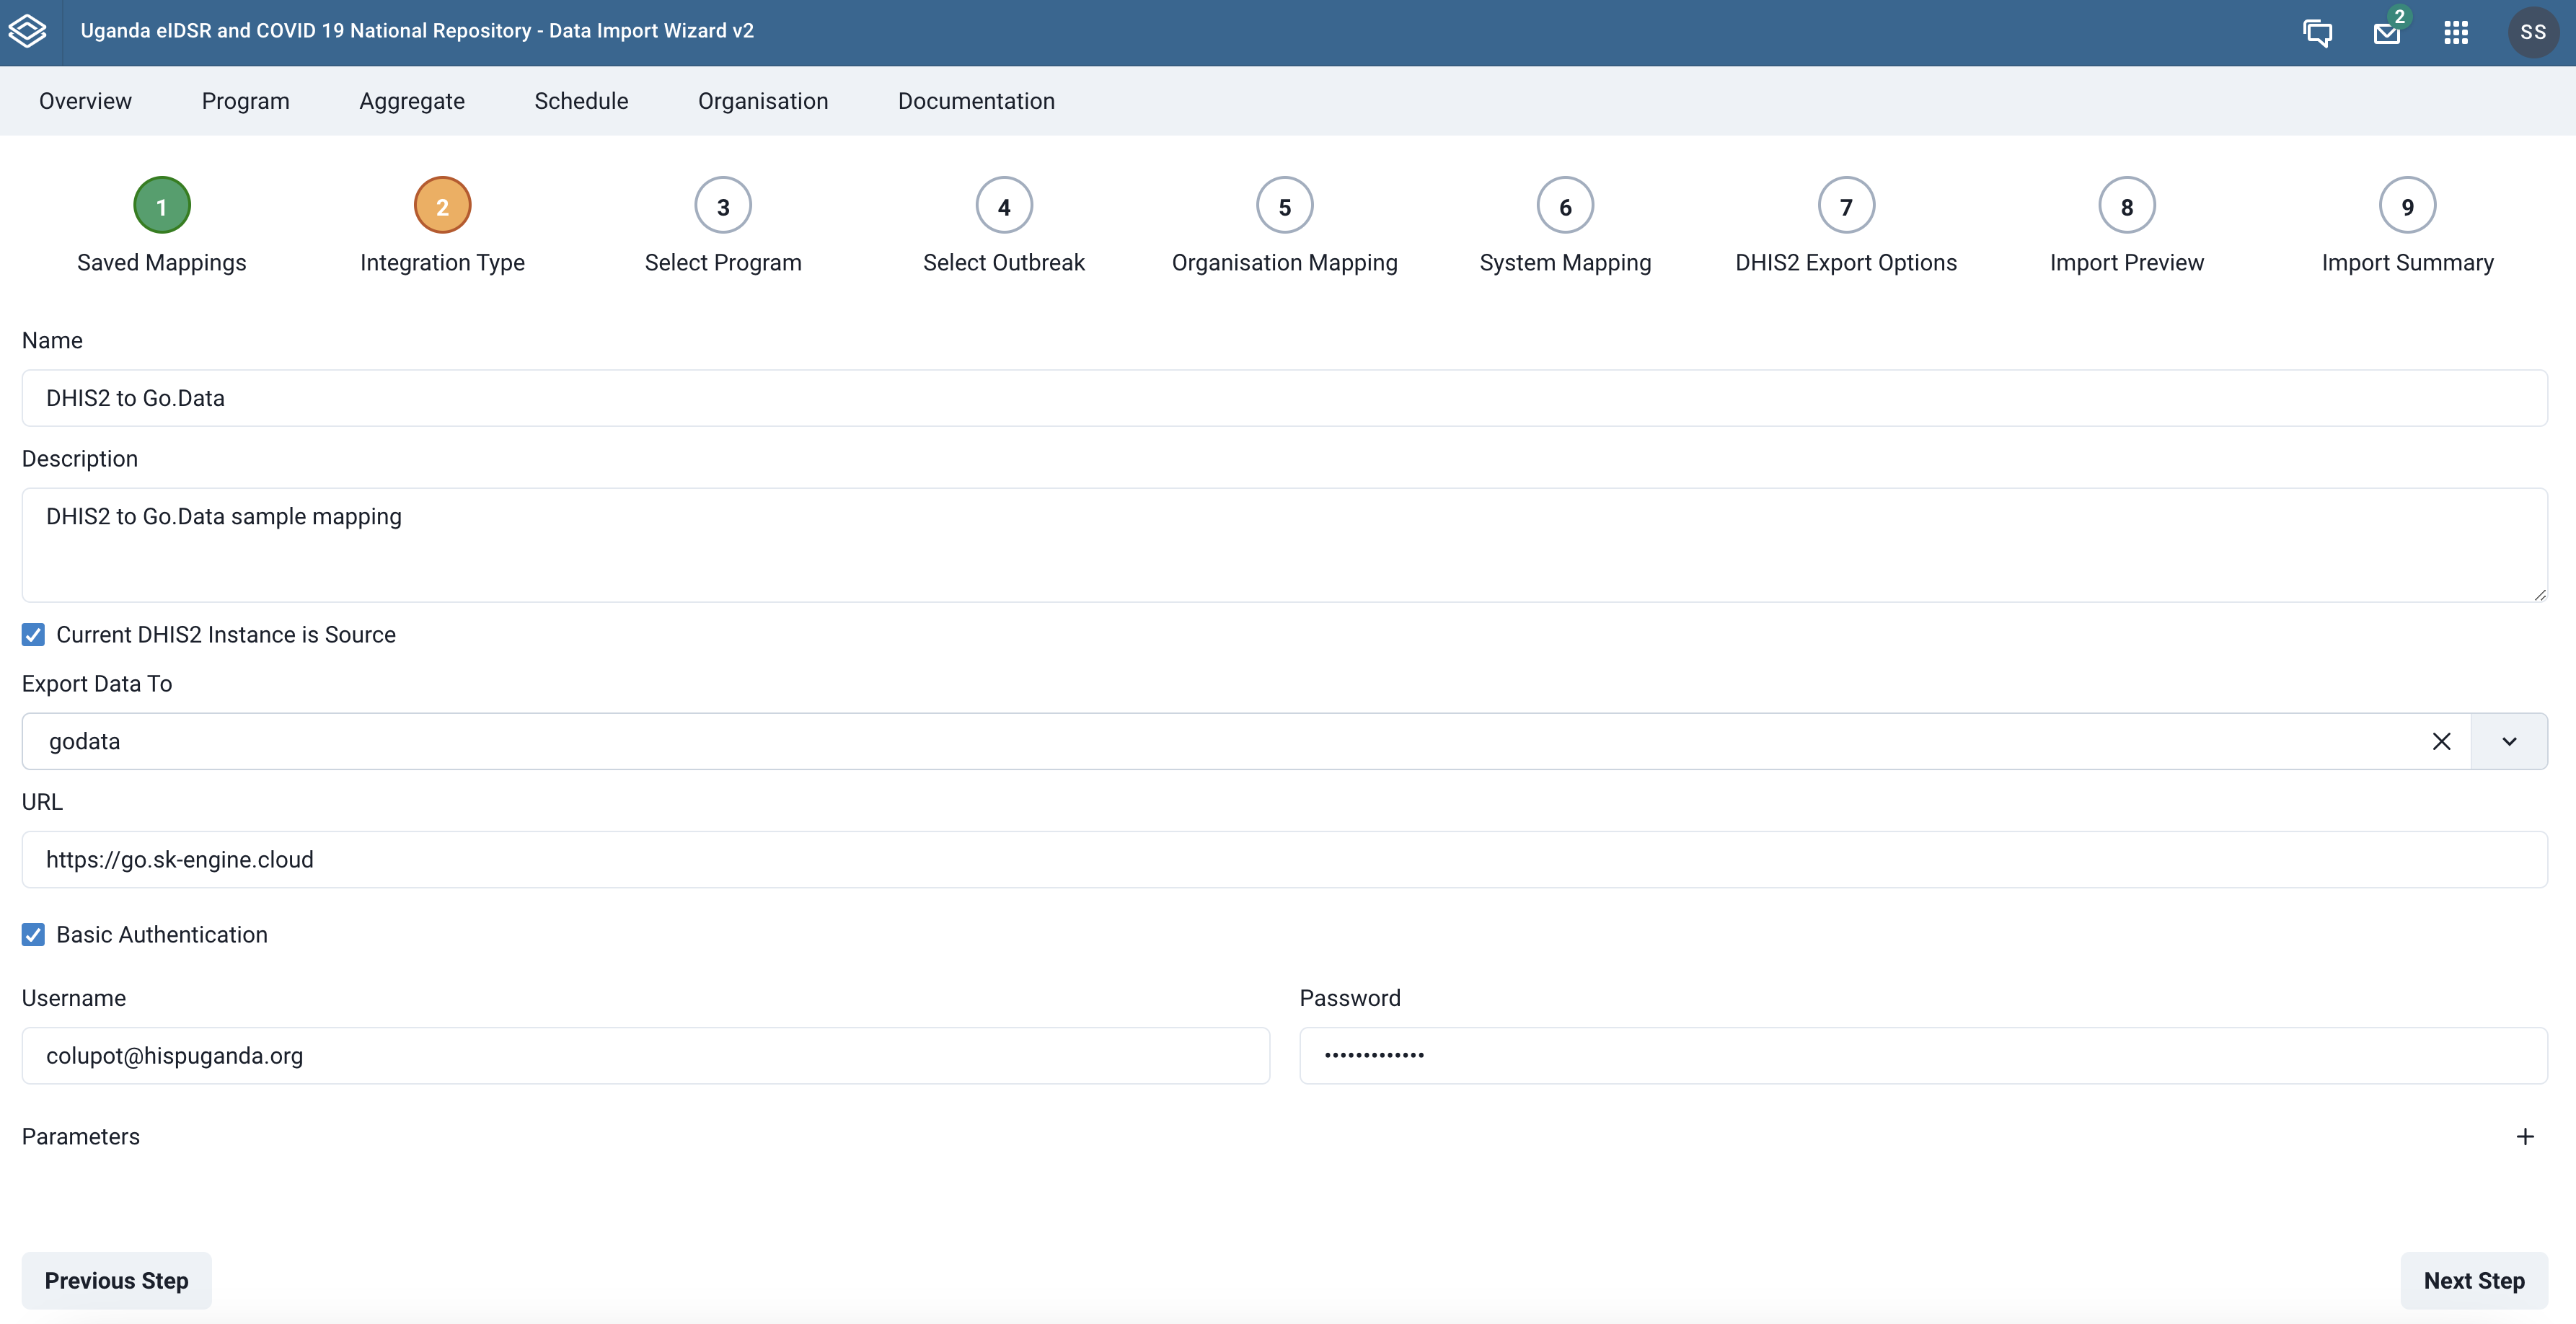 |
|---|
| Import source configuration |
Prefetching Data
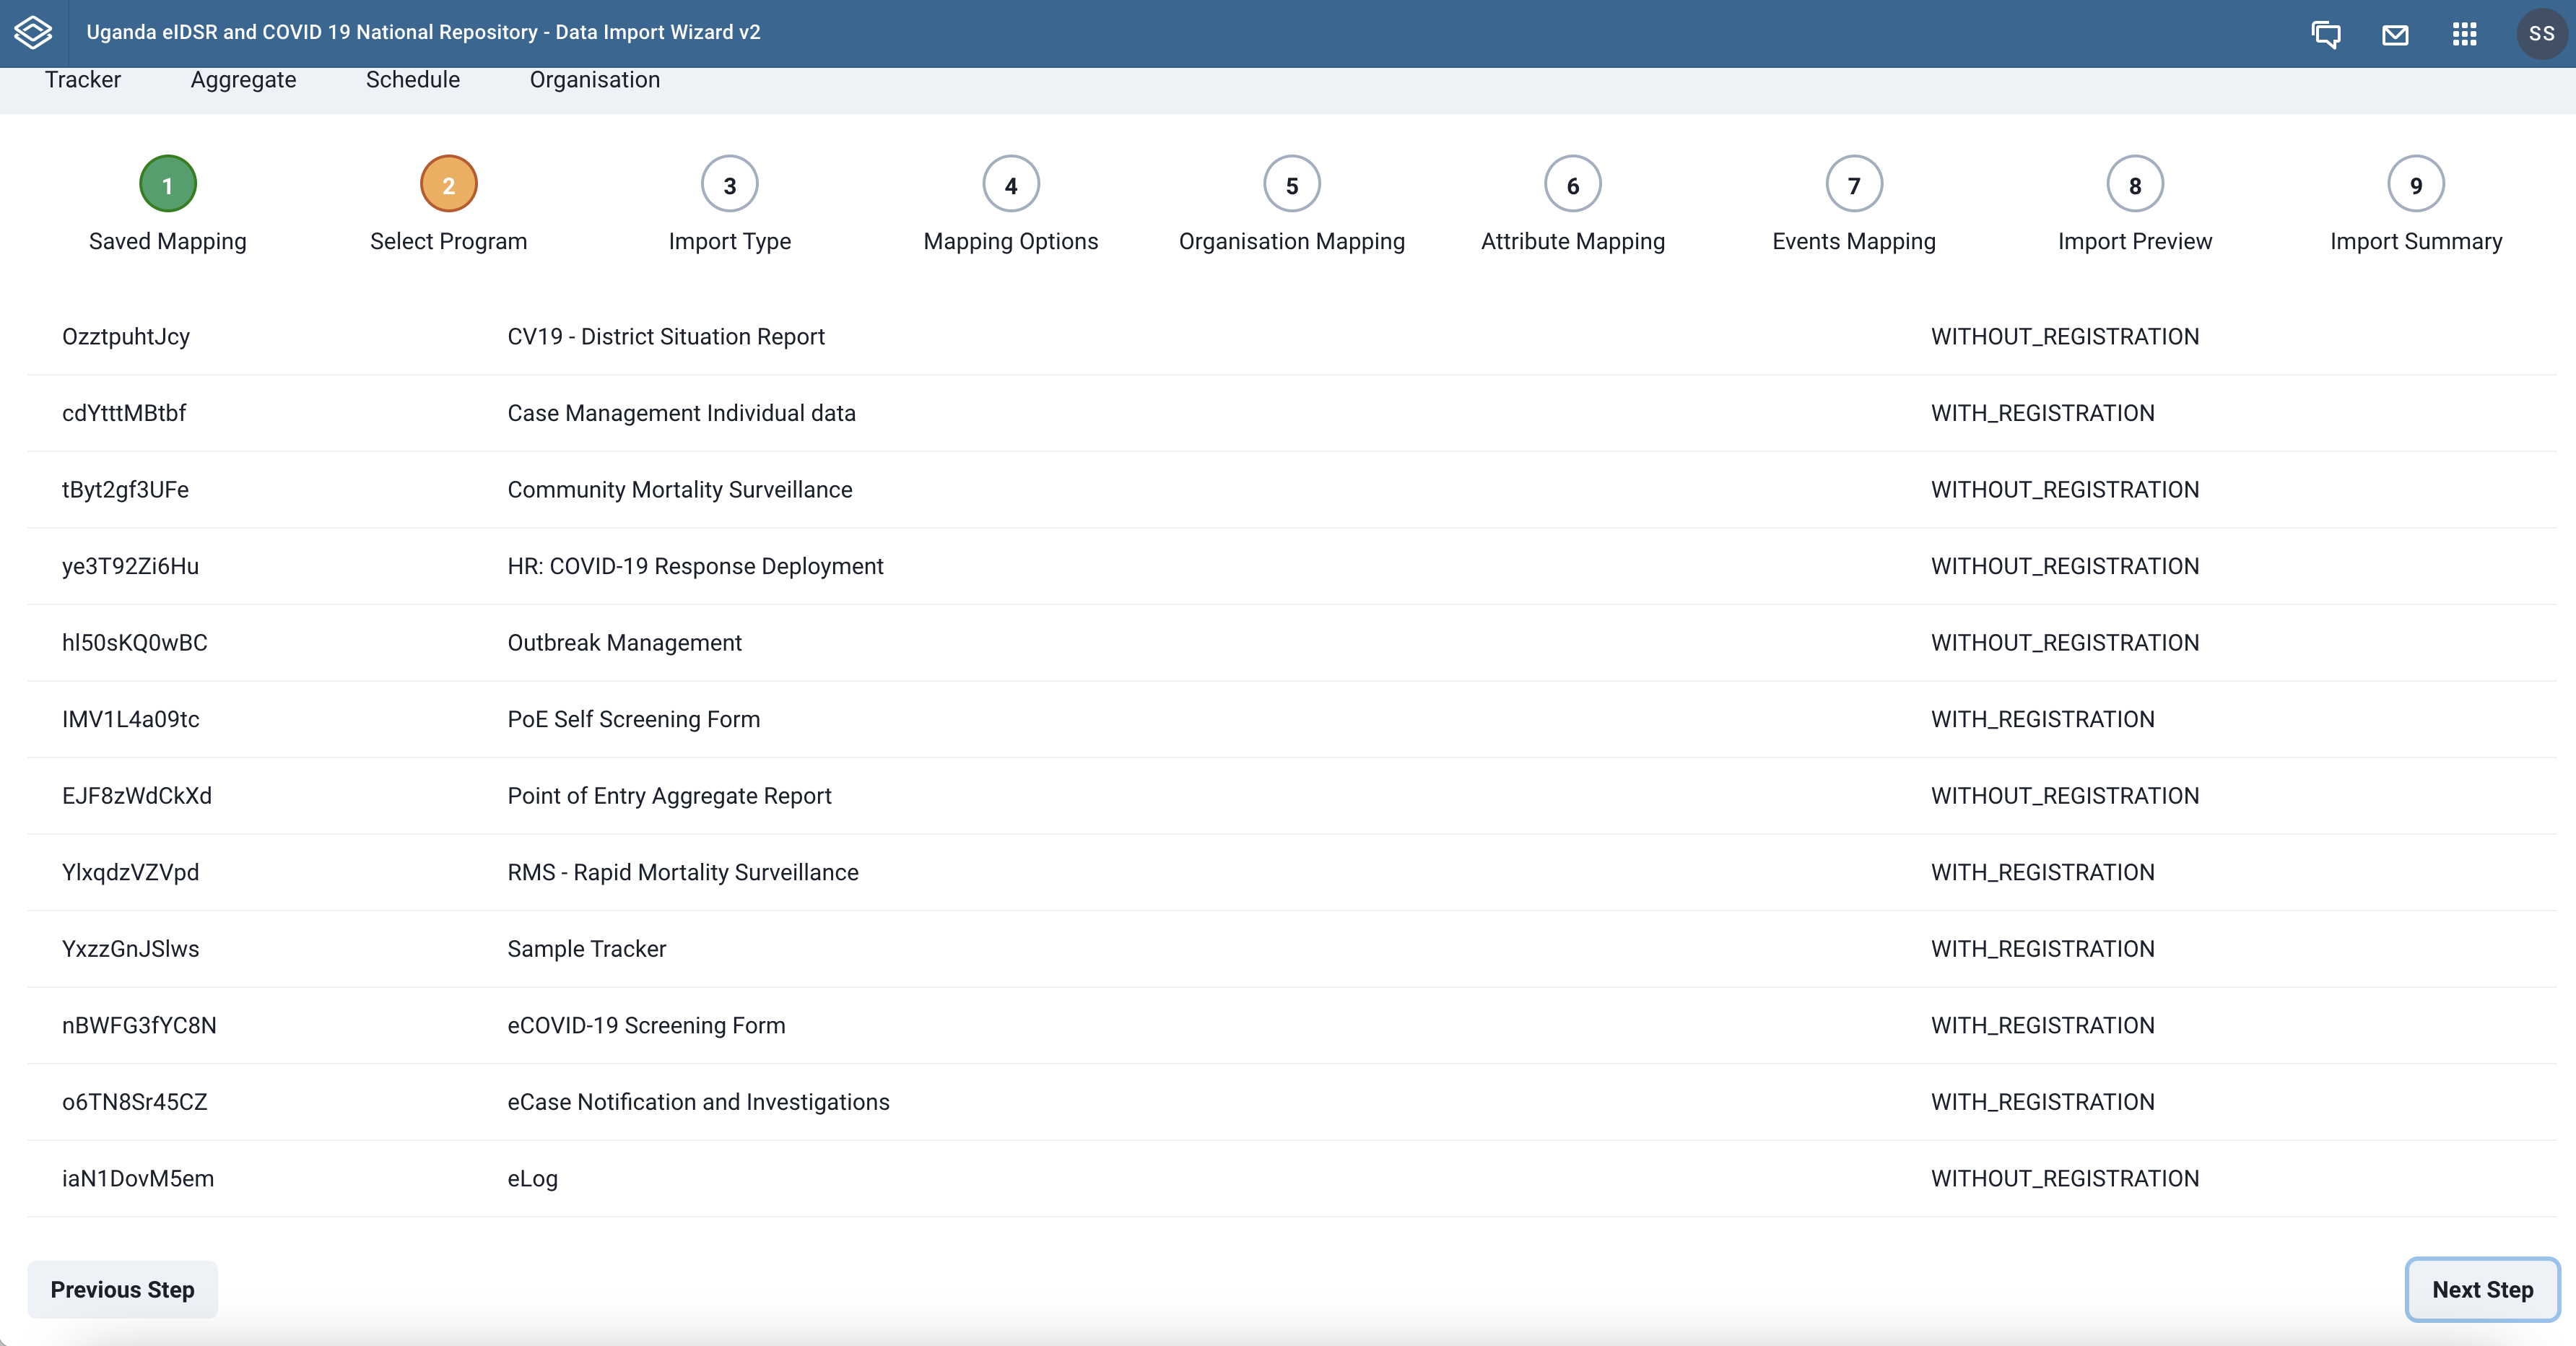
Step 3 - Select DHIS2 program to map metadata
Once you choose to create a new mapping, you then have to select a DHIS2 events program whose related metadata you want to map with. In this step, a list of available DHIS2 programs is provided. Select the desired program to proceed to the next step.
 |
|---|
| DHIS2 tracker program listing |
Step 4 - Select Go.Data outbreak
After selecting a DHIS2 events/tracker program whose related metadata you want to map with, you proceed to define a Go.Data outbreak you want to associate the selected program with. In this step, a list of available Go.Data outbreaks is provided. Select the desired outbreak to proceed to the next step. If you are working with a previously saved mapping, the corresponding event/tracker program will be highlighted.
 |
|---|
| DHIS2 tracker program listing |
Step 5 - Mapping locations with DHIS2 Organisation Units
This step shows the list of organisation units in DHIS2 and makes a provision for a select field that is used for mapping each organisation unit to a source location or organisation unit.
There is also a provision for a free-form search field that can be used to search through DHIS2 organisation units so that you can quickly map a specific one.
 |
|---|
| List of organisation units to map |
After mapping locations, you can check the Show Mapped Organisations Only checkbox to display the ones mapped so far. Remeber to hit the Save button to persist your current mapping.
 |
|---|
| Listing of mapped organisation units |
If the source location ids match the DHIS organisation unit ids, the import wizard will auto map for you the organisation units.
Step 6 - Set some mapping options
In this step we set some mapping options that are critical to how the data import is made from the current mapping.
Organisation unit Column- select an organisation unit colum or specify a customJSON pathto where it can be pickedCreate Entities- specifies if we are to create tracked entitiesCreate Enrollments- specifies whether to create enrollments upon importUpdate Entities- specifies whether we shall update events as we importEnrollment Date Column- specify which field or column holds the enrollment date in the source data.Incident Date Column- specify which field or column holds the encident date in the source data.
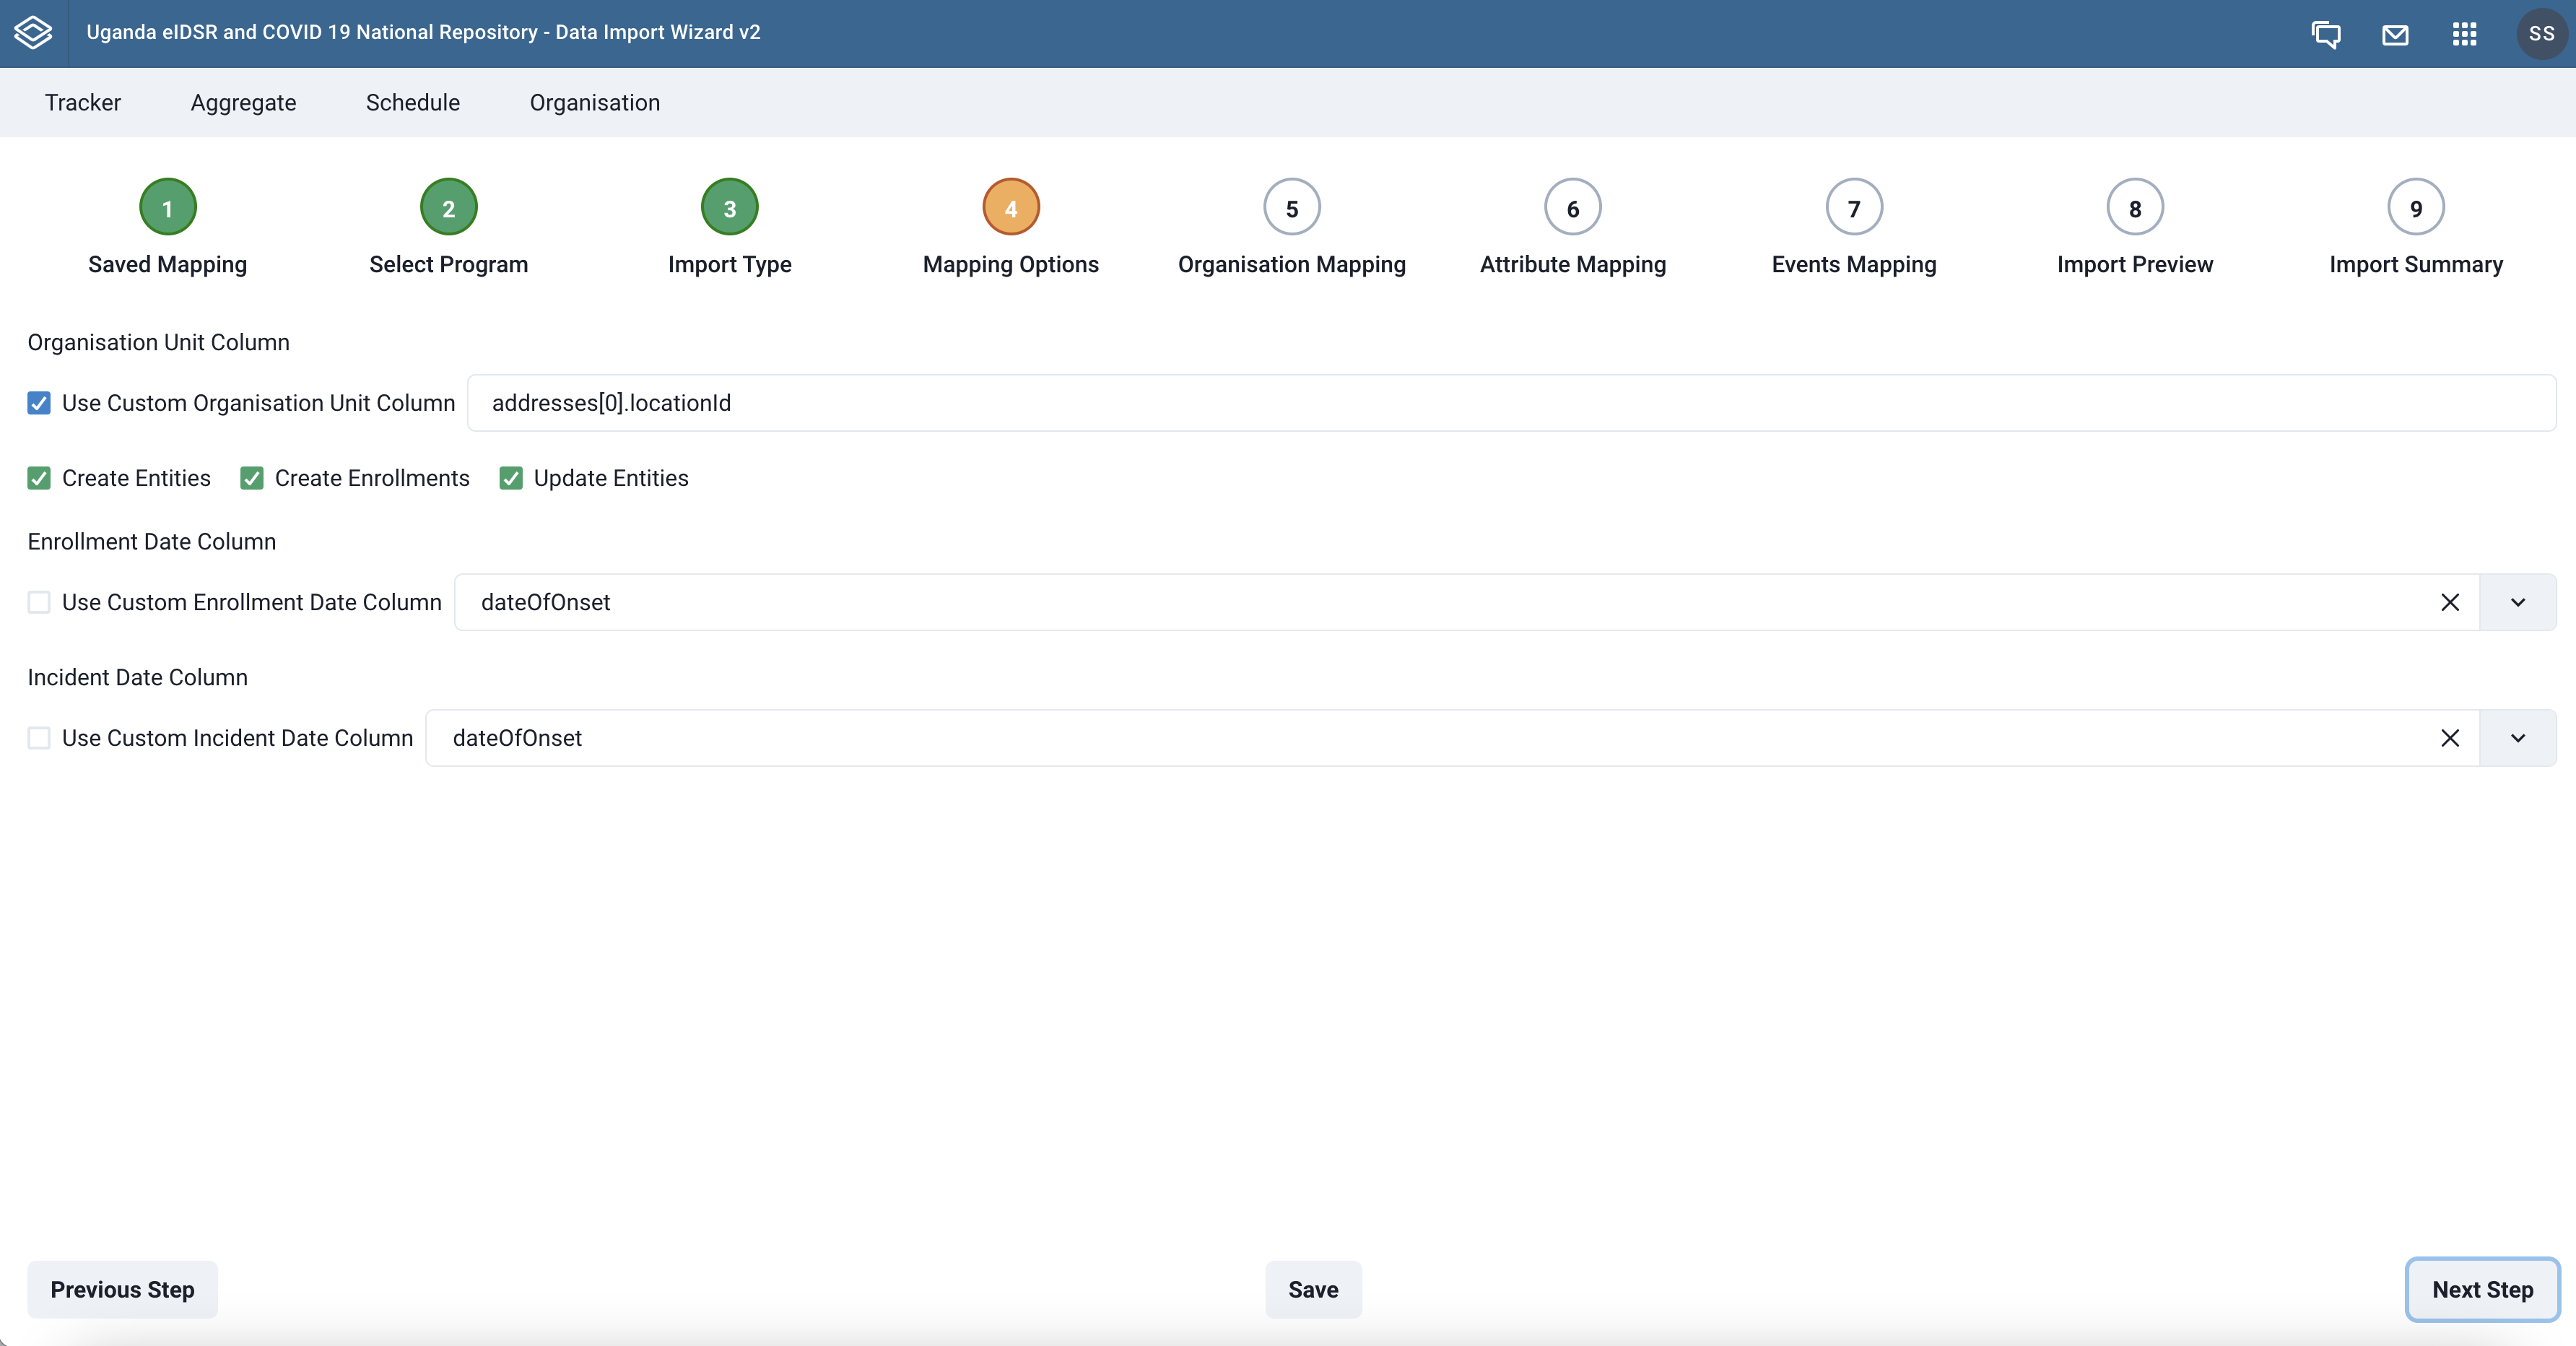 |
|---|
| Set mapping options |
Step 7 - Set DHIS2 export options
Step 8 - Import Preview
Step 9 - Map tracked entity attributes
In this step we match the tracked entity attributes for the DHIS 2 program with attributes from the source. Typically, a list of attributes in DHIS2 is displayed in a table where a select field is provided to aid the matching.
Some attributes can be marked as either mandatory or unique by ticking the corresponding checkboxes in the table row.
When mapping an attribute, it is also possible to create a custom JSON Path like mapping by ticking the checkbox in the Map Manually column. This is especially useful if the value of the attribute being mapped is deeply nested within the JSON object of data for Go.Data or JSON sources.
There is also a provision for a free-form search field that can be used to search through DHIS2 program attributes so that you can quickly map a specific one.
 |
|---|
| Mapping program attributes |
¶ Schedule
The Schedule page helps you to create schedules for data import while utilizing your previously saved mapping generated using the data import wizard.
The page shows a list of your previously created schedules along with the details on each schedule, that is; schedule type, name, description, mapping associated, creation date, date of last run, date of next run and actions that can be performed on the schedule.
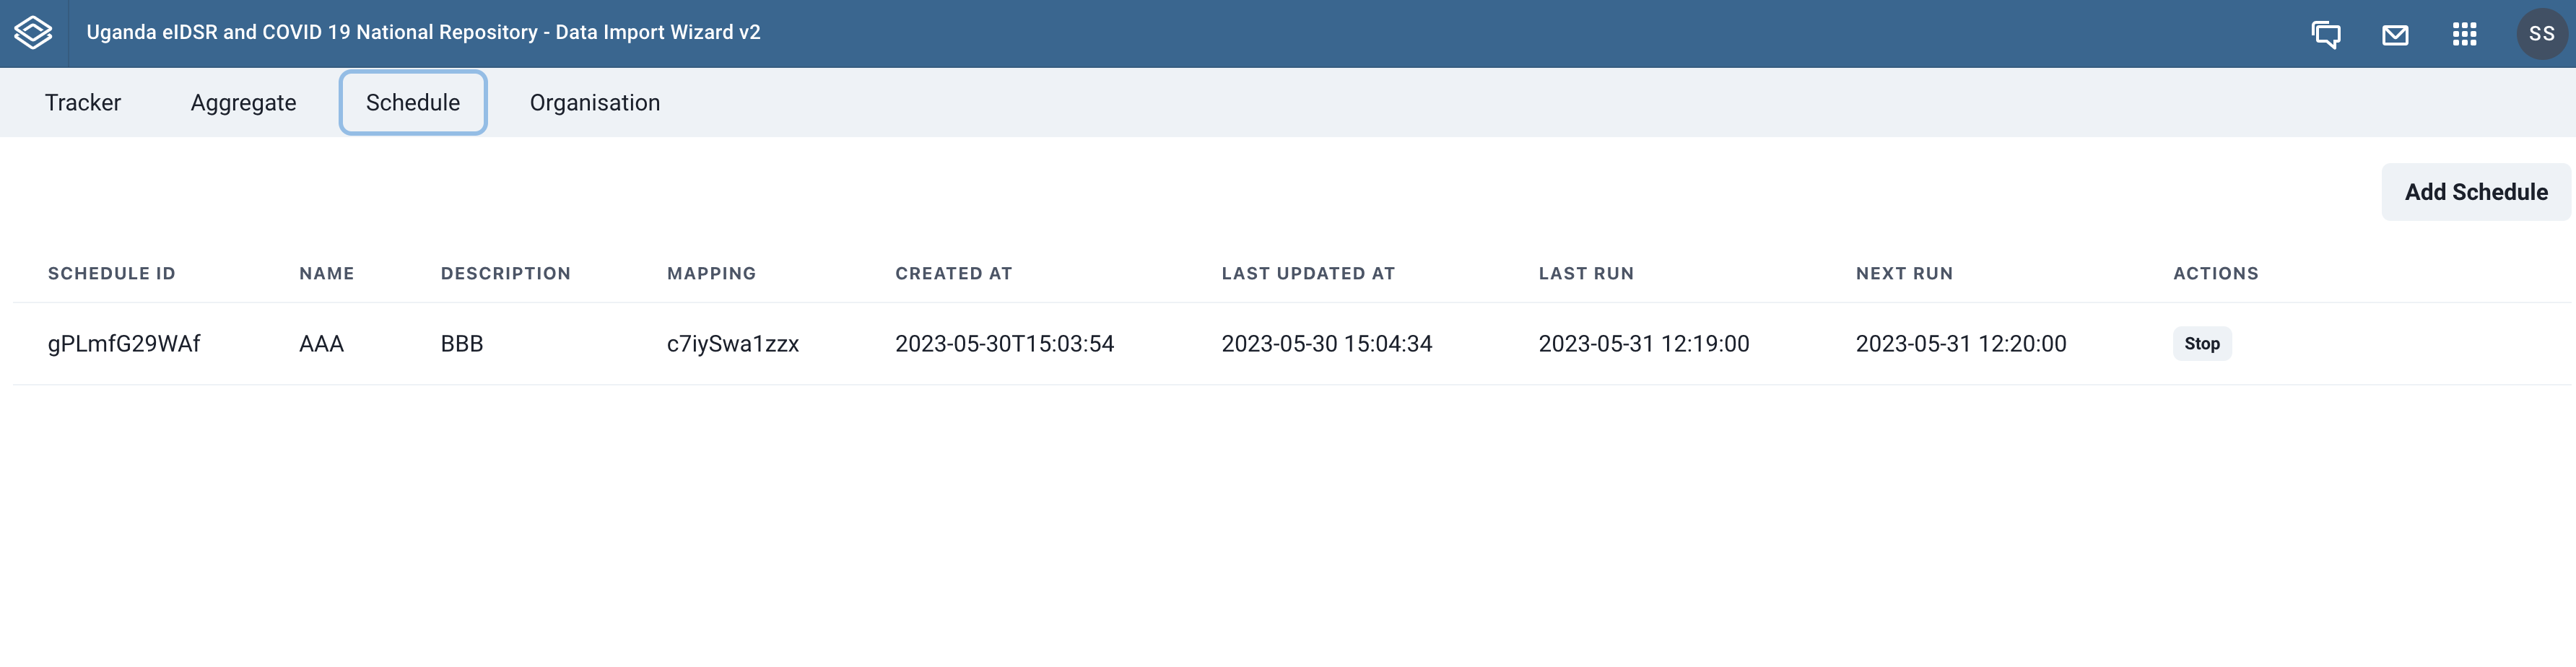 |
|---|
| Schedules page |
¶ Creating a Schedule
To create a schedule, click the Add Schedule button at the top right of the schedule page. This will display a form within a modal for you to capture details required to create a schedule.
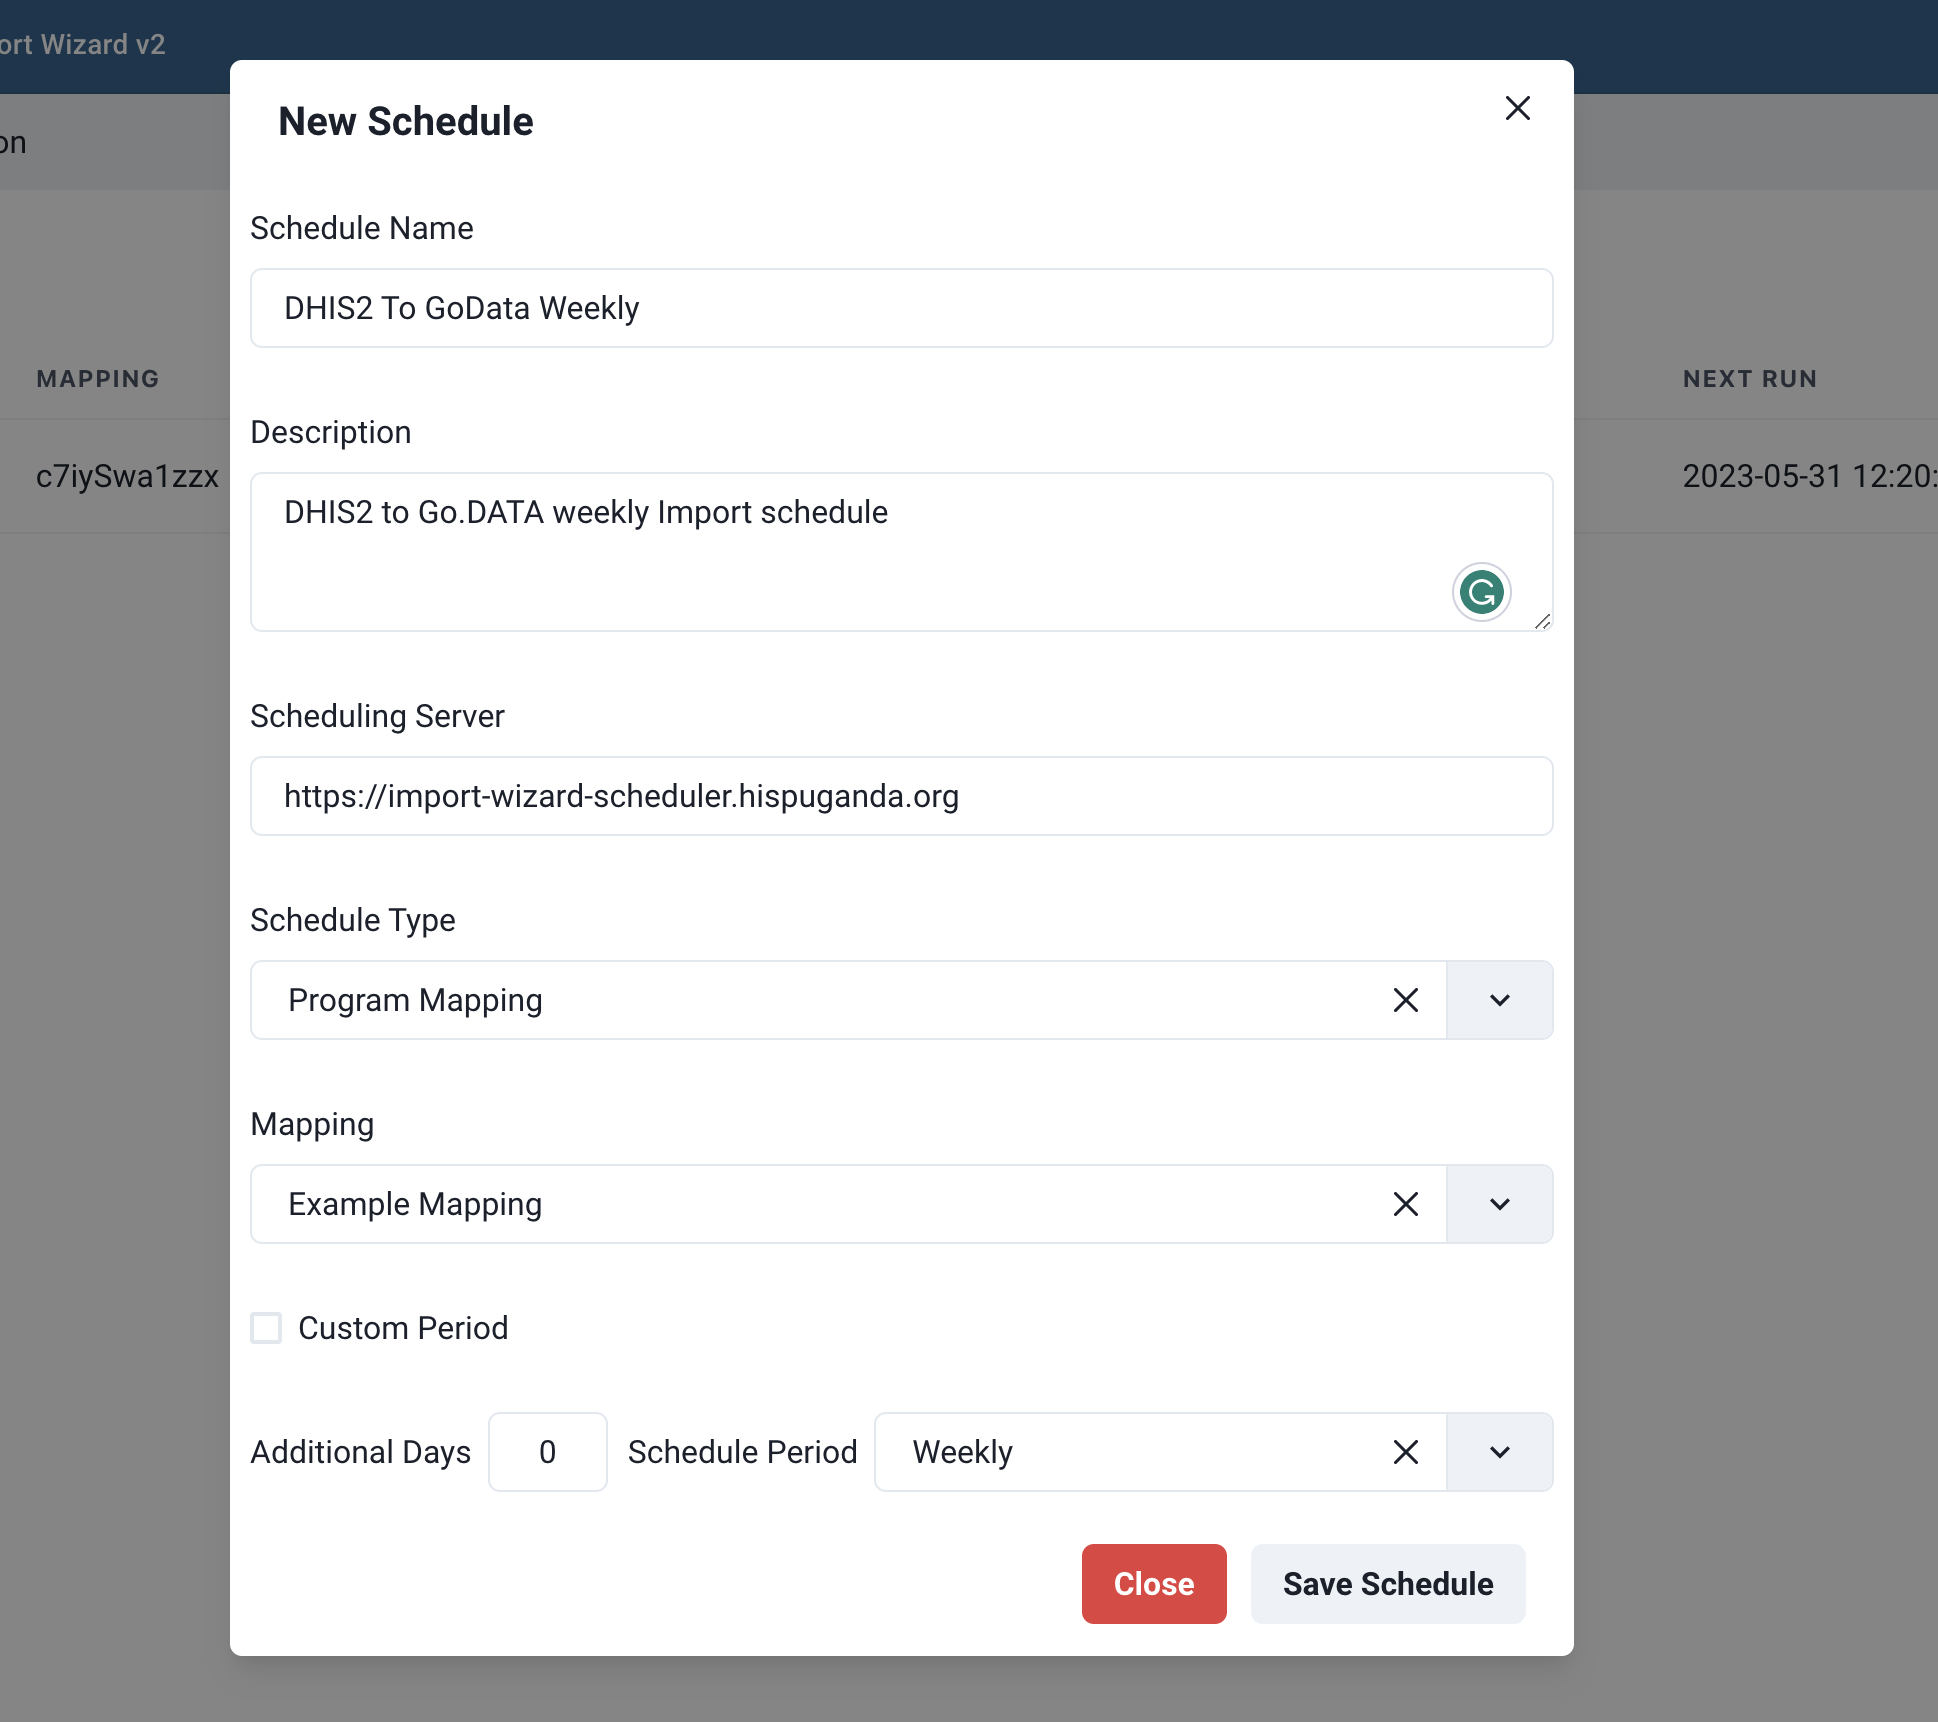 |
|---|
| Creating a schedule |
¶ Schedule Management
A previously created schedule can be edited, started, stopped or deleted. Each schedule shown in the scedules list has the edit, stop, start and delete actions showed in the actions column. Clicking an action button will affect the schedule accordingly.
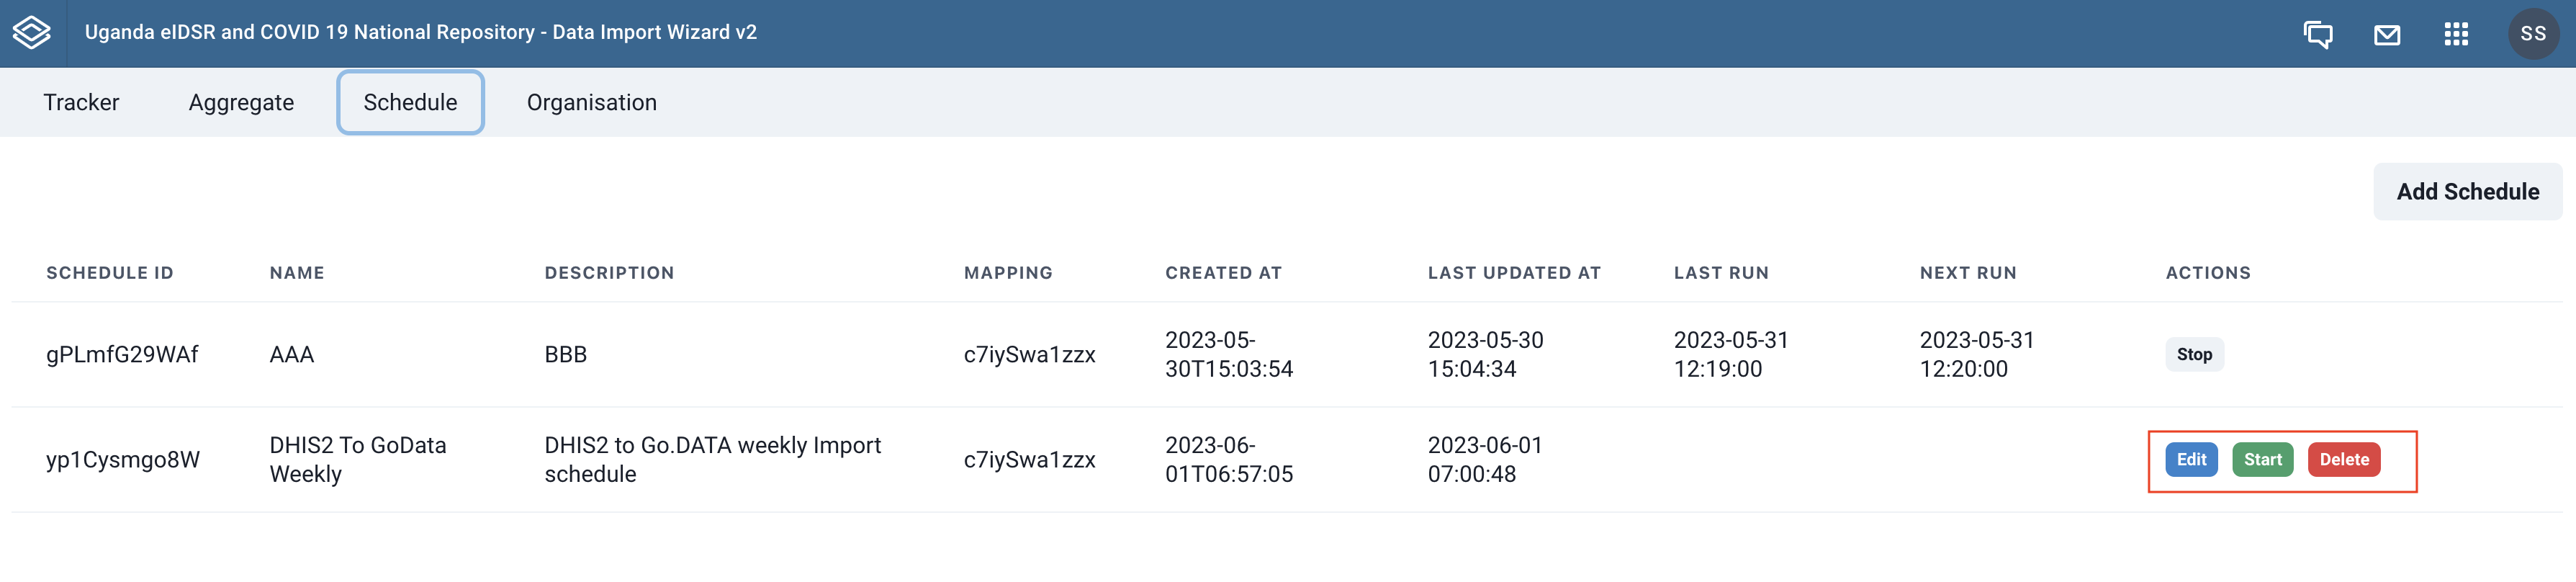 |
|---|
| Schedule management actions |
¶ Scheduling Server
Each time you create a schedule, you provide a URL for the server where the data import scheduler is running. This URL is should expose the /create, /start, /stop API endpints.